Streaks on white chocolate cake. Chocolate and Butter Cake Icing
Ene 29 2019
– Hola amigos de site, con el permiso de mi mujer les envió una sesión de fotos caseras de su lindo culazo. Le encanta hacerse fotos a cuatro patas con diferentes tangas y braguitas, y ahora está deseando que vosotros le dejéis muchos comentarios para que se ponga cachonda leyéndolos. Prometemos volver a enviar fotos si os gustan estas y nos dejáis buenos comentarios. Un saludo y disfruten del culazo de mi chica.
Ene 24 2019

- Hola a,esta es mi primera sesion de fotos en esta pagina. He decidido enseñaros mis tetitas a ver que os parecen. Soy una chica en los cuarenta y algo con muchas ganas de enseñar mi cuerpo y de que veáis como voy por mi casa y como me pongo para hacer una sesión de fotos. Espero vuestros comentarios y la próxima semana sera una sesión de fotos impresionante con el culo en pompa para hacer honor a la pagina…..besos para
Ene 14 2019

– Osita es desde hace unos años una de nuestras mejores colaboradoras, y la verdad es que entre más fotos caseras de su culo nos manda, más cachondos consigue ponernos. En esta ocasión parece que se ha animado a desnudarse en la oficina donde trabaja y corriendo el riesgo de ser vista por cualquiera de sus compañeros, se ha hecho estas magníficas fotos amateur de su culazo en exclusiva para nosotros.
Ene 9 2019

– Hola amigos de site, mi nombre es Isis y soy una mujer de Colombia muy caliente. Llevo muchos años siguiendo esta estupenda web, pero es la primera vez que me animo a participar en ella. Espero que os gusten las fotos que os envió de mi culo y me encantaría recibir muchos comentarios que me animen a seguir participando en la web y que me pongan muy cachonda leyéndolos. Un besito a todos y disfruten de mi colita.
Jun 2 2018

– Pues si amigos, tal y como avisamos hace unos días a través de nuestra cuenta de twitter (), hemos vuelto a las andadas. Son muchos de vosotros los que nos habéis animado a continuar trabajando en la web y cientos de chicas y parejas las que han seguido enviándonos fotos caseras, así que tenemos contenido para rato. Para empezar traemos un culazo amateur muy bonito de una chica que nos decía que buscaba gente para divertirse y pasar el rato.
May 9, 2017

Tengo una novia que es un auténtico espectáculo, para mi tiene un culazo precioso y me encanta cogérselo todos los días. La he convencido para subir algunas fotos caseras de su linda cola en esta web y ahora estamos deseando recibir vuestros comentarios. Seguro que nos vamos a poner muy cachondos mientras os leemos.
May 4, 2017

– Hola a todos, tanto para mi como para mi esposa es un auténtico placer colaborar con esta web. Como podréis ver en nuestras primeras fotos caseras, mi mujer tiene un culo bien rico, y lo mejor de todo es que le encanta enseñarlo para poner muy calientes a los hombres. Ella es conocida en el mundo del porno casero por “sexosa79” y está deseosa de conocer vuestras opiniones.
It seems that quite recently there was a time when a cake decorated with oil flowers and figurines caused delight in almost any person. But times are changing and confectionery with banal decorations you will not surprise anyone.
Today, professional chefs have learned to do really amazing things. Real copies of figures of people and animals, intricate designs, whole paintings and even photographs now often decorate cakes and pastries.
But it is not necessary to be a super professional to impress your friends or relatives. It is enough to learn how to make mirror glaze, and then a simple cake will turn into a real work of art.
Highlights of the preparation and use of mirror glaze
Mirror glaze, or as glaze is also called, is made from products that can be bought at almost any store. Usually its main components are water, sugar, gelatin, glucose syrup and chocolate. Depending on the type of glaze, dyes, cocoa, vanilla, condensed milk, molasses and other ingredients are also added.
After mixing and heating all the components of the future glaze, it is necessary to beat with a blender. In this case, be sure to monitor the temperature. Depending on the type of glaze, the working temperature is from 29⁰С to 39⁰С. If the glaze is colder than the set temperature, then it will begin to roll and the mirror effect will not work. If the glaze is too hot, then streaks will form on the cake, or the icing will completely drain down.
When glazing, care must be taken not to form condensation. Otherwise, the frosting will wrinkle and appearance will be corrupted.
You can work with glaze immediately after preparation or after a day. Store it in the refrigerator, covered cling film. You can use the rest of the glaze, only the composition should be the same.
Most often, mousse cakes or pastries, as well as soufflés, are covered with mirror glaze, as they require freezing. This will ensure an even and smooth distribution of the glaze over the surface of the confectionery.
Shiny glossy cake icing recipes
Chocolate glaze
- Water - 95 ml;
- Sugar - 240 g;
- Molasses - 80 g;
- Gelatin - 1 sachet;
- Cream (fat content not less than 30%) - 160 g;
- Cocoa - 80 g.
Recipe:
- The first step is to soak the gelatin. If the gelatin is powdered, then 30 ml of water will be enough, if the gelatin is sheet, about 200 ml of water is needed.
- Boil water with sugar and molasses. Remove the mixture from the heat and add the separately boiled cream.
- While stirring the resulting mass, add cocoa or chocolate bar and mix well again.
- During this time, the gelatin will have time to swell and it can be added to the glaze. Powdered gelatin must be warmed up a little before use. If the gelatin is sheet, it is squeezed out and added to the resulting mixture.
- The frosting is almost ready. It remains to pour it into a special tall glass, lower the immersion blender and beat a little.
- The glaze temperature should be 37⁰С.
Color Glasage
- Gelatin - 1 pack;
- 75 ml of water;
- 150g sugar;
- 150 ml of molasses;
- 1.5 tiles white chocolate;
- 100 g of condensed milk;
- 5 g of water-soluble dye.
Recipe:
- Combine sugar, molasses and water, put on fire. After dissolving the sugar, you can add gelatin (it must be soaked in advance).
- Melt the white chocolate in a separate bowl. The chocolate must be best quality that can only be found. The taste and quality of the glaze itself depends on this.
- Pour condensed milk into melted chocolate first, then syrup, then mix, add food coloring and blend with an immersion blender.
- When whipping, it is important that the bubbles form as little as possible, otherwise you can spoil the appearance of the glaze. Therefore, the blender should be slightly tilted and touch the bottom of the dish.
- You can fill the cake.
Caramel mirror glaze
Recipe:
- Combine sugar with molasses, and cook caramel. Do not stir the sugar, so that the mixture does not harden.
- After a while, the syrup will turn a caramel color. This means that it is time to remove the mixture from the heat and add the boiled cream. They need to be poured in gradually, constantly mixing the resulting mass.
- Pour the resulting caramel into the grated chocolate. Add diluted gelatin and mix.
- Lose 30 kg in 2 weeks! Diet for the laziest.
- The final step, as always, is to “break through” the glaze with a blender.
- To obtain a pearly hue, gold kandurin (approximately 5 g) is added at the stage of gelatin introduction.
Mousse Cake Recipe with Icing Decor
- Fresh strawberries - 260 g;
- Sugar - 80 g;
- Water - 35 ml;
- Rum - 4 tsp;
- Gelatin - 1/2 pack;
- Lemon juice - 1 tsp
- Egg yolk - 2 pcs.
- Gelatin - 10 g;
- Sugar - 4 tsp;
- Vanilla sugar - 1 pack;
- Cream (1) - 150 ml;
- Cream (2) - 250 ml;
- White chocolate - 85 g;
- Water - 60 ml.
- Gelatin - 1 pack;
- Sugar - 150 g;
- Invert syrup - 150 ml;
- Condensed milk - 100 ml;
- White chocolate - 150 g;
- Water-soluble dye - 1.5 g.
Cooking brownies
Mix melted butter and chocolate with sugar and beat a little with a mixer, add eggs. Turn off the mixer, add the almonds and flour and mix well.
Bake the cake in silicone mold half an hour (160 ⁰С). The finished cake must be cooled.
Making strawberry confit
Combine strawberries with sugar, boil. Dissolve the gelatin (previously soaked) in the strawberry mixture, pour in the lemon juice and rum. Mix the ingredients and freeze in a silicone mold.
Making chocolate mousse
Yolks, mashed with two types of sugar, pour two tablespoons of hot cream, mix. Pour in 150 ml of cream and thicken everything over low heat.
Cool the resulting mass a little, add gelatin (swollen), pieces of white chocolate and beat with a blender. In a separate bowl, whip the cream (250 ml) and add it in parts to the previously prepared mixture. Fill the mold with half of the chocolate mousse and place in the freezer to set. The form must be bigger size than the diameter of strawberry confit and almond brownie.
Cake assembly
On frozen chocolate mousse put the strawberry confit, pour a lot of mousse and put the brownie. Pour the rest of the mousse into the free space of the mold, and cool the cake in freezer 14 hours.
Glaze preparation
After combining water, sugar and glucose syrup, boil the mixture. Mix grated chocolate and condensed milk hot syrup by constantly stirring it. Add gelatin and dye dissolved in advance, beat with a blender, avoiding the formation of bubbles.
After the cake has hardened, you can begin to restore beauty. To do this, remove the cake from the mold and place it on a stand or wire rack (place a baking sheet lined with paper at the bottom). Bring the icing to a temperature of 33⁰С and pour over the cake. Once the icing has set a little, you can decorate the cake with white and dark chocolate sheets.
Mousse cake "Stendal" with two-color glossy icing
Cherry Mousse Ingredients:
- Cream (fat content 33%) - 150 ml;
- Cherry puree - 80 g;
- Egg yolk - 2 pcs.;
- Sugar - ¼ cup;
- Corn starch - 3 tsp;
- Gelatin - 1 tsp
For vanilla mousse:
- Cream (fat content 33%) - 250 ml;
- Egg yolk - 2 pcs.;
- Powdered sugar - 60 g;
- Milk - 250 ml;
- Gelatin - 3 tsp
Colored glaze (red):
- Gelatin - 4 g;
- Dark chocolate - 25 g;
- Water - 40 ml;
- Cream (fat content 33%) - 40 ml;
- Cocoa - 40 g;
- Sugar - 125 g.
Making cherry mousse
Pour a little less than half of the cream into a saucepan and heat a little. Then, in a thin stream, add the separately whipped mixture of yolks, sugar and starch, while stirring constantly. Bring the resulting mixture to a state thick sour cream over low heat (outwardly it will still look like custard).
When the cream has cooled down a bit, add the pre-soaked gelatin and let cool. Then whip the remaining cream with cherry puree and cream.
Put one into a detachable form chocolate cake, then the resulting mousse. Lay the second biscuit on top and put in the freezer for 3-4 hours.
Vanilla mousse preparation
Mix the icing sugar with the yolks and beat well. Without ceasing to whisk, add boiled milk (thin stream). Bring the mixture to a boil and cook a thick cream.
Whip the cream into a strong foam and gently mix with the cooled cream. Stir the soaked gelatin in the cream beforehand.
Glaze preparation
To prepare the red glaze, boil a mixture of water, molasses and sugar, add condensed milk, chocolate (pre-melt), gelatin diluted in water and red food coloring. Mix thoroughly with a blender, avoiding the appearance of bubbles.
For chocolate glaze in a metal bowl, mix cocoa with sugar, add water and cream, stir again. chocolate mass bring to a boil, stirring with a whisk or spatula. Cool slightly and dissolve pre-prepared gelatin. Beat the glaze with a blender or whisk.
Cake assembly
Cover a baking sheet with a thick film, put a confectionery ring with a diameter of 24 cm on it. Pour a third of the vanilla mousse into the ring, and cool the cake blank in the freezer.
After a few hours, put the biscuits with a cherry layer in the form with vanilla mousse and pour the remaining vanilla mousse. Remove the cake in the cold for 14 hours.
Once the cake has completely set, take it out of the mold and, turning it over, place it on a stand. Pour chocolate icing over part of the cake and wait a while. Fill the other half with red icing. The junction of flowers can be decorated with fresh cherries and grated chocolate.
- To minimize the formation of bubbles, the blender should be held at a slight incline to “pull” the mass into a single jet. If, nevertheless, it was not possible to avoid getting air into the glaze, then the bubbles can be removed with a spoon or pass the mixture through a sieve. There is also a special emulsion nozzle for a blender.
- When cutting a cake, there is often a problem with the icing reaching for the knife. This can be avoided by preheating the knife a little. The cake must be very cold.
- If the glaze is too thick, you can remove it with a spatula. The spatula is also useful when removing cakes and cakes from the grill so that the icing threads do not hang down.
- A special ring tape will help to pull the cake out of the mold. It fits into the ring before assembling the cake and helps keep the edges of the product smooth.
- And if the mirror glaze did not work the first time, do not despair. The more training, the better the result!
Meet "Dark Larry", a discovery cake for all chocoholics on the planet. The proportions and ingredients of the dough give us indecently sticky cakes that are so porous that they weigh nothing, while being amazingly soft and juicy. Strong chocolate taste put on the shoulder blades even the sensational “Cake for one-two-three”, and this is a serious application, do you agree? Real revolution in ingredients, their proportions and technology of preparation. And if you promise to follow all the steps exactly, this cake will become your favorite. He absorbed the best from the world of brownies, chocolate cakes and air mousses, thereby becoming the standard chocolate cake. I even admit that a third of readers will not even have time to make cream for cakes, because they will no longer be. Actually, don't try it. ready-made cakes or pieces before you assemble the cake, otherwise you will have to come up with stories about why the cake disappeared. And at the same time, I give the long-awaited step by step guide on chocolate icing, beautiful smudges and fashionable today kandurin.
Look, a 16-18 cm cake will be cooked, for other diameters I will make a traditional plate at the end. We take the ingredients as much as I write in the text and in the composition, we don’t take the photo into account, here I experimented with the number of cakes.
Sift dry ingredients into a large bowl: flour (375 g), cocoa (90 g), baking powder (10 g), soda (7 g). Please take the maximum good cocoa. No green packs. We need taste, color, and the absence of particles that squeak on the teeth. I recommend Barry Callebaut Belgian alkalized to everyone, I have it in my store. 
Repeatedly said that you need to mix everything carefully, with a whisk. Especially mixtures where there is soda or baking powder. Otherwise, you may have different parts of the cake in composition, in one there are more of these agents and the cakes will go in bubbles. We take it aside. 
And in the mixer bowl we combine any vegetable oil(150 g) and sugar (450 g). The attentive reader will notice that I have oil Green colour. This grape seeds I decided to try it and I liked it. Not only is the color cool while cooking, but there are also no familiar smells. But this is not critical, replace with your favorite oil. 
Beat well with a mixer. It is clear that such butter will not whip into foam, like butter, so we just wait for the uniformity of the mass. I continue to test the SMEG mixer, I will soon be ready to give a review. 
Then lower the speed to low and add all the eggs (3 pcs) and vanilla extract (5 g). According to vanilla, everything is as usual, we do not replace vanilla or chemical flavors better don't add anything. Beat the mass for 2 minutes. 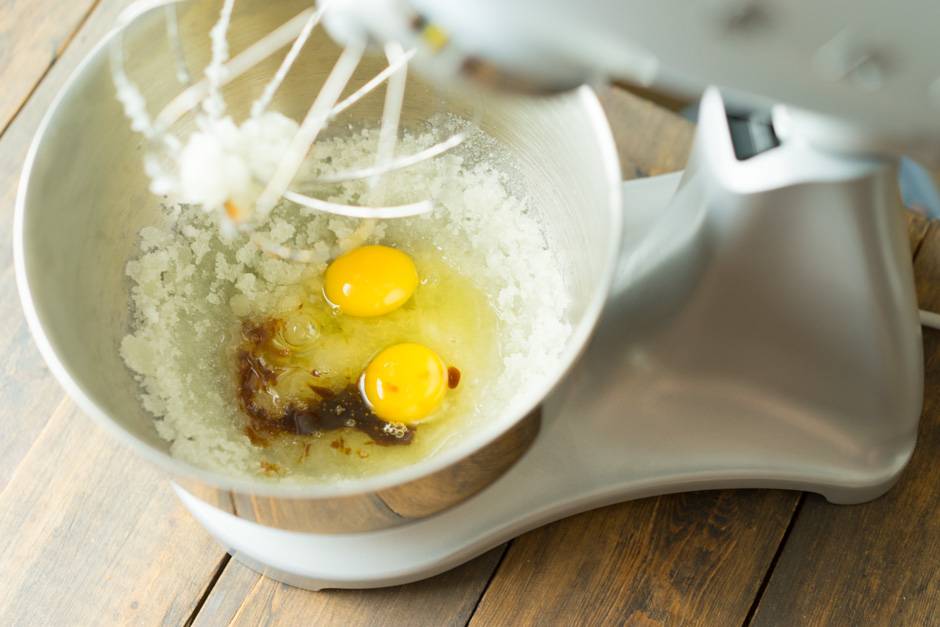
We introduce half of the dry mixture. We beat. 
Pour milk (150 g), the temperature is not important here. 
And now the most interesting - hot coffee(340 g). Once again I draw your attention - yes, grams. Because the bowl is on the scales and it's easier than measuring with glasses. You can take instant coffee, brew it yourself or use a coffee machine. The main thing is boiling water. By the way, if for some reason you are afraid of coffee, just add water. What is happening at this moment? Boiling water activates the baking powder, and although we are used to seeing it work already in the oven, in this case we need air in the dough right away. Then you will see the difference. The second moment, cocoa is brewed. It literally turns into hot chocolate(we have cocoa, fats and temperature to heat up) so the cakes will be surprisingly darker. Alcohol (75 g) must also be sent there. I took Marsala, you can whiskey, cognac, liqueurs, in short, everything that has a pleasant tart flavor (not wine, of course). Again, special housewives can replace this with water or juice. 
Beat on low speed and add the rest of the dry ingredients. 
Look, we get quite a lot of dough. Now is the time to decide how we will bake. It is more convenient for me to bake one cake at a time, so I made for my 16th form and I will bake SIX cakes. The weight of each dough is about 300 grams. In principle, if you are in a hurry, you can make three doubles (then just cut off). If you are confident in your abilities, you can make two calls (in each form, then you will have three cakes). The dough will be liquid, this may confuse you. Do not be afraid if everything was done by weights - then you have right dough, and although it seems that it runs straight - this is normal. 
We bake at 180 degrees, preheated the oven, top and bottom. 
We bake a single cake for about 25 minutes, if there are more servings in the form, the time will increase. There is a subtle point here - the dough is very dark, and in the process of baking it will turn completely black, so you may not catch the moment when the cake burned out. Check with a skewer, as soon as it comes out dry - take it out. You can simply press the center of the cake with your finger, as the pros do, if the cake springs, it is clear that it is completely baked. The remaining cakes can be safely baked for exactly the same amount of time. And don't worry about the dough, it will wait. There will be a bump on top, we all know that it will need to be trimmed. 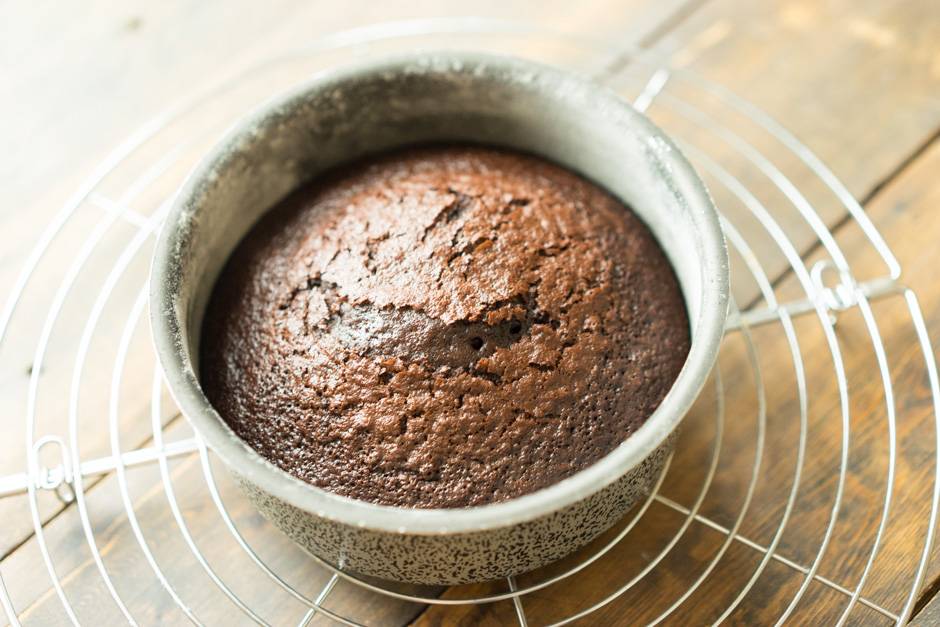
They took it out of the mold immediately, put it on a wire rack and removed the parchment. We use it again for following games. I always turn the cake over so as not to deform the bottom important edge. 
So in turn we bake all the cakes. We repeat every time. For silicone, only parchment at the bottom, but I would make these cakes in metal. 
When the cakes have completely cooled, wrap in cling film and put in the refrigerator for a couple of hours (preferably overnight). During this time, moisture from the center of the cake is distributed to the edges, and the film does not allow it to leave the cakes. Look, the cake seems to be sticky. It turns out so juicy, it's unbelievable. 
We cut the cakes to the same thickness, we talked about this in a special lesson. 
Since the cakes are very wet, I line each with parchment so that they do not stick together. 
Next cream. I took my standard, 2.5 servings. Which cream to take you, decide for yourself. Also in portions - this is always an individual parameter. It is clear that we tint it with dye, I take those that I have in my store - Americolor. For some reason, few people go to the Mistress section for a note, there is a collection of creams, choose the one you like, everyone has their own taste. 
We are building a cake. 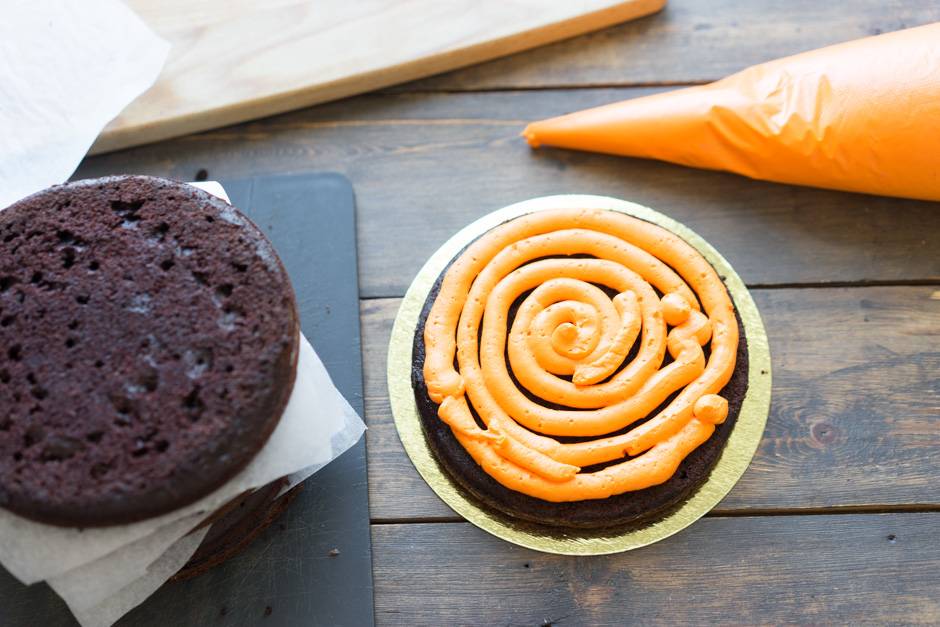
We follow the geometry. 
Remember about the rough coating. 
Now about the icing, I will add this block in , but let it be here too. The first thing we need is a well-cooled cake. It's great if you cover it with cream in the evening, and pour glaze over it in the morning. cold cake will help to quickly cool the icing and it will harden with beautiful smudges.
How do I make frosting? Dark chocolate and oil. You can also use ganache, but you still need cream. 
For such a cake, you will need about 80 grams of chocolate, I took it with a margin. If you take tiles, chop them finely, we need a homogeneous paste, and if there are large pieces, they melt for a long time and the process stretches. 
Melt in my favorite way - a pastry bag in boiling water. This way you will NEVER overheat the chocolate. 
Once the chocolate has melted, pour it into a wide bowl. 
Add chopped pieces of cold butter. The calculation is this - for 100 grams of chocolate - 60-80 grams of butter. Why is it? Firstly, the chocolate will shine, and secondly, the icing will be softer on the cake, and not become a hard crust that cannot be cut and eaten. 
silicone spatula stir the mass until smooth. If the chocolate does not cope with the oil, you can put it in the microwave. 15 seconds, removed, mixed everything, another 15 seconds. You should get an emulsion - that is, a completely homogeneous mass without lumps. 
Let the chocolate frosting cool down a bit. At first, it will run from the shoulder blade like water, it will gradually become thicker, like kefir, this is the state we need. In the meantime, let's get decorating. Many asked to tell about kandurin. This is a harmless powder of gold or silver color (I have it in the store). Used for coloring and decoration.
For example, we can cover blackberries with it. Pour the part onto a plate, dip a soft brush into it and gently grease the berries. It is clear that we will work gently with raspberries, but we will not stand on ceremony with strawberries at all. You can cover the berries completely or lightly dust them. 
And here is how the cakes are covered. Pick up kandurin on a brush, bring it to the surface of the cake by 4 cm and blow strongly on the side of the cake. Gold dust is applied to the sides of the cake. You can't just apply with a brush. Hair streaks will be visible and the gold layer will be too thick. And in this way you very clearly regulate the density of application. I went over the bottom third of the cake like this, creating a slight gradient. At first it may not work for you, but gradually you will understand the essence. We apply dust again and again, to the desired shade. Clearly, the darker the cream, the more beautiful and obvious the gold coating will be. 
And now for the frosting. I made a video. And now I'm summarizing everything for you. First - the cake is cold, waiting in the refrigerator. Second, chocolate glaze liquid, without lumps, similar in texture to kefir, a ribbon flows from a spatula.
Prepare a small spatula or spatula. We will “draw” our smudges with it. Pour frosting onto the center of the cake. It is necessary to pour so much that 1.5-2 cm remain from the edges. And carefully, slowly distribute the icing with a spatula from the center to the edges. To get a smudge, you just need to “push” the icing down with a spatula, that’s all, gravity and the cold sides of the cake will do the rest. If you want thicker smudges, cool the icing a little more. But it seems to me that not everyone likes a thick hat of chocolate, so we have cute smudges. Did you notice that they are different heights? This is also achieved by the fact that we bring more or less glaze to the edge of the cake with a spatula. Practice, I think that your second cake will turn out perfect.
When the glaze has cooled, you can also cover it with kandurin, it will give a pleasant shine and specularity. 
I chose the color of the cream in the theme of Halloween, but at the usual time you can take turquoise, it looks good with the filling. 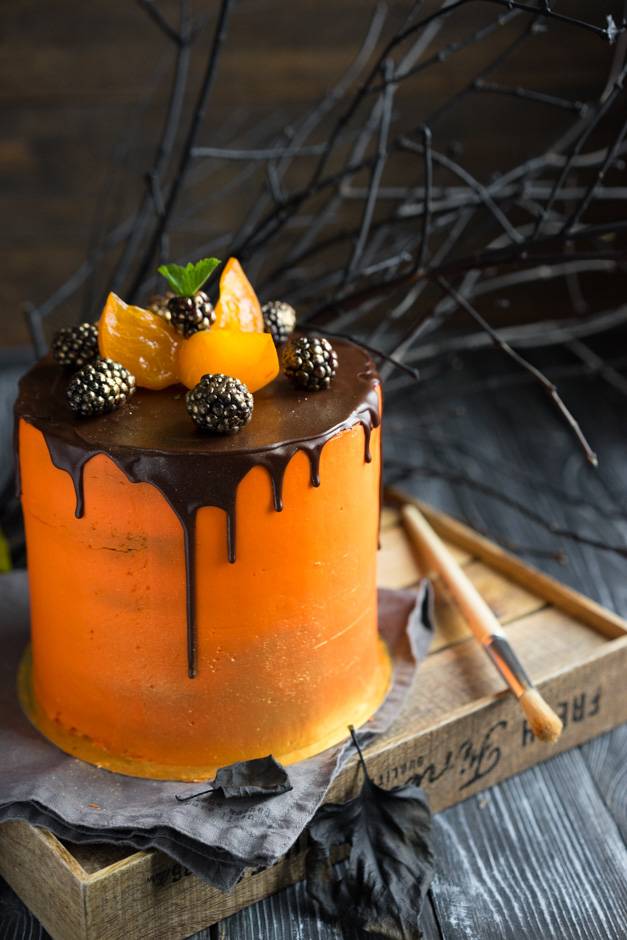
By the amount of dough for cakes (3-6 cakes from 1.5 to 2.5 cm):
| mold diameter (cm) | 16-18 | 20-22 | 24+ |
| servings of dough | 1 | 2 | 3 |
Modern confectioners are a real discovery for me! Looking through the pages of sites, Instagram, you can find bewitching works, from which it is difficult to look away. And after closing the photo, it pops up in your thoughts for a long time. I love current trends confectionery world. Cakes of the 21st century are, without exaggeration, masterpieces! But, as you know, fashion is a fickle lady, it changes very quickly, and what is in trend today may earn the stigma of “last century” tomorrow. Let's discuss how, today, you can give a zest to the cake, and bring your work closer to a masterpiece?
The answer is quite simple - make smudges on the cake. This is not a difficult technique that every pastry chef, even a beginner, can master. The main thing is to focus and keep proportions. A sense of proportion plays a rather large role. A cake with smudges looks neat and attractive only if the icing flows down in thin streams of different lengths. Smudges on the cake are one of the most universal designs. Pairs well with fresh berries, candy, flower decoration. Depending on the theme, they can be chocolate or colored.
Secrets of the "correct" glaze
Chocolate icing is great for creating smudges -. There are many recipes. However, obtaining an excellent result depends not so much on the ingredients as on the preparation technology.
- It can only be applied to a chilled product.
- It is very important that the glaze has the right consistency. If it is too thick, you will get pot-bellied worms, and if it is too liquid, smudges will drain onto the substrate, forming chocolate puddles.
- Before applying, be sure to check the temperature by applying to the skin of the hands. It shouldn't burn. Too much hot icing ruin your creation.
- Volumetric smudges on a chocolate cake look more impressive. This point again depends on the density.
So, let's look at the recipe for making this wonderful glaze.
Chocolate smudges

The recipe for a cake with chocolate smudges involves the use of the following ingredients:
- Dark chocolate from 50% - 90 g;
- Cream with a fat content of 33% - 70 ml.;
- Butter - 40 g.
Cooking process
For such confectionery experiments, it is highly desirable to use a scale. But, in principle, you can do without them by adjusting the density using the sample method on chilled dishes, described above.
- We heat the cream to a temperature of about 70 degrees (do not bring to a boil!). Remove from fire.
- Finely chop the chocolate, add to the heated cream. Do not be alarmed, at first the mass will seem stratified. Keep stirring, the cream will become homogeneous.
- Add butter cut into pieces. Some pastry chefs do not use it, but this ingredient gives a chic glossy sheen to ganache.
- Glaze is ready. Next is a matter of technology, so to speak! Use our recommendations for its application.
During the execution of smudges, the ganache changes its consistency, freezes. Control this moment! Either work quickly or heat up the frosting as you work.
As practice shows, it is better to perform such manipulations with a small spoon, but you can also use pastry bag. Who is comfortable. When the smudges are done, fill in the central part of the top of your masterpiece.
colored glaze

Colorful desserts attract the eyes of both adults and children. If you are preparing for children's holiday, use colored smudges for the cake as a design. "The head of the holiday", in this case, will not be left without compliments.
Ingredients:
- White chocolate - 65 g;
- Vegetable oil - 20 g;
- Food coloring.
Cooking process
- Melt the chocolate in microwave oven, stirring every 15 seconds, or in a water bath. Make sure the bowl is dry. The ingress of even one drop of water is highly undesirable.
- Add vegetable oil (refined, odorless) to melted chocolate.
- The next step is to add color. Mix everything thoroughly until a uniform color.
- Take out the pre-chilled dessert and pour the icing, starting from the edges. Then we fill the center, leveling everything with a spatula.
We have tried to describe in as much detail as possible the essence of this unpretentious process! Share in the comments how your expectations and reality coincided?)) We hope this article will contribute to the development of someone's confectionery talent.
×- Chocolate from 50% - 90 g
- Cream from 33% - 70 g
- Butter - 40 g
close Ingredient printing
I already talked about decorating cakes with chocolate smudges (otherwise - drips) and showed them in a post about. But since this technique is very popular today, many novice home confectioners, as well as those who just want to make cakes on family holidays, are interested in how to make them correctly and beautifully, I decided to allocate a separate article for this topic.
Chocolate smudges! Appetizing, glossy, intriguing! They look super: beautiful and “fashionable”, and they seem to be very easy to work with. This is where the trick lies. Most often, for those who make smudges for the first time, they turn out not at all the same as in the picture. experienced craftsman. The layer of chocolate ganache is thin, it happens that it even shines through, and smudges directly reach the very, very bottom and puddles form on the plate. The correct smudges are voluminous, convex and “stop” long before the substrate.
Well, I suggest doing it like this.
First, level the cake and put it in the refrigerator. And if the filling allows, then in the freezer - for 15-20 minutes. In this case, it is super important that the cake is very well chilled!
While the cake is cooling, prepare chocolate ganache. It is to them that we will make smudges. The indicated amount of ingredients is enough for smudges for a cake with a diameter of 18 cm.
We take 70 g of high-fat cream - from 33%. Pour them into a saucepan, put on fire, bring to a boil and turn off!

We put in this saucepan 90 g dark chocolate(from 50%, I usually take 70%).

Stir with a silicone spatula until the mixture is homogeneous. It won't happen right away, don't worry! First there will be something like this:

... but soon the mixture will thicken, acquire a slight viscosity and shine.

In order to enhance the gloss, add 40 g of butter.

And again stir until smooth!

It turns out such a shiny and, if I may say so, densely flowing chocolate mass.

For the beautiful chocolate smudges we really need the right consistency. It needs to be “caught”, felt. And, perhaps, you will have to spoil more than one cake until this understanding comes :) Although, I hope my writing here will help you save a certain amount nerve cells:) So, consistency. Ganache should not be thick, but it should not be completely liquid, like water, either! The right ganache flows like a thick liquid, like some kind of varenets, for example. But even if the ganache seems thick to you, do not rush to add cream. Maybe it's all about the temperature. By experience, my colleagues and I found out that the working temperature of ganache, the one at which its consistency is most suitable for creating chocolate smudges, is about 33 degrees. Therefore, if you are thick, check the temperature. It is likely that in the process, for example, of stirring the chocolate or after adding cold butter, the ganache has thickened, simply because it has cooled down. You can put it in a water bath (only so that the water does not touch the bottom of the saucepan with chocolate) for a couple of minutes.
Here you go. Ganache is ready, the consistency is right, the temperature is good, it's time to make smudges! We take out the cake from the refrigerator or freezer and pour the ganache a little bit along the edge with a spoon. We are closely monitoring how it is distributed. For those who have these smudges - one of the first, I do not advise you to immediately pour all the ganache into the middle of the cake and wait until it drains beautifully. It’s logical: if we apply a little bit, we have the opportunity to track the quality of the ganache and improve it, and pour it right away - while there is little experience, it’s not known how it will go, I think few people want to spoil it with one movement whole cake!

Thus, we make smudges around the entire circumference of the cake. If the ganache thickens a little during the process, heat it in a water bath, but just a little!

And then fill in the middle. Here in the photo, my ganache was already thick enough to spread freely, and I helped him with a spoon. The perfectly smooth center was not important to me, because a rich fruit decor was planned. But I could get a smoother middle if I warmed up the ganache a little - to fluidity, and carefully, slowly, controlling the process, poured it into the middle of the cake.

So our fashionable delicious decor is ready!

Experiment, and let the results always please you!
And I never tire of thanking the cake shop Cakebomb for invaluable tips on working with chocolate smudges!
UPD: Of course, smudges can also be made from milk chocolate, and from white, but there will be other proportions. I recently tried to cook from milk: 60 g of chocolate and 40 g of cream melted in the "impulse" mode in the microwave (20 seconds each, stir, warm again, etc.), added 1 tsp. butter, mix well and “distribute” the chocolate in the form of smudges around the circumference of the cake. Here's how it happened!

I will try to make it on white chocolate, I will also write and show!


