Cutting dough for sweets. How to evenly cut a tender biscuit into cakes - the super secrets of hostesses
I want to cook something special for the holidays. And offer a new reading of already known and beloved dishes. So it's time to check out some new culinary design ideas!
Our today's review is devoted to the creative cutting of dough - from the simplest to real masterpieces of flour production.
We put ideas in a piggy bank!
Buns from strips and layers of dough without filling
From "sausages" yeast dough you can make beautiful buns. To prevent the strips from sticking together, the sausage must first be greased with an egg. And then wrap it with an ornate line according to the pattern you like.


From a small rolled strip, you can make a flower bun, a bow bun, a leaf bun.


For children, we definitely make pastries in the form of animals.


From a layer of puff pastry, you can make a stylish bun with a large bow.

Roll based baking
Original spikelets, buns and bread can be made on the basis of rolls. Here, various schemes for cutting dough with scissors are used.
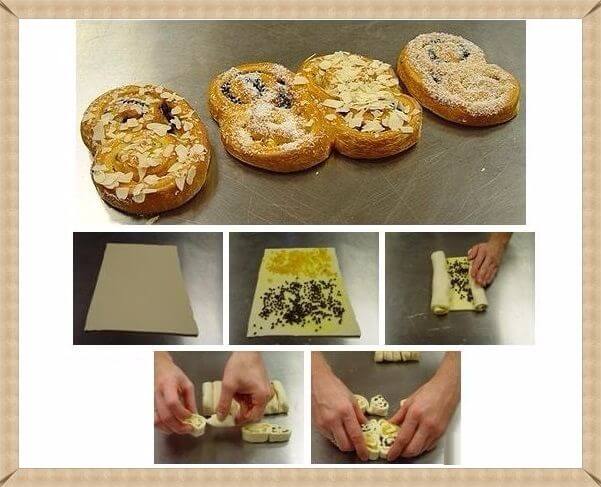
We perform the spikelet as follows: sprinkle the “sausage” from the dough with poppy seeds. Then we make cuts in the roll at an angle of 45 degrees, and lay them out with a “pigtail”.

Similarly, we perform spikelets stuffed with poppy seeds or cinnamon with sugar.


You can make a ruddy wreath from a roll with sugar and cinnamon.

If you cut the roll into pieces and spread on a baking sheet, you can make cinnamon buns. Pour the buns when ready. chocolate icing, concentrated syrup, nuts with sugar or other tasty decoration.


Decorating the edge of the pie
Open pies and pizzas can be decorated in a special way by shaping the edge in advance and filling with toppings.


Original pies with filling
Pies are loved by adults and children. You can surprise and please your loved ones by making them in the form of roses, animals, curls, apples and other fruits and vegetables. Thus, you can make themed pies for a specific event or for a specific person.


stuffed pies
Large stuffed pies can be decorated in the form of a funny turtle. The relief on the shell can be made using prints of cups or dumplings.

Stuffed flower pie can be made with any sufficiently thick filling or with a combination of two fillings. We spread the filling on the lower layer - we form the center and the ring. Then cover with a second layer of dough and fix the center with a plate. We fasten the ring along the edge and make cuts, unfold the dough like flower petals.

We make a stuffed ring pie with a peeking out filling using special cuts in the center of the dough layer and bend it to the edge.

A stuffed pie in the form of a fish is made from puff pastry or yeast dough.

A country pie with minced meat and eggs is also quite beautiful and colorful. This dish is sure to impress your guests!

From small round pies with filling we form bunch of grapes, decorate with carved leaves and vines. Here is the finished culinary masterpiece!

Stuffed pie can be perforated. For such pirogue will do thick filling from pieces of meat, cabbage, apples.

bicolor pies
Pies and buns made from two-color dough are very original. We make them according to the principle of the well-known Zebra pie, coloring half the dough with cocoa powder. And then it all depends on your imagination. You can put snow-white dough balls in a baking dish and pour the dark part of the dough, you can bake multi-colored cakes and make a cake out of them, or you can combine two layers of light and dark dough, make two rolls and colored butterflies from them.


decorative bread
It is our custom to greet guests with bread and salt. But where to get beautiful decorative bread? It turns out that it is quite possible to bake it yourself. There are a lot of decent options. Let's get to know them:


Open pies and pies
Open pies and pies can be decorated not only with the original edge.
We make puff pastry pies with the effect of an opening flower from two square layers, cutting the top one.

Charlotte with apples is now made in a new format. On shortbread dough spread the curd filling consistency thick sour cream, on top we decorate with roses from apples.


We decorate pies with berries and jam filling with decorative pieces of dough.


We make open puff pastry pies with meat filling.


We decorate pies and pies with an edge of dough and sausages. To do this, we put a sausage between the two layers, fix it, make cuts and unfold it.


With pieces of boiled sausage, you can make rose pies.


An open pie with pear and cottage cheese is very useful. Filling in the base shortcrust pastry pears, cut into rings, without separating them. We spread them in the form of a flower and fill it with liquid curd filling. We bake.


We make a pear pie from a puff layer and half a pear. Original and simple!

Pie "Santa Claus"
For new year holiday it is worth baking a cake with one of its symbols. We propose to make a cake with the image of Santa Claus.


Now, fully armed, let's start experimenting with original pastries!
Photos used: hlebopechka.ru, www.liveinternet.ru,
They brought the dough for buns, pies and pretzels, but you don’t know how to cut the dough so that the fancy products turn out beautiful - see the step-by-step photo.
beautiful buns
Section "Orchid": roll out, cut out a square, fold in a triangle, make cuts along the sides, leave a section of dough without a cut, unfold the square, connect the cut ribbons in the center.

Section "Peony": roll out, cut out a square, fold in a triangle, make cuts along the sides, leave a section of dough without a cut, expand the square, fold the triangle with other corners, make cuts. Expand the square, connect the cut ribbons in the center. Put the stuffing into the flower petals.
Section "Curls": roll out the layer, flavor with stuffing, roll into rolls on both sides, cut across.
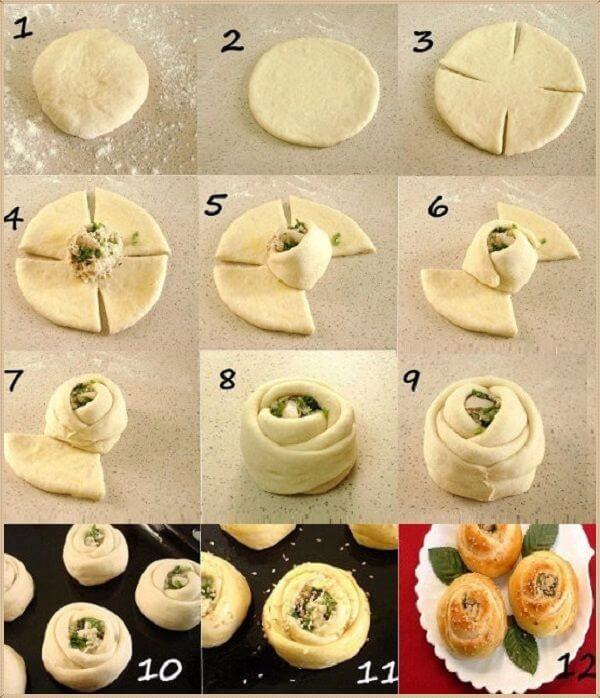
Cutting for muffin "Rose": roll up a bun, roll out a circle, make 4 cuts at equal intervals, put the filling in the middle, fold the rose petals in turn.

Sweet "Bows": roll up koloboks, roll out mugs, fold the circle in half, make cuts 4 external and 3 internal.

A simple flower made from sweet yeast dough: roll the sausages, connect them into rings, put the filling to the two walls inside the ring, connect in the center, as shown in the photo.
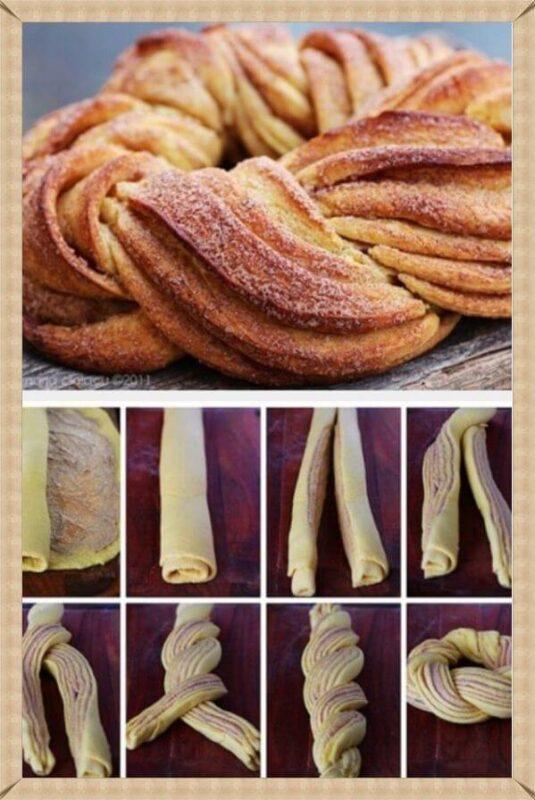
Beautiful puff Kalach: roll a bun out of it, roll out a circle, grease with stuffing, roll into a roll, cut the roll lengthwise, twist two puff ribbons together, connect the ends to make a roll.
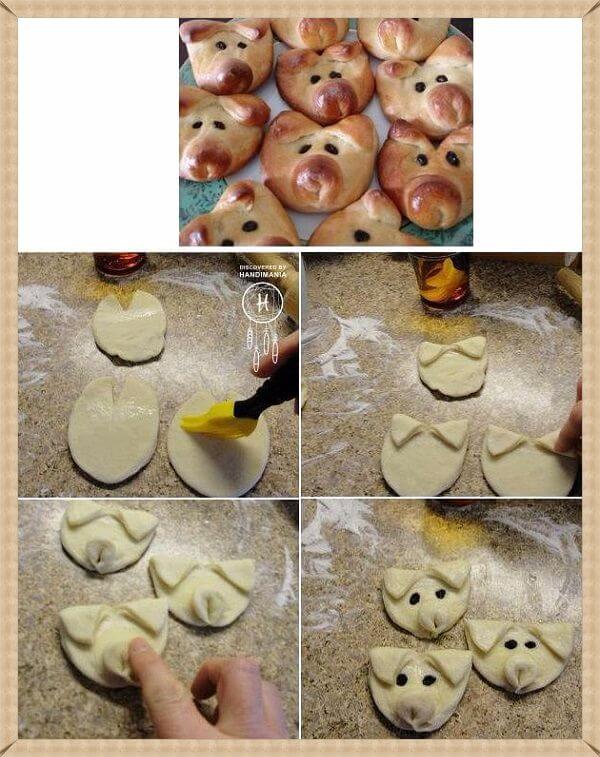
How to make "Piglets" from rich yeast dough. Roll out a circle, make a small incision on top, bend the corners - the ears. We sculpt a piglet for a pig in the lower part, bending the edge and flattening it a little. The piglets' eyes are made of raisins.

Sweet "Mushrooms": a circle is rolled out, which is then cut into pieces (see photo) and laid out in the form of mushrooms.
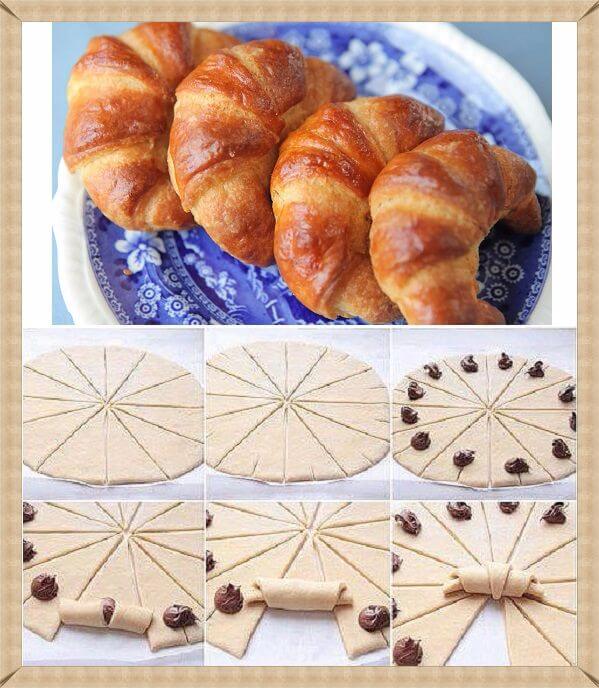
"Croissants". Roll out the circle and cut it into triangles, cutting from the center to the outer edge. An incision is made on the outer side of the triangle in the middle and the filling is laid out at its end. The croissant is rolled from the outer edge to the center.

Bun "Bird": roll up the sausage, wrap one end around the index finger and thread it into the resulting ring. With a small pinch, shape the dough into a beak shape. The tail needs to be flattened and cuts made, giving the appearance of feathers. Eyes are highlights.
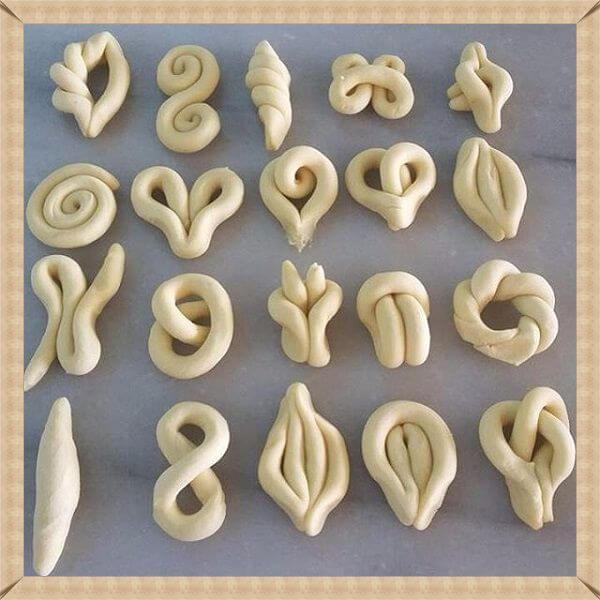
And here simple options beautiful buns made from sausages. By the way, even a child can make such forms. Involve the little ones in this entertaining baking process. At the same time, develop fine motor skills and imagination.
How to decorate pies
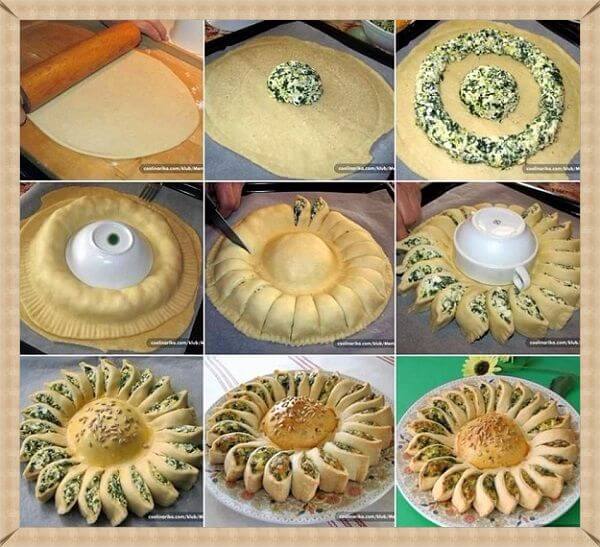
Cake decoration "Flower": roll out a round-shaped layer, put a bun of filling in the center. Carefully distribute the rest of the filling in a circle, leaving space from the edges and the central bun. Cover everything on top with another layer of dough. With a small bowl or tea cup, press the edges around the center filling. Cut the outer edges with an openwork knife. Then evenly cut the dough with the filling, which you have goes along the outer ring. Slightly turn each "petal" stuffing up.
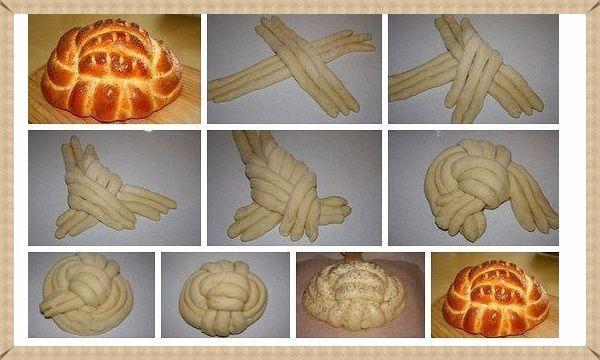
Cutting Butter Loaf. Roll up flagella - sausages and weave a loaf of them, as shown in step by step instructions on the picture.
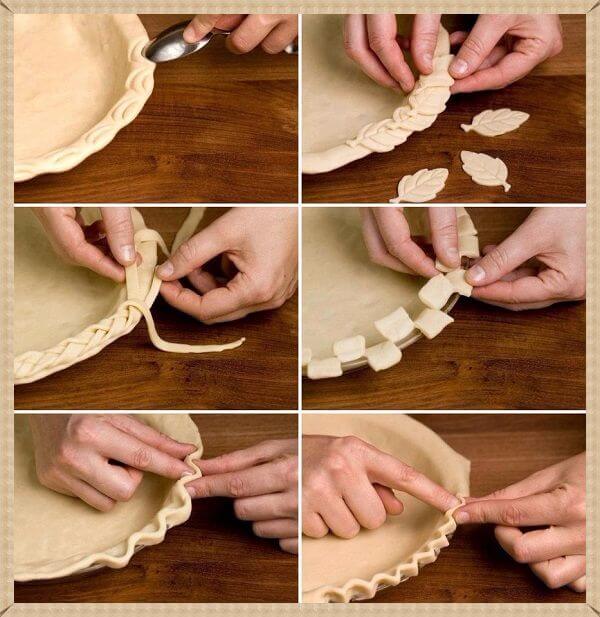
And here are the options for decorating the edge of the pie.
Cutting the dough "Pigtail" or "Spikelet"

The simplest version of "Pigtails". A rectangle is cut out of the rolled out layer of dough, a longitudinal incision is made in the center. Then, one edge is threaded several times through the resulting hole. Thus, the edges are twisted into a spiral. The filling is laid out in the center.

"Pigtail with sausage". Three sausages are connected by the upper edges. Then a slice of sausage is laid out between them. Weaves like a braid. The right harness is placed between the left and center, then the left is placed between the right (which is now on the left) and the center (which is on the right). Again, a slice of sausage is placed and the weaving of the pigtail continues.

Sausage in the dough "Pigtail". This delicacy is sometimes called "Obzhorka" in culinary shops. The sausage is laid out in the center of the dough cake. Then the edges stick to each other, and the sausage wrapped with dough is cut equal parts. Each polka is turned inside out with the sausage side up and placed through one on opposite sides of the middle. Sent to the oven when half cooked. Sprinkle with cheese, herbs on top, grease with mayonnaise or ketchup (for an amateur). And bring the pastry to readiness.

Beautiful bun "Spikelet". This baking option is done simply, but it looks very beautiful. Roll out a thin layer, grease vegetable oil or an egg, sprinkle with sugar and cinnamon (poppy seeds). We turn the roll, which we then cut with scissors a little obliquely, as shown in the photo. We spread the resulting "spikelets" into one large beautiful bun.

And this is a simple pigtail with a poppy. The sausage is covered with poppy seeds and cut with scissors, spreading the petals on different sides.
Biscuit - the basis of cakes, pastries, rolls. It is not difficult to make a biscuit for a cake lush, light, tender, but baking it is half the battle, and then you need to carefully cut it into cakes to assemble the cake. Of course, if you have to deal with purchased biscuit cakes, then there will be no problems. And if on the table it has long cooled down taken out of the oven fluffy biscuit 5-6 cm thick, then the question arises: how to cut it into thin cakes?
This task at home is not so simple, and it becomes more difficult in proportion to the number of cakes needed. Therefore, if there is no special experience in this matter, then it is better to first dwell on two or three layers. In any case, when choosing a way to cut a biscuit, you need to realistically evaluate the height of whole pastries.
Method number 1. Cut the biscuit with a long bread knife.
The most common, but not the most accurate (in the sense - even) way. With the help of a knife it is convenient to cut dense biscuits, and loose biscuits can crumble from such “intervention”. Therefore, the knife must be long, sharp and with a very thin blade. First you need to make “notches” along the height of the future cake / cakes and make sure that all these marks are on the same level. Lightly holding the biscuit with your hand and, slowly rotating it counterclockwise, with the other hand, cut with a knife towards you along the marked marks.
Method number 2. Using a baking ring and plates
This method also cannot do without a long and sharp knife, but a ring from a baking dish is additionally used as an “assistant”. The biscuit is placed inside the ring, at the bottom a plate or several plates of the same diameter as the shape are placed under it. The more plates - the higher the biscuit will protrude above the edge of the mold, the thicker the cut cake will be. The essence of the method lies in the fact that the shape ring acts as a measure for the layers of biscuit. The main thing is that the knife should always be directed clearly horizontally, without tilting. If you need to make several cakes, then you will have to add plates from below, and then again measure the height of the future cake.

Method number 3. How to properly cut a biscuit into cakes with a thread
Strong thin thread (nylon) or fishing line, of course, is thinner than any knife, so with their help you can make narrow layers of biscuit. With the same knife, you need to outline the width of the cake and make a light incision, which you can continue with the help of a thread. Tie the thread around the biscuit at the required height, cross the ends and slowly pull them to different sides, advancing the thread / fishing line through the thickness of the biscuit in a horizontal plane. It is more convenient to do this towards you, and not vice versa.
A spare video and shows in more detail how to cut a biscuit for a cake with a regular thread:
Method number 4. How to cut a biscuit into cakes with a string
Method number 5. Shape slicer for cutting cake layers
The cake slicer shape is a convenient device that allows you to cut into 6 perfectly even cakes. All cakes are smooth, the same thickness. The cutting process is very simple and takes very little time.
Remember that the biscuit cake can be cut and decorated with cream only when it is cold!
Biscuit - the basis for many confectionery, pastries and cakes. It bakes quickly enough, it turns out tall, lush and tender inside. Difficulties for housewives most often arise only when cutting the biscuit into cakes. They usually don't look very even. As a result, it looks sloppy and unappetizing. In our article we will talk about how to evenly cut the biscuit into cakes. We offer several to choose from. effective ways using a range of devices.
What should be considered when cutting a biscuit?
A fluffy, tall, perfect sponge cake that has just been taken out of the oven is no guarantee that the cake will turn out just as beautiful. Firstly, it can come out dry, which makes it very difficult to cut it. Secondly, the cake can fall off from the temperature difference. Therefore, in the cooking process, it is important to take into account all the points: how and when to get the biscuit, how to cut it.
The basis of any biscuit cake is eggs, sugar and flour. Additionally, other ingredients can be added to the dough: or butter, baking powder, etc. Hardest to cut classic biscuit having a porous texture inside. With an inept attempt to divide it into cakes, it crumbles or is pulled together in lumps. Along with this, oil and chiffon biscuit s (based on butter and vegetable oils, respectively) are cut more easily.
In addition, the quality ready-made cakes depends on the diameter and height of the base, as well as their desired thickness. For comparison, a biscuit with a diameter of 20 cm and a height of 7 cm is much easier to cut into three layers than a product baked in a 26 cm mold. Important also has to do with how well the biscuit has cooled. Before cutting it into cakes, it must necessarily “rest”.
How to prepare a biscuit for cutting?
In the process of preparing the base for the cake, it is important to follow the recipe exactly. In this case, both the diameter of the mold and the duration of the biscuit in the oven are important. The readiness of the product is always checked in only one way: by piercing the cake in the very center wooden skewer or a match. If it comes out dry, then the cake is ready.
The form with the cake is removed from the oven immediately. For a minute or two, the product should stand on the table at room temperature. The biscuit should move away from the walls of the mold on its own. After that, the product must be turned upside down on the grill. After 10 minutes, the cake is turned over to the opposite side and left on the wire rack to cool completely. This will allow air to circulate around the product, causing it to cool faster. But thinking about how to cut the biscuit into even cakes is not the time yet.
Before cutting, the cooled product is wrapped in cling film and refrigerate for at least 2 hours. Under such conditions, the biscuit will become more moist inside, and it will be easier to cut into cakes. Ideally, if the base is left in the refrigerator overnight.
How to cut a biscuit with a knife
This method is considered one of the most common. To cut the biscuit into cakes, you need to prepare a thin, long and sharp knife. Many housewives choose a special bread knife with a serrated edge for this. It is important to consider that the diameter of the product is not too large.

So, how to evenly cut a biscuit into cake layers with a knife? First of all, you must follow the following sequence of actions:
- Lay the biscuit on a flat horizontal surface.
- Using a knife, make notches along the entire cut line, taking into account the number of future cakes.
- Press the biscuit firmly on top with your hand.
- Rotating the product counterclockwise, cut it into cakes along the previously made notches, moving the knife towards you.
- The knife should be held parallel to the table surface. Make sure that the cake is even, and does not have the shape of a cone.
How to cut a biscuit cake with a plate?
To use this method, in addition to dishes, you must have a detachable baking dish, or rather a ring from it. It will act as a level. Using a springform ring and several flat plates is the only sure way to evenly cut a biscuit into 3 cake layers.
Actions are performed in the following sequence:
- A biscuit is laid out on a flat plate. A detachable ring is lowered from above. As a result, it should turn out that the product is on a plate, but inside the ring.
- From below, substitute so many plates under the biscuit so that from above it protrudes above the ring by required thickness cake.
- Holding the product with your hand, long and sharp knife cut off the top cake, using the ring as a support.
- Substitute a few more plates from below and cut off the next cake in the same way.
Cutting a biscuit at home with a thread

This is one of the simplest and available ways obtaining ideal biscuit cakes for the cake. How to evenly cut a biscuit into cakes using a silk thread (fishing line, guitar string), you can find out from the step-by-step instructions:
- Using a knife, make notches along the entire line of the cut. You can also use toothpicks. They must be stuck at the desired height around the entire circumference.
- Wrap the biscuit with a thread, passing it through the cuts made with a knife.
- Cross the ends of the thread. Take them in different hands.
- Separate the ends of the thread in opposite directions, cutting the biscuit in this way.
- If necessary, repeat the same steps with the second cake.
How to cut a biscuit into cakes with a string?

Such a device outwardly resembles a coat hanger with a string stretched inside. Its position can be changed depending on the desired height of the products.
How to cut a biscuit into even cakes can be described in the following instructions:
- Place the cake base on a flat, horizontal surface.
- Set the string to the desired height.
- Press the biscuit on top with your hand.
- Put the string knife on its legs next to the biscuit. Without tearing them off the surface of the table, cut off the cake with sawing movements.
- Cut the following cakes in the same way.
How to use a biscuit slicer?

This method is more suitable for professional confectioners who often have to cut the product into cakes. Externally, the slicer resembles a split baking dish, but with parallel holes around the circumference. The biscuit is placed inside the split ring and cut into right amount cakes along the slots. The distance between the holes is 1 cm. This means that the question of how to evenly cut the biscuit into cake layers can be solved very simply.
Another advantage of the slicer is that the ring is adjustable in diameter, which allows you to cut biscuits of any size in it. The main thing is that the knife is long enough and sharp.
chiffon biscuit recipe

Such a biscuit is ideally cut into several even cakes. It turns out tender and moist inside, so it does not require additional impregnation. Vanilla-lemon chiffon biscuit is prepared in the following sequence:
- The oven heats up to 160°C.
- Flour (130 g) is sifted several times with sugar (80 g), a pinch of salt and baking powder (1 ½ tsp).
- Yolks room temperature(2 pcs.) combined with vanilla and lemon zest (on the tip of a knife), lightly warm milk(30 ml) and vegetable oil (65 ml). The resulting mass is whipped with a mixer to a state of lush and light foam.
- The yolk part of the dough is mixed with the sifted dry ingredients.
- Proteins (4 pcs.) Are combined with sugar (25 g) and beaten with a mixer until steep peaks.
- Part of the proteins is introduced into the yolk-oil mass and gently mixed with a spatula.
- The remaining proteins are added to the dough and combined with it in a similar way.
- The prepared dough is transferred to a detachable form with a diameter of 26 cm.
- The biscuit is baked in a well-heated oven for 30 minutes.


