How to make biscuit dough. Biscuit dough
To make a biscuit, you need the most regular products and a little patience. I suggest classic version biscuit dough, performed without a mixer. I use a detachable baking dish, with a diameter of 26 cm. You need to take small sugar, medium-sized eggs and fresher.
Cooking:
Separate the whites from the yolks and put them in the refrigerator. Beat the yolks until white with 2 tbsp. spoons of sugar.
Add a pinch of salt to the egg whites and beat until stiff peaks.

Whipped proteins are considered when they become viscous and do not slip off the walls when the dishes are turned over. If you turn over the egg whites, they will not fall out.
Then beat the whites, gradually adding 1 tbsp. a spoonful of sugar. Proteins whipped with sugar become viscous and shiny. You need to beat until the sugar dissolves, then the biscuit will be more magnificent.

Add the sweet yolk mass to the sweet protein mass. Whisk a little together.
Mix flour (we collect tablespoons with the largest slide) and mix starch and carefully sift directly into the lush egg mass.

Gently, from the bottom up, mix the flour with a spatula or spoon into the egg mass. This must be done gently so that the proteins do not fall off.
Then we “pour” the dough into a form covered with parchment, oiled and sprinkled with flour (the walls can not be lubricated). Carefully level the surface.

We put in an oven preheated to 160 ° C and bake for 35-40 minutes. Biscuits don't like heat. The baking temperature is very dependent on the characteristics of your oven. To make the biscuit even, rise well, I first cover the form with foil, and when the biscuit rises to the edges of the form (after 15 minutes), remove the foil, cover parchment paper and bake until golden brown. If I don't cover the mold, the biscuit will be smaller. Biscuit does not like sudden movements, everything must be done gently.
Ready biscuit becomes ruddy and easily lags behind the walls of the form.
We take out the biscuit from the oven, cool a little directly in the form and then on a wire rack or on a plate.
With a mold diameter of 26 cm, from the indicated products I get a biscuit 4 centimeters high. The higher the walls of the form, the higher the biscuit will turn out.
If you need tall biscuit, and you have a form with low walls, you can make a ring of the desired height from the baking paper according to the diameter of your form. It is better to fill the form with dough for 1/2 height (no more than 2/3).
To prepare a biscuit, we need flour, sugar and eggs.
Form for diameter - 20 cm (or square 18x18).
Note: Some recipes use 100 g flour and 20 g starch instead of 120 g flour. Biscuits with starch fall off less during baking, but crumble more when cut and are less plastic. So they are not suitable for rolls.
No additional baking powder (such as soda, dough baking powder, yeast, etc.) is required for this biscuit dough.
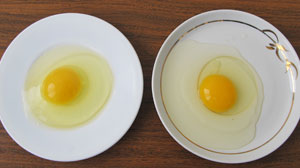
The quality of the biscuit dough and future biscuit depends on the freshness of the eggs. How fresh eggs, the more magnificent and better the biscuit will turn out. To determine if they are fresh, you need to break and pour one egg on a saucer. It is fresher if the yolk is a high dome, and the albumen hugs it, and only a small amount of liquid spreads over the saucer from the bulk of the protein.
For clarity, I photographed two eggs.
The one on the left was demolished by a chicken just a few hours ago. The one on the right has been in the fridge for a week. See the difference? In the first, the protein is collected around the yolk, and in the second, it spreads over the dish. The first egg is suitable for biscuit, and the second is suitable only for scrambled eggs.
Separate whites from yolks. It is important to do this so that even small droplets of yolks do not get into the proteins, otherwise the proteins will not beat well.

Beat the yolks with 2/3 of the sugar until a light, homogeneous mass is obtained.
It will be possible to stop when grains of sugar disappear in the mixture, and it itself becomes white and frothy. With my mixer speed it takes me 6 minutes.

Whisk the whites.
The bowl for whipping proteins must be completely clean, without traces of fat, otherwise the proteins will not beat well. You need to beat the proteins until a stable foam is obtained. If the dough contains too small bubbles, it will shrink during baking. If the whites are whipped poorly, they need to be cooled, add a little salt, citric acid or a few drops of vinegar. It takes me 5 minutes to whip egg whites.

Add the rest of the sugar to the proteins and beat until shiny (about 1 minute).

Mix together the protein and yolk masses. This should be done quickly, not in circular motions, but by lifting layer by layer so that the dough remains enough air bubbles.

Pour the sifted flour and gently but quickly mix with movements from the bottom up.

Ready dough quickly pour into prepared forms or onto a baking sheet and bake immediately, otherwise air bubbles will escape from it, and the biscuit will lose its taste and tenderness.
It is convenient to bake a biscuit in a detachable form, the bottom of which must be greased with oil or lined with baking paper. Lubricate the side walls of the form with a non-stick coating should not be, otherwise the dough will rise only in the center of the form during baking. If a mold without a non-stick coating is used, then the walls of the mold can be lubricated with oil.

You need to bake a biscuit on a uniform medium heat. The oven should be preheated 10 minutes before placing dough items in it. Do not put the biscuit in a hot oven, as it can immediately form on the surface of the product. hard crust, the biscuit will burn on the outside, but the inside will not be baked. For baking, the optimal temperature is 200 degrees and the time is 20-25 minutes.

During baking, especially in the first 15-20 minutes, the biscuit should not be shaken, as it may settle and not bake.
Readiness is determined by wooden skewer or toothpicks.
The baked biscuit should be left for a while in open oven so that it doesn't fall off. If it is immediately taken out to the cold, it may settle.
The average height of the finished biscuit should be approximately 4.5 cm.

The finished biscuit is easily separated from the walls of the mold, when pressed with a finger, the dimple is quickly leveled, the upper crust of the biscuit golden color. If the finished biscuit is placed on a damp, cold towel, it will be easier to remove it from the mold.
Tip: a freshly baked biscuit is poorly cut and poorly saturated with syrup, so it is recommended to keep it after baking for about a day or at least 8 hours. So that it does not dry out at the same time, then you need to wait until the biscuit has completely cooled down and wrap it in a film.
Tip: the finished biscuit can be frozen. To minimize labor costs when preparing for big holidays (Birthdays, New Year etc.), the biscuit is best prepared in advance and stored in the freezer. After defrosting at room temperature he by palatability no different from freshly prepared.
Bon appetit!

This recipe interested me primarily as a way to utilize proteins. It's no secret that there are hundreds of recipes where only yolks are required, and from one or two recipes proteins one or two have counted. Well, we don’t like meringues ... and protein omelet we don't seem to be too sorry. Therefore, I am constantly on the lookout for recipes that use only proteins. And then another portion of 8 proteins accumulated in the refrigerator, and I got into the Internet. And there I unearthed this miracle. I'm just delighted. And, most importantly, this is the first biscuit in my life that turned out unconditionally. It rose well, did not fall off after cooling ... Until now, I have not been friends with biscuits !!! Here is a preamble. I must say that the site has a recipe for Angel Food Cake or Lesya_Dol Cook's Angelic Biscuit. However, there is one small, but in my opinion very significant difference. Lesya_Dol uses baking powder, but, as I understand from the Internet, in Angel biscuit leavening agents are not used. Properly whipped proteins provide him with splendor and tenderness without additives. The recipe is quick and very easy.
Biscuit dough is the classic and most common version of cake layers and other desserts that we are used to using. In fact, there is nothing difficult in preparing a biscuit, and any cook can make it on their own at home with a minimum of effort.
Classic biscuit dough
This biscuit dough is suitable for almost any kind of cakes.
What you need:
- chicken eggs - 4 pcs.;
- sugar - 150 g;
- flour - 100 g;
- vanilla sugar - 1 teaspoon.
First of all, we prepare everything necessary ingredients. We take a form of small size and a diameter of 20 centimeters, grease it with oil and cover the bottom with parchment paper. The flour needs to be sifted a couple of times so that there are no extra impurities in it. The whites are separated from the yolks. Be very careful while doing this.
Mix the yolks in a separate bowl with 75 g of sugar and vanilla. Rub them with a whisk until they increase noticeably in volume. Beat the whites with a mixer at low speed until a peak forms. After that, we begin to gradually pour the remaining sugar into it, while the mixer does not turn off.
Add 1/3 of the whipped protein to the yolks, mix gently with a spoon and pour flour into it. Mix well again, add the remaining proteins and knead the dough. Do not overdo it in time, otherwise the air bubbles will disappear and the biscuit will not rise. Pour the dough into the form, level and bake for half an hour. Temperature 180 gr.
In a slow cooker
And again, the owners of multicookers can rejoice, because they are able to make biscuit dough using the miracle of technical thought. Multi-glasses are indicated as a measure of weight in the list of ingredients.


What you need:
- flour - 1 cup;
- chicken eggs - 4 pcs.;
- drain. oil - 20 g;
- sugar - 1 cup;
- vanilla sugar - 1 teaspoon.
Separate the yolks and beat the latter until peaks form. Add the egg yolks and both sugars one by one and continue beating with the mixer. Gently add flour to the mixture, mix with a spoon or spatula.
After that, grease the multicooker bowl with a piece of oil and carefully pour the dough into it, leveling the surface. Biscuit cakes cook in the “Baking” mode for about an hour. The result will be fluffy base, which can be used to create any dessert.
Biscuit for 4 eggs in the oven

To make the 4 Egg Biscuit Cake, you will need the following ingredients:
- flour - 1 cup;
- sugar - 1 cup;
- rast. oil - 1 tbsp. spoon;
- chicken eggs - 4 pcs.
Well, what could be easier than baking a simple biscuit? Probably many of you will not agree with me, because to cook fluffy biscuit can only experienced hostess. And in part you will be right. There are many nuances and subtleties in the preparation of classic pastries, which will be discussed in this article.
I baked my first "biscuit" at age 12, and what I got out of the oven looked more like an omelette than the cake layer I imagined. In those days there was no Internet, cooking shows and magazines with colorful step by step recipes. There was only my mother's notebook with a list of ingredients and short description process. And then no one really knew how to cook it, neither my mother's friends, nor my friends, and even more so my grandmother, who is my friend only with yeast dough.
A recipe verified to the gram and understandable proportions
But in twenty years, I did learn how to bake a real biscuit, thanks to a series of experiments and personal experience. And it is this recipe that I always give to my friends and relatives, and I will also pass it on to my still little daughter.

Friends, there will be a lot of text further, so please be patient, and I promise you that your first biscuit will be lush, airy, and incredibly tasty. As you can see in the photo, the cake can be cut into three parts.
List of ingredients
- 5 eggs
- 1 cup of sugar
- 1 cup flour
- 1 pinch of salt
Additionally:
- vegetable oil for greasing the mold
- baking dish with a diameter of 28-26 cm.
- glass 250 ml.
Cooking instructions
Prepare two comfortable and deep bowls in which it will be convenient to beat with a mixer. Check that there are no drops of water in the bowl in which we will beat the whites, the bowl should not only be dry, but also fat-free. Even a fraction of a drop of fat will spoil the biscuit. Therefore, make sure in advance that the protein bowl is dry and fat-free.
Now the most exciting part of the process: we need to separate the whites from the yolks. Carefully separate the proteins from the yolks, and make sure that even a small drop of yolk does not get into the proteins. As I wrote earlier, fat from the yolk, even in small quantities, will interfere with whipping proteins. If you are not experienced in separating the yolks from the whites, it is best to do this over a separate plate. If you spoil one protein, then the total protein mass won't get hurt.
Now add half the sugar to the yolks.

Beat the yolks with sugar with a mixer until the sugar is completely dissolved, and set aside.

Cold proteins are the key to successful baking
One of the most important rules making a biscuit - the proteins must be cold, otherwise they simply will not whip. If you did not have time to cool the eggs in advance, then put the bowl with the separated proteins in the freezer for 10-15 minutes, where they will quickly cool. Add a pinch of salt to the chilled proteins.

Whip egg whites with salt with a mixer at high speed. lush foam. At this stage, it already becomes clear whether a biscuit will turn out or not. If the squirrels are whipped into a beautiful foamy hat, then everything is fine, we can move on. Gradually add the remaining sugar to the whipped proteins, and continue to beat the proteins until the sugar is completely dissolved.


No sudden movements!
Gradually introduce into the protein part into the yolks whipped with sugar. This must be done very carefully to biscuit mass did not sit down, at the lowest speed of the mixer, but it is better to stir clockwise with a spoon, so that for sure.

We do the same with flour, which must be sifted in advance. Add the flour to the biscuit dough one tablespoon at a time, and mix gently at the lowest speed of the mixer, or with a spoon.

"French shirt"
Next, let's prepare the mold for the biscuit. We don’t need surprises, so we even lubricate the form with a non-stick coating vegetable oil with a brush, or with your hands, and sprinkle with flour. Excess flour must be shaken off. By the way, I just recently found out that this way of processing the form before baking is called “French shirt”.

Pour the biscuit dough into a mold, and send it to bake in a preheated oven.

How to bake in the oven
If you are cooking for the first time, then you will probably ask me at what temperature to bake a biscuit in the oven? Answer: in the case of biscuit dough extremes are not needed, the golden mean is 170-180 degrees. Bake - 30-40 minutes. Grid position in the middle. Do not forget that you cannot open the oven for the first 25 minutes, otherwise the biscuit will not rise.
We check the readiness of baking with a wooden toothpick or skewer. If the toothpick is dry and the biscuit is browned on top, then the pastry is ready. Do not immediately remove the form from the oven, because it may fall. Turn off the oven, open the door halfway, and leave the oven to cool.

Remove from oven, unmould and transfer to a plate. After cooling, the finished biscuit falls a little, and the surface wrinkles, but still remains lush and airy.

Well, that's all my friends, I hope I didn't confuse you too much. As you can see, there is nothing difficult to prepare. classic biscuit There is not. The main thing is to follow all the above recommendations, and you will certainly succeed.
What oven to bake biscuits in? Both electric and gas ovens are suitable for baking. In an electric baking oven, turn on the top and bottom heating without convection. Grid position in the middle. For gas oven, turn on only the lower heating, the position of the grate is also in the middle and without convection.
Which oven to put the biscuit in? For guaranteed results - perfect biscuit, the form with the dough must be placed in a preheated oven. But more than once I put the form with the test in cold oven and the biscuit rose perfectly. Therefore, if you are at a crossroads to put a biscuit in a hot or cold oven, it is better to choose a hot one.
Why won't the cake rise in the oven?
Oven seal broken. This feature is typical for old Soviet ovens. Over time, the rubber seals dry out, and extraneous air enters the oven during the baking of the biscuit. If you have a modern gas or electric oven, then there is nothing to worry about.
Do not open the oven with a biscuit for the first 25 minutes. The biscuit settles in the oven if you open the oven door earlier. Set yourself an alarm, or watch through the glass as the dough rises in the form and the top browns.
Added too much flour. Flour in the dough should not be added by eye, but according to the recipe. There is a very simple proportion for a biscuit: 1 tablespoon of flour goes to 1 egg. In my recipe, this proportion is maintained: 5 tablespoons of flour are placed in a glass of 250 grams. This proportion will come in handy if you want, for example, to bake a biscuit for 7 or 9 eggs. The same proportion applies to the sugar in the recipe.
The flour was not sifted. If you are baking a biscuit for the first time, then you should not ignore this stage. Be sure to sift the flour to enrich the dough with oxygen, because classic pastry prepared without soda and baking powder, so oxygen is most welcome here.
Use of domestic eggs. The yolks in domestic eggs are always more fat than in shop eggs, so for best result, I always bake with eggs from the store.
Recipe for a classic biscuit cake
4.8 (95.56%) 18 votesIf you liked the recipe - put stars ⭐⭐⭐⭐⭐, share it on social networks or write a comment with a photo report of the dish you cooked. Your feedback is the best reward for me 💖💖💖!


