Folding wooden table with your own hands. How to make a sliding table with your own hands
For modern city apartments, folding furniture is very relevant, because it allows you to save free space and at the same time does not lose its functionality. The dining table is an essential attribute of any home. It should be large enough to allow the whole family to sit down, as well as receive guests. In the case of the dining room, by the way, you will have the option of a sliding table. When folded, it can be a small table for everyday use or just a cabinet.
Of course, a collapsible table can be purchased at furniture stores or ordered, but this is quite expensive and can seriously damage the family budget. Why not make a folding table with your own hands? Despite the fact that its mechanism is not easy, nevertheless, the manufacture of such a piece of furniture is within the power of any man. The main thing is desire and a little patience.
DIY wooden table book

Decided to make a kitchen table with your own hands? We advise you to look at the option as a clamshell. Such a dining table will fit perfectly into the interior of a city apartment and will not take up much space. Its mechanism, despite the apparent complexity, is very simple. The only thing really worth paying attention to is the manufacture of parts.
Before you make a table book with your own hands, as in any other case of creating home-made furniture, prepare a drawing.
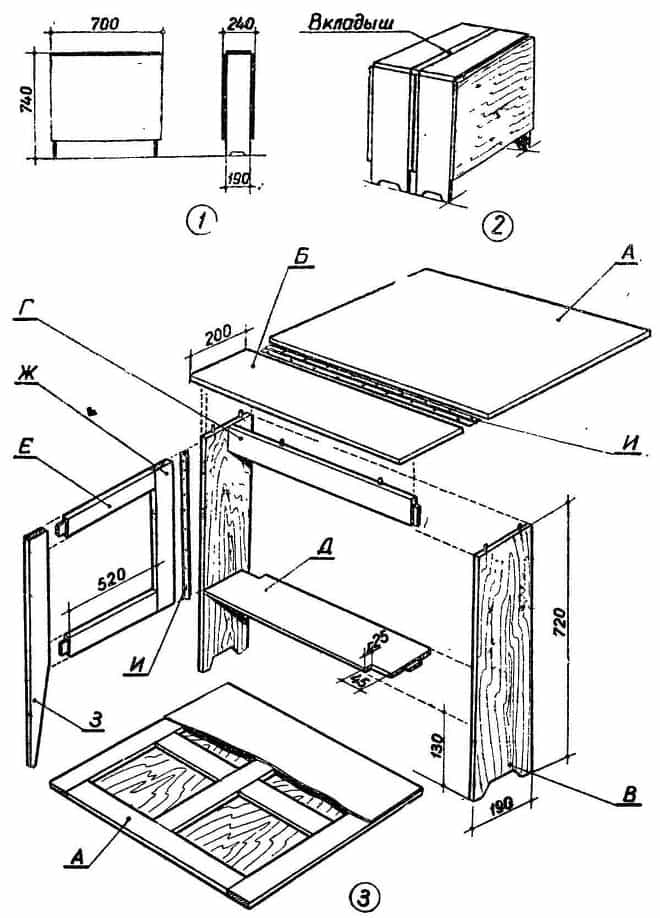
Homemade folding table consists of the following parts:
- A - countertop, 700x670 mm (recommended material thickness - 20 mm, it can be MDF,
- Chipboard or hollow panels, at your discretion), 2 pcs.;
- B - cover, 700x200 mm (the material is the one used for countertops), 1 pc.;
- B - leg, 720x200 mm (tabletop material), 2 pcs.;
- G - drawer side, 638x190 mm (tabletop material), 1 pc.;
- D - lower shelf, 628x190 (tabletop material), 1 pc.;
- E, F - horizontal and vertical bars, 500x40x25 mm, E - 4 pcs., F - 2 pcs.;
- H - movable leg, 720x40x25 mm, 2 pcs.;
- And - piano loops, 4 pcs.
Folding furniture
Transformable furniture is very convenient to use for car tourists, in the country, in a country house, when going on a picnic, etc. Such a set of furniture for a camper in the folded state takes up very little space during transportation and in a residential area. The design of this furniture is quite simple, which allows you to make it yourself with minimal woodworking skills. In this article I will tell you about the principle of transformation that was used in the manufacture of furniture for children. If you increase the dimensions below, we get furniture in the form of a table and chairs for adults.

Click on the picture to enlarge
Click on the picture to enlarge
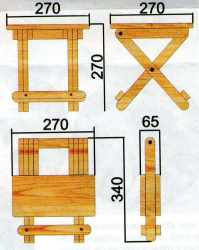
The design of the children's chair has dimensions of 270x270x270mm and is made of coniferous wood, and the weight of the chair is only 1.9 kg. If you make a set of children's furniture for the home, and the age of the children is 5-6 years old, then you can use solid pine as a material.

Click on the picture to enlarge
In the manufacture of a set of furniture for a camper - this furniture can be decorated with carving elements finished with waterproof materials. For adults, garden chairs must be made with dimensions of 420x420x420mm, and laminate and varnish or paint can be used as a finish.
Click on the picture to enlarge
I want to draw your attention to such a very important thing in the manufacture of this furniture as a very accurate execution of the repeating details of the design transformation. The slightest inaccuracy leads to distortions and marriage. It is better to make "adult" furniture of this type from hardwood or thick plywood. Assembly of furniture is best done after the complete finishing of all parts. Furniture assembly
Click on the picture to enlarge
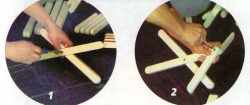
It is necessary to prepare for this process by first sorting and decomposing the parts into left and right. Swivel joints of furniture units are made with ordinary furniture couplers, but you can also use M6 bolts with nuts and washers "in secret".
![]()
Click on the picture to enlarge
The transverse bars are also fastened with a hinge and the right and left parts of the product are assembled separately. For their connection, the handle and the second pair of crossbars are fastened with self-tapping screws. To assemble this assembly, it is better to use 70x6mm screws.
![]()
If you make several identical products, then use the "conductor" to fasten the seat parts. This is such a device that allows you to align the frame of the base on the lower level and avoid distortions of the halves of the seat. When fastening the prongs with screws, it is necessary to use a calibrated insert, and the product itself must be assembled. At this stage of assembly, there is a risk of making a mistake and assembling a structure that will not unfold, therefore, after attaching the seat, it is required to mark the front and back of the structure
Order of transformation

Click on the picture to enlarge
In this folded state, the furniture is carried and comfortably held in the hand.
Who among us does not like to go fishing with family or friends for a picnic, barbecue or just relax in nature.
However, in addition to fishing rods, food, barbecue and tents, you need at least some kind of camping furniture - cooking and sitting on bare ground is inconvenient.
And the main item needed for a picnic outside the city is a folding table.
Now it can be purchased at any travel or fishing store, but why spend money when you can make a folding table yourself. Let's find out how to do it and what is needed for this.
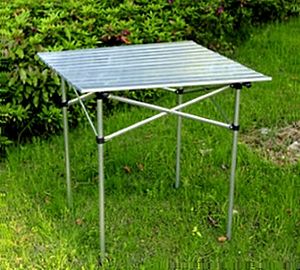
If you do not go into details, then you can distinguish two types of camping tables - a table with folding legs and a table-suitcase.
In the first version, when transporting or carrying, the legs are removed under the countertop. Upon arrival, simply move the legs of the table apart to put it on.
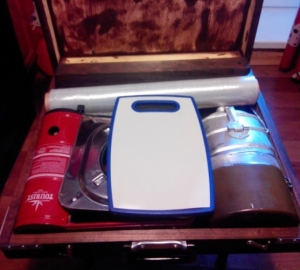
In the second version, the tabletop is like a suitcase or a chessboard - in the stowed position, the legs lie inside it, but in place they must be taken out of the “suitcase”, connected to it and put the table in the right place.
Both types have their advantages. A folding table is easier to make and only takes a few seconds to set up. At the same time, the suitcase table is more convenient to carry, takes up less space, and, in addition, you can put dishes, skewers and other necessary things in it during transportation.
Wood, plastic or metal?
 What is the best material for making your own folding camping table?
If ease of creation is most important to you and you do not have a large set of tools or skills in working with plastic and metals, choose wood.
Timber, boards, chipboard, plywood - all this can be used to create a fairly simple folding table.
But a table made of wood, if you do not protect its surface with varnishes and special coatings, under the influence of dampness, sunlight and temperature changes will warp and lose its attractive appearance.
Both plastic and even metal can be used as a material for legs and countertops. But here you may need those tools that can not be found in every home. In addition, working with such materials is more difficult than with the same tree. But tables made of plastic are not subject to corrosion, and those made of metal are very strong and durable.
 In order to make a collapsible or folding table, you need a set of fairly simple tools that can be found in any home or garage:
- Electric jigsaw (can be replaced with a circular saw or a hacksaw for wood);
- Electric drill for preparing holes for screws;
- Hammer and Phillips screwdriver;
- Roulette, square, ruler, pencil and level.
Attention! Remember that cutting tools such as a circular saw or jigsaw are sources of increased danger! Observe everything necessary measures safety at work.
Folding picnic table
 To make a simple and fairly strong folding table, you need the very minimum of materials and fasteners:
- wooden boards, 20–40 mm thick. For countertops, instead of boards, you can use a sheet of chipboard or plywood, about 10 millimeters thick;
- self-tapping screws, furniture bolts, and for each pair of legs the bolts must be of different lengths, wing nuts for bolts;
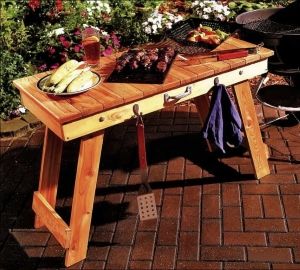
- door handles for carrying the table and hooks.
To begin with, cut out a countertop of the desired size from boards or a chipboard sheet. If the countertop is made up of several boards, assemble them together, lay them down and measure the length and width.


Stages of work
Step 1. Making the frame
Lay the boards for the frame on the countertop, on each side the frame should recede from the edge of the countertop by 2-3 centimeters. Using an electric jigsaw, cut the boards to the desired size, then lay them again on the countertop, check the length and width of the frame according to the drawing. Outline the contours of the frame - use them to make holes in the countertop for the screws.

Important! In order to accurately maintain the dimensions of the paired parts, connect the boards together with clamps and cut them with an electric jigsaw or hacksaw together.
Step 2. Intermediate bars
Cut out the stop bars on which the unfolded table legs will rest, make four holes in them for the screws. To prevent the table legs from colliding with each other when folding, make wooden substrates for the second pair of legs, which will be located between the frame and the stop bars.

Step 3: Assembling the Frame and Tabletop
Assemble the frame elements together, fasten the stop bars and wooden substrates, make four holes for the bolts with an electric drill. Fasten the tabletop and frame with screws. 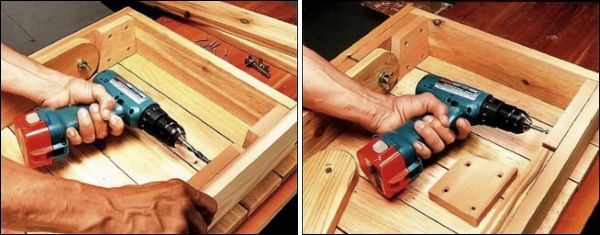
Step 4. Table legs
Draw and cut out the legs of the table with an electric jigsaw. In the upper part, where they are fixed with the frame, the legs should be rounded, while in the lower part there should be a cut at a slight angle (15–20 degrees). Make holes for the bolts.

Step 5 Assemble the table
Connect the first pair of legs with a crossbar and secure to the frame with a bolt and wing nut. Repeat the same with the second pair. Check that the legs do not catch on each other when unfolding and folding the table. If they get stuck, treat the legs at the point of friction with sandpaper.
Folding table is ready. Additionally, you can attach a handle to it for easy carrying and hooks to hang towels or barbecue and barbecue equipment.
Table-suitcase
 To make a travel table-suitcase, you will need large quantity materials and fasteners:
- sheet of plywood or chipboard for the lid. In case of their absence, boards can be used;
- wooden beam for legs and countertop box;
- hinges, door or suitcase handle, two latches;
- furniture bolts and wing nuts;
- self-tapping screws.
Stages of work
Step 1. Take sheets of chipboard, cut out halves of the countertop. Then saw off the frame bars you need along the length, connect them to the halves of the countertop with screws from all sides. Fasten the halves of the tabletop together with the help of loops.

Step 2 Cut off four beams, which will be the legs of our table, make holes for the bolts in them and in the frame, while indenting so that the table legs freely connect to the frame.

Step 3 Connect the legs and frame with furniture bolts and wing nuts.
In my travel kit for a field trip, there was literally everything. The brazier was a gift from my dad, I bought the skewers many years ago, and recently I bought folding chairs. All that was missing was a folding table. The idea to create it myself visited me a long time ago, but all hands did not reach. Once I came across drawings of a suitable table and that's what happened, look further.
And somehow I went into a hardware store, where I saw a small folding table, which I really liked. I photographed it, bought materials for making the same table there, and went home to embody a long-standing idea.
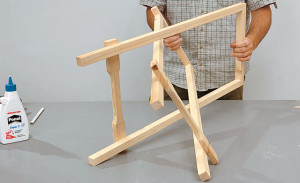
Design. The underframe consists of two H-shaped frames connected by bolts and nuts at a height of approximately 2/3 of the length of the legs. When folding the table, one frame fits into the other. The table top consists of two halves. On the lower side of each of them, two support bars are attached across the dividing line of the halves, which go beyond the borders of the halves of the tabletops towards each other. With their free ends (indented from the edge by about 5 cm), these bars are attached to the upper ends of the table legs. The distance between the bars is chosen so that they do not interfere with each other and the legs when folding the table.
The ends of the inner pair of bars are connected by a round section insert - when the table is folded, it is on top and serves as a handle for transferring it. To make the whole structure movable and easy to unfold, the legs and support bars are fastened with bolts and nuts.

-The tabletop consists of two halves for its manufacture, a piece of plywood 6 mm thick came up.
- "Internal" legs are connected by a jumper. They have grooves for the jumper of the "external" legs.
- The “inner” support bars of the tabletop will be connected by a handle to carry the table.
- "External" legs.
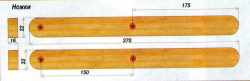
Manufacturing. Some materials for the table did not have to be bought. At home, I found a piece of a handle from a chopper 024 mm and a length of 32 cm for a handle. Also, among the remnants of old crafts, a piece of plywood 60x70 cm thick b mm was found - it went to the manufacture of countertops. I first filed its corners at 45 ° and then rounded it with sandpaper. In the store, I noticed a round countertop. It looks good too, but I still settled on a rectangular tabletop - it has more space, which is important for a small table, and it is easier to manufacture.
I bought bars with a section of 20x40 mm in a store. From them I sawed blanks of supporting bars 46 cm long. From one end, having washed down both corners, I rounded them with a sandpaper, from the other I sawed down and rounded only on one side. With this end, the bar will be attached to the bottom of the countertop, and rounding is useless there. So did with each of the four bars.
So that the bars of the legs and the supporting bars fixed on the halves of the tabletop do not fall on each other when folding, they spread them across the width of the table. The support bars of one of the halves of the tabletop, connected by a handle, occupy the inner part, legs are located outside of them in pairs, and along the edges are the support bars of the second half of the tabletop. Since the cutting length of the cutting was determined, I began work with a half of the table top, on which the support bars occupy a middle position.
In two blanks, with a Forstner drill, he drilled blind holes for the handle, inserted it and, without fastening it, laid it out on the floor on one part of the countertop.


- Legs in the folded position freely enter each other, and the transverse bars do not interfere with this.
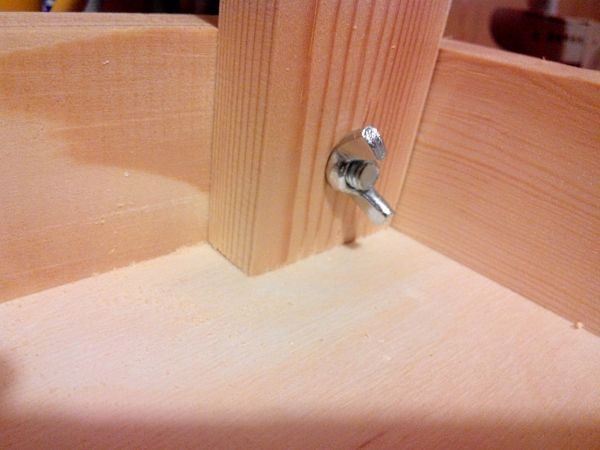
-The legs are screwed with bolts and nuts that act as axles.
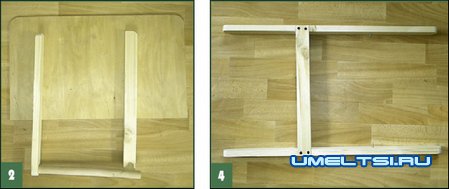
Then I moved on to making table legs. They are conditionally designated as "external" and "internal". Started with "internal". I sawed off blanks from the same bar with a section of 20x40 mm, 720 mm long, rounded them at both ends. After that, at a distance of 160 mm from the lower edge of the legs on the outer edge, I chose a groove for the transverse bar and the same grooves - on the inner edge, but 50 mm higher than the first (at a distance of 210 mm from the bottom edge) - they will include a transverse bar " outside" legs when folding the table.
After that, he laid the blanks on the floor from the outer sides of the supporting bars already laid out there, measured the length of the transverse bar and, having cut it out, attached it to the legs with screws. To prevent the bar from cracking during screwing, I pre-drilled holes for self-tapping screws.
To the resulting H-shaped assembly of the “inner” legs, I attached two blanks for the “outer” legs from the sides and marked the grooves for the transverse bar on them. Having selected the grooves and prepared the crossbar, I fastened the frame with self-tapping screws.

- When folded, the upper ends of the support bars protrude above the legs by approximately 30 mm.
Then, at a distance of 500 mm from the bottom edge of the legs, I drilled through holes. I fastened the legs in pairs with bolts, drowning both the heads of the bolts and the nuts in through axial holes drilled to a shallow depth. And in the upper parts of both pairs of legs, I outlined and drilled holes for attaching the support bars of the halves of the tabletop.

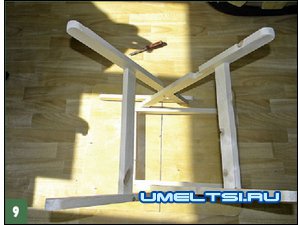
- The basement is ready. The location of its elements relative to each other is clearly visible.
-To determine the attachment points of the tabletop to the support bars, I installed the inverted underframe on the inverted tabletop and made the appropriate marks.
To accurately determine the position of the mounting holes in the support bars, I folded the legs, laid them on the floor and put the “internal” support bars into them so that their lower ends did not reach the nearest transverse bar by 3-5 mm. This is necessary so that the structure is then freely laid out. In this case, the upper end protrudes above the legs by approximately 30 mm. Based on the holes in the upper parts of the legs, I marked the position of the holes in the support bars, drilled them and fastened the legs and support bars with bolts, drowning their heads and nuts. Strongly did not tighten - everything should move freely.
It remained to determine the location of the "external" support bars for the second half of the countertop. I installed them flush with the "internal" bars. By analogy, I mounted them.
- The table is sanded and ready for painting.
Now it was necessary to screw the parts of the tabletop to the corresponding support bars. To do this, having folded both parts of it on the floor, he turned the assembled underframe over and installed it on a composite tabletop. Then he made marks on it in place. It remains only to attach the parts of the countertop to the support bars with screws.
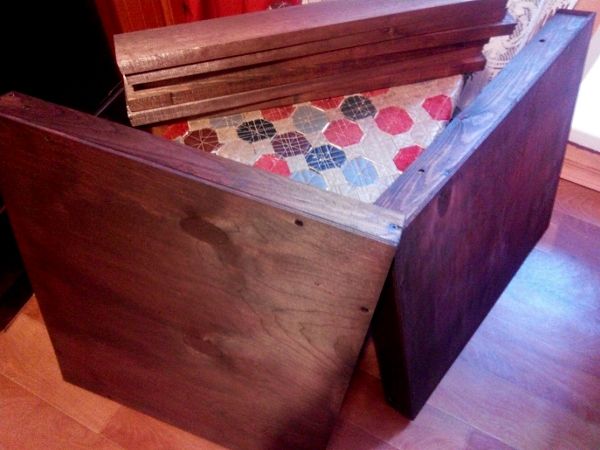
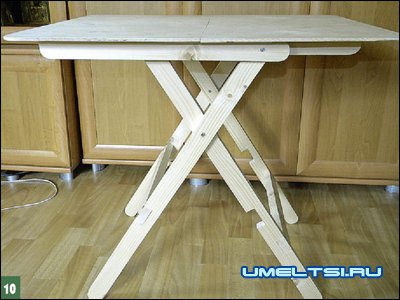
In the end, everything was thoroughly processed with a grinder and varnished in two layers. The table turned out to be compact, convenient and not very expensive.
A folding table can have a variety of designs, and the choice is not limited to the material, the shape of the table top and the way the legs are attached. In addition, there are different types of assembly options for the assembly method.
The table can have large or compact dimensions, while all parameters are determined by its intended purpose. However, the simpler the design of the folding table, the easier it is to make it yourself.
Options overview
They use a table of a similar structure, as a rule, in a room of small footage, in nature, in a summer house, in facilities under construction. But this is not all areas of application, since if desired and in the event of such a need, a folding table can be taken with you anywhere on the road. This, perhaps, is the main advantage of a piece of furniture of this type.
Other pluses:
- compact dimensions, even if the table takes up a lot of space when unfolded, after assembly, you can fit this design in any secluded corner so that it does not interfere with movement around the room;
- unusual design, since in design such pieces of furniture differ significantly from standard counterparts;
- light weight, which facilitates transportation;
- folding tables are usually pretty easy to make yourself.
There are many versions of such structures. The main and most popular versions:
- Tabletops of excellent shape: square, round, rectangular, oval.
- By material: metal, wood, combined.
- The table can also vary in the way it folds. So, one of the options is with cruciform legs, as a result, the dimensions of the folded structure change, but the table itself cannot be disassembled. Another view - completely collapsible to get ready product threaded fasteners are used.
There are other versions that are more convenient to transport (table-suitcase), however, they are much more difficult to do with your own hands.
Charting
First you need to evaluate your own capabilities. In the absence of much experience, it is recommended to choose the following design:
We will make the simplest version of a folding table
Depending on the dimensions, this folding piece of furniture can serve as dining table, it is also used in hiking, fishing, etc.
 For the countertop we use glued solid pine
 So, you need to decide for what purposes such a table is being prepared. As a result, a scheme with arbitrary dimensions will have next view:
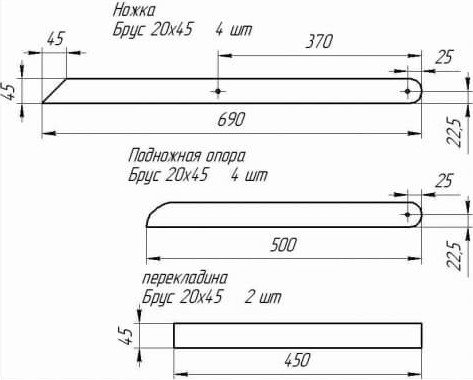 Diagram of legs and crossbars
 The specified dimensions can be changed at will. But this should be done in accordance with the level of load exerted on the structure, and as proportionally as possible.
Tool, material for work
Improvised means are selected based on what material will be taken as the basis: wood, chipboard, aluminum. IN living conditions it is easier to make a table out of wood with your own hands. And it is better if the countertop is made of chipboard.
Set of tools:
- jigsaw;
- building level;
- paint brushes;
- roulette;
- screwdriver;
- sandpaper or grinder.
The last of the tools is best used only if you have experience. And the use of sandpaper will significantly slow down the manufacturing process. As for materials, it all depends on the dimensions of the structure.
For example, in accordance with the above sketch, bars of 20x45 mm will be needed. If the folding table is planned to be made larger, you need to use 30x50 mm. The length of purchased bars can be different: 1.2 m; 5 m
All the same, they will have to be cut with your own hands in accordance with the dimensions according to the sketch. The board for the countertop is taken in the desired thickness. For a large structure, an option up to 40 mm thick is suitable.
Assembly
 First cut out required amount bars with a small margin in size.
 Hole diameters should be slightly more sizes fasteners, for example, for self-tapping screws / M4 bolts, holes with a diameter of 5 mm are prepared. All parts after cutting are processed with sandpaper / grinder. Next, you need to open them with a protective compound, for example, wood varnish.
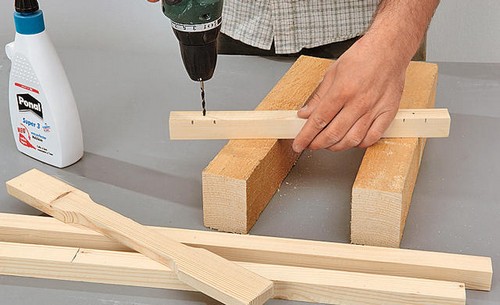
 We connect the support legs together and drill a hole for fasteners
 First of all, you need to fix the foot supports with your own hands, there are 4 of them, and they are located perpendicular to the “goats” (folding legs with crossbars at the bottom). This is done using self-tapping screws (3 pieces per support).
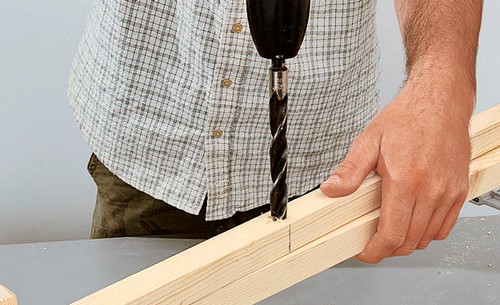
 They are attached to each other with a bolt.
 The location of these elements is determined by the length of the crossbars that will connect the legs. And the distance between adjacent elements should be equal to the width of the bar from which the "goats" are made
First, they knock down the crossbar and 2 legs, you need to prepare two such structures, and one of them should be 40 mm longer (a value equal to the total width of the two legs). It remains only to connect these structures; for this, bolts of sufficient length are used, which are installed in the central through holes of the bars.
 If you do not understand some of the operations - look at the photo. It gives an idea of the general design
 It is not necessary to tighten the bolts to ensure free rotation of the axle. "Goats" are attached to the table top by means of a bolted connection with pre-fixed foot supports. To prevent the axial fastening of the legs from becoming loose from regular folding, lock nuts are used in two sections of the cruciform connection.
To make it even more compact when folded, the footrest bolts and the trestle can be removed. It is enough to remove two bolts. For this reason, it is not necessary to overtighten the fasteners in these areas.
The only thing that requires a strong attachment is the foot supports, as these elements provide a secure installation of the legs. If you make the tabletop not from wood, but from a lighter material, such as chipboard, the finished table will have less weight, which will facilitate its transportation.


