Winter crafts from salt dough exclusive. Master class on making Christmas decorations from salt dough "New Year's toys
Salt dough is a popular and affordable material for children's creativity and DIY crafts. Just like plasticine, you can sculpt products of any level of complexity from salt dough, so children of any age can make crafts from salt dough. The recipe for making salt dough for modeling is very simple, the ingredients for it can be found in every home.
Salt dough recipe. How to make salt dough
You will need:
Flour - 2 cups
- salt - 1 cup
- water - 250 gr.
Wheat flour is needed, the most common, without baking powder, dyes and other additives. Salt - "Extra". Water - ordinary cold.
How to make salt dough: mix flour and salt, add water, knead the dough. The degree of readiness of salt dough can only be determined by hand. If the dough crumbles, add water. If, on the contrary, it stretches too well and sticks to your hands, then there is a lot of water, and you need to add a little flour. Roll up the ball, make a few indentations in it with your finger. If the dough does not spread and holds its shape, then it is ready. In the process of kneading, it is recommended to add vegetable oil. Now the dough will not stick to your hands, dry out quickly and become covered with a crust during work. However, it should be remembered that the best is the enemy of the good! If there is a lot of oil, the dough will get dirty, and the final drying may take a very long time. For our recipe, a couple of tablespoons is enough.
Well, the dough is ready, now you can proceed directly to the process of sculpting from salt dough.
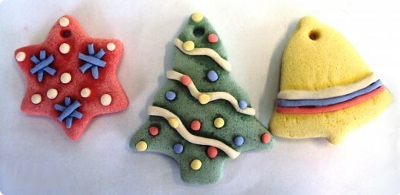
Salt dough Christmas crafts. Salt dough Christmas decorations
In this article, we will tell you about how to make Christmas crafts and Christmas decorations from salt dough. We tried to pick up such crafts from salt dough, which, on the one hand, are easy to manufacture, and on the other hand, the end result is beautiful.
Salty dough. Salt dough crafts
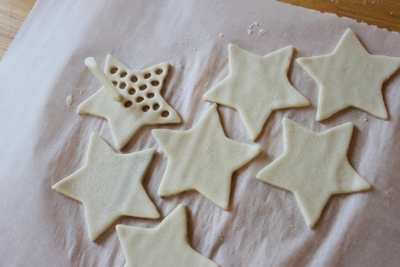
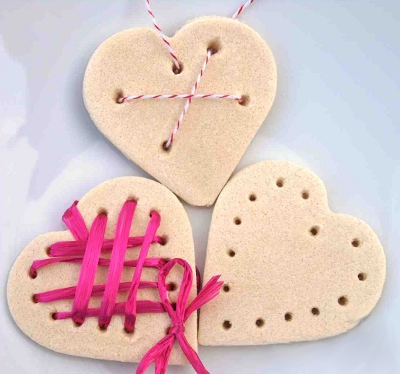
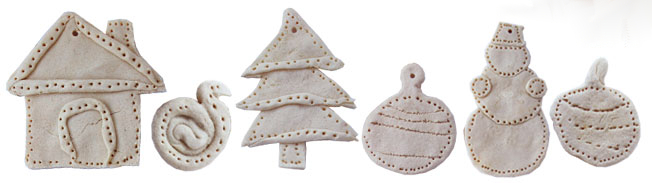
For making Christmas decorations from salt dough, you will need figured cookie cutters. With their help, even a kid can cut out figures from a rolled out layer of dough.
The resulting figures from salt dough can be left as is, but it is even better to decorate them. For example, like this.

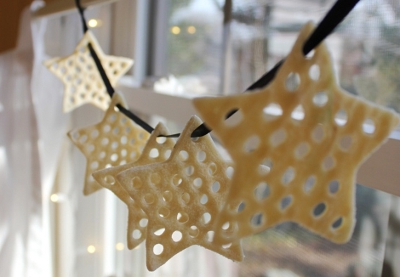
You can use a cocktail tube to make many holes in the dough and then you will get lace figures.
Or decorate crafts from salt dough with beads. Just keep in mind that if you use plastic beads, etc., then you will not be able to dry finished salt dough products in the oven, otherwise the beads may melt.


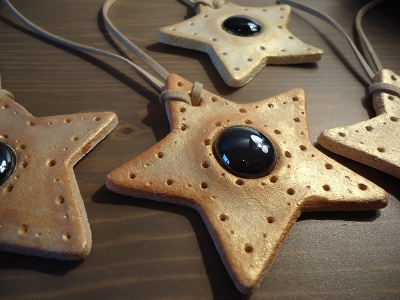
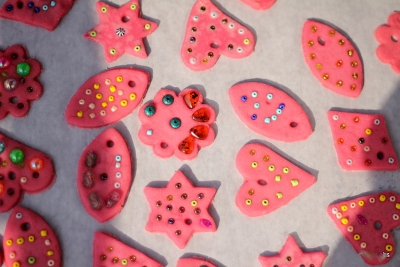
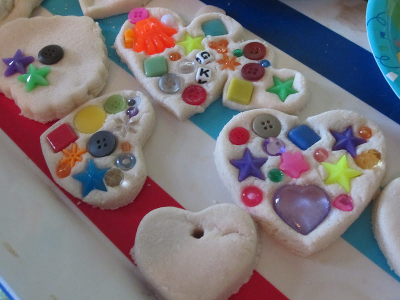
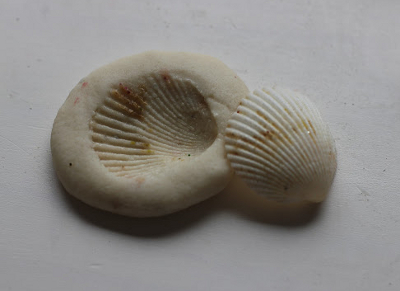
Instead of beads, you can use different cereals, shells, buttons, and even broken dishes to decorate New Year's crafts from salt dough.

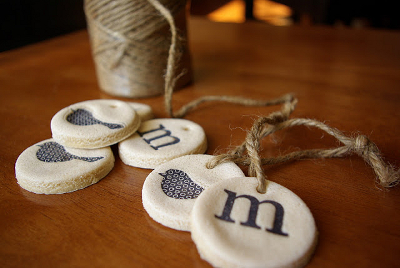
You can give a festive look to Christmas decorations made from salt dough with the help of beautiful ribbons and threads.
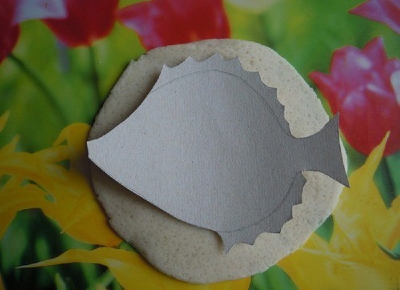
Note: if you do not have a suitable mold, then you can cut out a stencil from cardboard and cut salt dough for crafts on it.
Salt dough molding. Salt dough photo
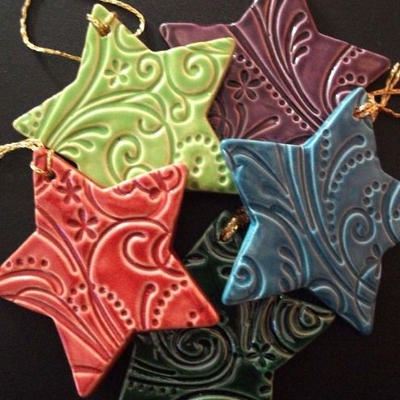
Ready-made, already dried salt dough products can be decorated with sparkles by applying them to a layer of glue.


Salt dough crafts. Salt dough master class
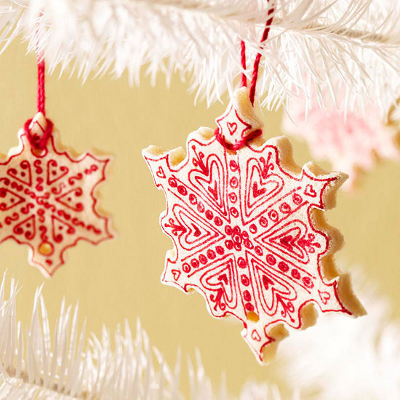
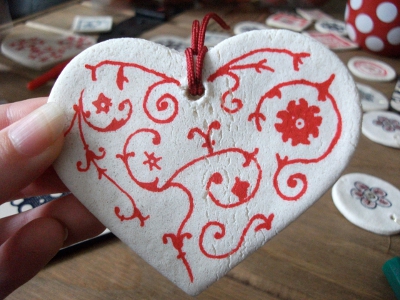
Christmas decorations made of salt dough, painted with colored permanent markers, look beautiful.

Salt dough products. Salt dough molding
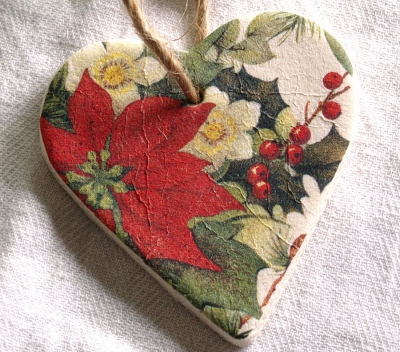
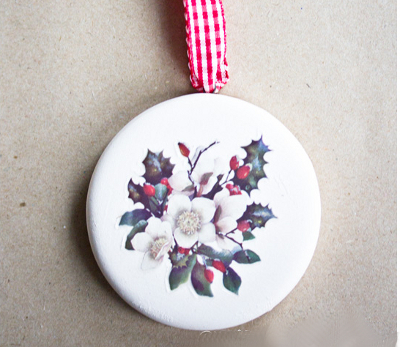
You can decorate New Year's crafts from salt dough using the decoupage technique by pasting them with beautiful pictures or decals. For decoupage, you can use pictures cut from New Year's napkins. For New Year's decoupage, ordinary PVA glue, diluted with water in a ratio of 1: 1, is suitable. Cut out pictures or a pattern from New Year's napkins, peel off the top layer and stick it on the finished salt dough craft. Apply another layer of glue on top.
Salt dough figurines. Salt dough crafts
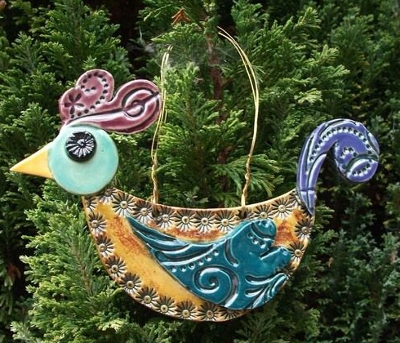
Here are some more examples of decorating figures from salt dough.


Christmas decorations from salt dough. Salt dough molding
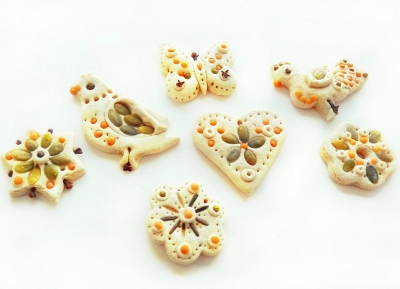
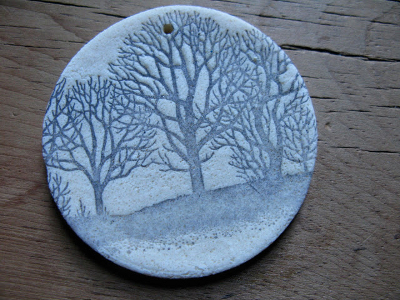
A simple and original way to decorate salt dough products is to make prints on them. Prints can be made with all kinds of objects with an interesting texture that you can find at home.

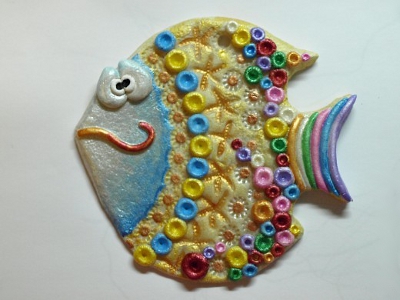
The "Fish" salt dough craft in the photo below was made using various textured items that the author of the craft found at home. For a detailed master class on making this original salt dough craft, see the link
For making Christmas decorations with your own hands from salt dough, natural material is also suitable: twigs, shells, leaves with thick veins.

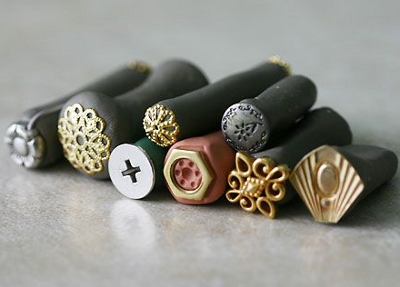
When making New Year's crafts from salt dough with your children, you can use purchased stamps for children's creativity. The ink is suitable for both black and color.

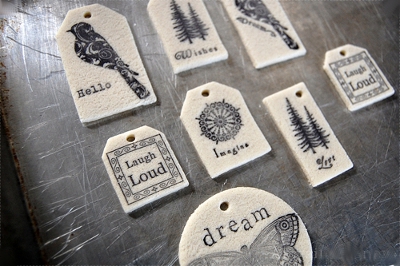
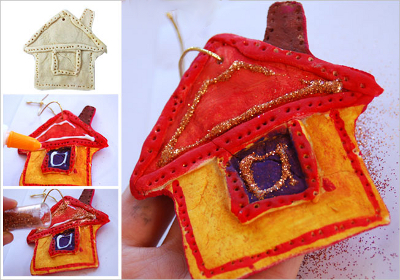
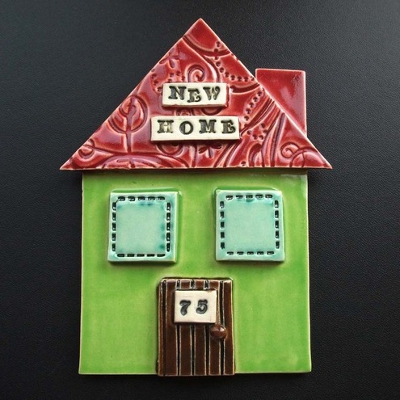
Do-it-yourself Christmas decorations stars, a house and a cockerel in the photo below are also made from salt dough using patterned dies. By the way, you can make stamps for children's creativity yourself. Read about how to make stamps with your own hands on our website in a special article.
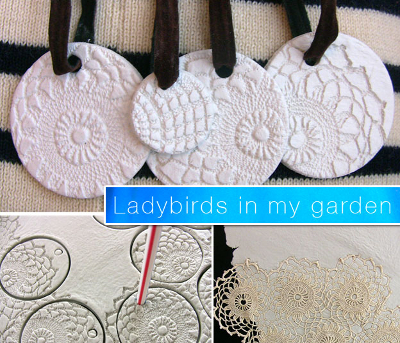
An interesting way to make Christmas decorations from salt dough is offered by Ladybirds in my garden. With the help of textile or paper lace, openwork prints are created on salt dough, from which figures are then cut out using curly molds or a simple glass.
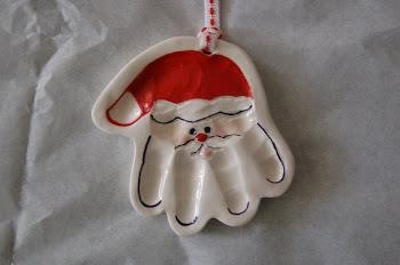
Christmas decorations made of salt dough with prints of children's hands or feet look touching. On the back of the salt dough craft, write the date the imprint was made.
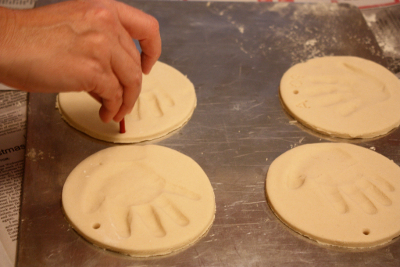
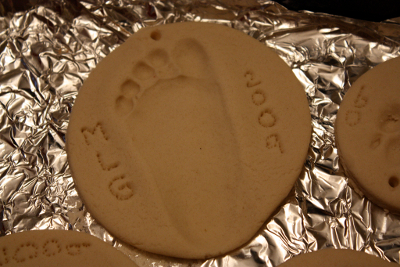
From fingerprints and palm prints on salt dough, you can make such memorable Christmas decorations with your own hands: a Christmas tree and Santa Claus.
Salt dough crafts. Salt dough figurines
Finishing our review article on the topic "New Year's crafts from salt dough", here are some more interesting New Year's crafts that can be made from both salt dough and plasticine.
1. New Year's mosaic of beads and glass beads
To make this original Christmas decoration, you will need:
Plasticine or salt dough
- plastic lids
- beads, beads
- gold paint (optional)

Paint the caps with gold paint, then fill them with plasticine or salt dough, lay out a mosaic of beads and glass beads on top. Making such New Year's crafts is possible even for kids.
2. DIY craft for the New Year "New Year's candles"
To make this Christmas craft, you will need:
Salt dough or plasticine
- cardboard base from a toilet paper roll
- corrugated paper in red, yellow and orange colors

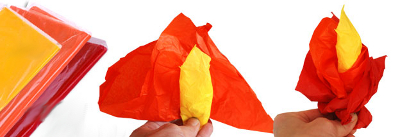

Make rings from plasticine or salt dough of different colors, then put them on a cardboard roll. Make a flame out of corrugated paper, insert it inside the candle.
3. Christmas crafts for children "Herringbone"
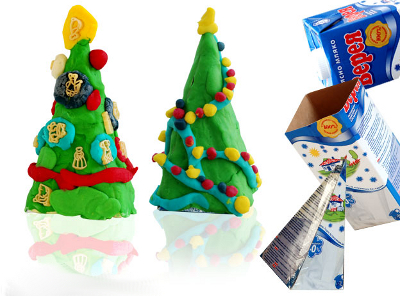
You can make a pretty Christmas tree out of a cardboard package for milk, kefir or juice and plasticine (salt dough). See the photo below for a master class on making this craft from salt dough.


See also articles on our website:
4. New Year's compositions from plasticine
An interesting master class on creating New Year's compositions from plasticine by cutting is posted on the Country of Masters website. Look at the Christmas tree below. It is assembled from separate branches, cut from one plasticine blank, and then decorated with plasticine Christmas toys made using the same technique.

Images of burning candles will help decorate the New Year's composition. The Country of Masters will teach you how to make original twisted plasticine candles. This composition is complemented by a chrysanthemum flower and a small plasticine snag.

For everyone who is interested in plasticine crafts for the New Year, we also recommend the book by Roni Oren "Secrets of Plasticine. New Year".

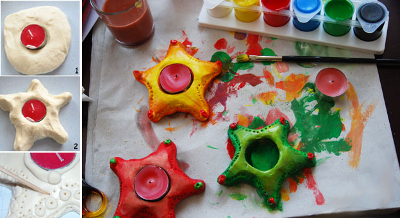
5. Salt Dough Candlesticks

6. New Year's salt dough mosaic
My kids love to watch Fixies. And after watching a series about Claudel Models, they came to the kitchen with a question:
- Mom, can we make plasticine? To do this, you need only one glass of flour, half a glass of salt and half a glass of water. That's what they said on the fixes.
I could not refuse such a creative work, and the process went at full speed. It was before the New Year, so the theme of the toys is New Year's.
Christmas, New Year's toys from salt dough - children's master class:
 1. First of all, the children kneaded the dough on their own. Mixing all the ingredients in a bowl. The proportions were taken exactly as the Fixies said:
- 1 cup flour
- 0.5 cup salt
- 0.5 cups of water
 2. Then they rolled out the dough into a cake.
 3. While the children were rolling out the dough, I prepared a Christmas tree-shaped paper stencil for them. This stencil they very diligently circled and cut out with the help of stacks.
 4. In the process of making Christmas decorations from salt dough, I remembered cookie cutters. The children really liked this idea, and they quickly made different figures from the dough: bells, Christmas trees, cones, stars, etc.
It is easy to work with molds and the result is always pleasing, so in this version this activity is suitable even for children from 3-4 years old.
 5. We also tried to make colored salt dough by adding watercolor paint to it. To do this, simply dripped a little water into the paint, stirred it with a brush and poured the colored water into the dough. This was also mentioned in the cartoon.
 6. All the figurines were left to dry near the battery for the night.
 7. And in the morning, the children did not have time to wake up completely, they were already rushing to their New Year's toys from the dough to decorate them. Painted with simple watercolors. Also in my bins, I found some rhinestones - they are great decorated Christmas decorations.
To make the paint dry faster, the eldest son turned on the fan and sent a stream of air to the painted toys. Painted on both sides.
 8. When the paint was dry, the children were happy to decorate the Christmas tree with their New Year's toys from salt dough.

 9. It turned out very nice. And the manufacturing process was pleasant and joyful. This year, our Christmas tree is beautiful in a special way, because almost all the toys on it are made by hand.
And I wish you pleasant creativity with your children.
Subtleties in the manufacture of Christmas tree decorations from salt dough:
1. It is better to take salt for the dough with fine grinding so that there are no salty grains on the finished figures.
2. Sculpt with children Christmas decorations from salt dough, it is better on a large table, where there will be nothing superfluous. After the figurine, it is better to immediately put it on a large flat dish or a piece of thick cardboard, so that it is easier to transfer to a drying place. For example, on the window or next to the battery. If you will dry in the oven, then the figures must be immediately folded onto the enemy, covered with foil.
3. New Year's toys from the dough can be solid, or from several components. The parts stick together well if they are lightly moistened with a wet brush.
4. To make holes in toys, you can use the desired diameter of pasta, pen caps, cocktail tubes and any other materials at hand.
5. You can paint salt dough with food coloring, gouache, watercolor, acrylic, glitters (shiny paints).
7. You can dry salted Christmas toys:
- just at room temperature (but this may take 2-4 days).
— near the battery (1 night for flat figures)
- in the oven at 50 gr. (few hours)
Christmas decorations can be made not only from dough, but also, etc.
Do you know that the New Year is just around the corner? It seems today that autumn is still on the calendar, and you will have time for everything, and tomorrow - bang-bang! - and winter came, and time was running out. Yes, yes, it's time to hurry if you want to decorate the Christmas tree this year salt dough Christmas toys! This is a completely affordable project that is 100% matched to the contents of the family pocket and completely matches your needlework skills. Well, seriously - all the necessary materials can be found at home (and if not, then most likely we will talk about paints, but you can buy them at the nearest stall, and if a package of gouache or a couple of tubes of acrylic is not included in your financial plans right now, you can generally refuse from painting toys and making them in such an underlined eco-style), and even a child can roll out the dough and cut circles out of it with a glass (yeah, don’t want circles? It means that your needlework skills have stepped a little further than the level of a novice Pithecanthropus, and you are quite you will be able to create New Year's miracles of the advanced level).
In general, less words, more action: - the most complete step-by-step guide with photo evidence, go under the cut and carefully study. Join also New Year's marathon "Handmade Runet" VKontakte and show your finished toys in joint theme. Waiting for you!

Step 1 - Dough
There is nothing complicated, the main rule is intuition. And even if the word "about" does not scare you, everything will work out.
Let's start with the fact that the recipes on the Web are wagons and carts loaded "with a slide." And all the very best, of course, are the best, proven, accurate and generally practically guaranteeing that New Year's toys from salt dough will be made by themselves, dry and jump on the Christmas tree. We urge you to believe everyone, but do it your own way - listening to intuition. We tell and show in pictures.
Need to:
1/2 cup fine salt "Extra";
1/2 glass of water;
1 st. l. vegetable oil;
about 2.5 cups flour.

We measure the salt. Many sources write that this should be the most common small "Extra" and not necessarily iodized-fluorinated. Uh huh, there is. But the author of the master class does not have non-iodized salt at home and, as you yourself understand, her common sense does not allow her to leave the house in the nasty frost and vile slush to find non-iodized salt in the thirty-eighth supermarket. Believe me, with the one that is at hand, for some reason it also works.
Yes, for those who hate such a measure of volume as half a glass, we clarify: they weighed it, it turned out that salt was exactly 170 g.

If you don't have a food processor, you're out of luck - you'll have to play with your hands. Pour salt into the bowl in which you usually knead the dough for dumplings. If you are a turmeric with a combine, pour into the bowl of the combine.

We measure water. Yes, half a glass. Happened 130 g water.

Bulk - to her salt, let them be friends.

Vegetable oil - in the same company. By the way, you can get by - if you are a greedy person and do not want to transfer precious olive oil to some New Year's toys there, and you never had cheap industrial palm and rapeseed at home, do not add at all. Butter is needed so that the dough is a little more elastic than it would be without butter, that's all. By the way, if you suddenly feel the urge to show miracles of unprecedented generosity and pour half a glass of butter into the dough at once (and why waste time on trifles, we measure everything with glasses here!), We warn you: such a dough will dry until the next New Year. So you better be greedy. Or remember about the golden mean and add a spoonful, just one tablespoon of oil.

Now it's time to turn on your intuition. We add flour. We immediately measure the glass (the scales said that it happened 160 g flour).

And into its water, right into the salt water.

We mix - it turns out thick, thick sour cream. You can't make anything out of it! The photo is a little unclear, but the meaning is 100% clear - there is not enough flour, you don’t have to be a professor of salt-toy affairs to understand this.

Therefore - boldly pour another spoonful of flour, full-full ( plus 20 g flour).

We mix. Nothing, it looks like something.

But in fact, it’s not enough: the dough sticks to your hands and with all its appearance speaks of personal unwillingness to turn into Christmas tree decorations.

Adding another spoon plus 20 g flour).

Oh, this is already beautiful - the dough has gathered into a ball, nothing sticks to the walls.

We check - in the hands, too, everything is in perfect order.

Well, almost completely - nevertheless, some tiny particles still stick to your hands, so you can play it safe and add another teaspoon of the dry component (plus 5 g of flour). Exceptionally intuitive.

By the way, the longer you knead, the better the flour gluten will develop and the easier it will be to work with the dough - so let the combine work hard, it won’t be superfluous.

We check with our fingers - nothing sticks at all, the recesses in the dough do not blur, the pits "keep" their shape. It’s worth stopping at this - an excess of flour will negatively affect the products, they will crumble, such a dough is very, very nasty and difficult to work with.

Last test just in case - everything is fine.

Next - a corporate secret: take a lump of dough and throw it on the table with force. Gather up again and throw again. Once again. And so - until you get bored, but at least 10-15 times - this way you will make it homogeneous, more elastic, pleasant and smooth.

Everything, you can wrap it in a bag so that the dough does not wind up while you prepare for the second stage.
By the way, many sources say that the dough should be aged, they suggest wrapping it in three rolls of cling film and hiding it in the refrigerator for at least a day, or better, almost a month. Bullshit! No, of course, nothing bad will happen if you have a week in reserve and let the dough rest, but if you feel like working with it right now, if you can’t refuse your inspiration, then don’t - let’s do it right away !
Step 2 - cutting out the figures
This is perhaps the most interesting stage of the work - creative, creative, "clean" and simple.
There are three ways to go.
The first is not to cut out figures from salt dough, but to sculpt - remembering school labor lessons or Roni Oren's books, puff and try. In general, this is a very worthwhile and curious option, but on one condition: if the level of your skills is such that when you are going to sculpt an elephant, you at least get a cat, and not, waving a crooked hatchet, claim that this is actually a sled Santa Claus, then, of course, you can try.
The second is to print from the Internet or draw the templates of flat New Year's toys (Christmas balls, Santa Claus's bag, bells, icicle stars), and then, following the call of love for art, apply the templates to the dough, carefully and almost jewelryly cut them with with a knife, making sure to be especially careful when cornering: one awkward movement -
The third is not to reinvent the wheel and not to discover America, but simply to take cookie cutters and cutters for working with mastic and, resorting to their help, cut out something simple, accessible and thematic. With a special passion for creativity, you should reassure yourself with the hope for the full realization of needs at the stage of coloring and painting.

So, put a small piece of dough (we hide the rest in a bag, do not relax) on a lightly floured surface.

We roll it out as you like, the main thing is evenly, while remembering that the thicker the toy is, the longer it will take to dry. The optimal size is 3 mm: it will not break, but it will still dry quickly.


Of course, not themselves: the use of child labor at this stage is welcomed and strongly encouraged. Mom needs coffee sometime!

With a properly organized labor process, everything will be done quickly and efficiently.

Do not forget to immediately make holes for future threads that will help you hang toys from the Christmas tree.

Or a lot of holes - for reliability: so that there is exactly something to cling to.

Please note that some cookie cutters are left on the cut "lohmushki" - if they are thin and small, you do not need to remove them, they will fall off during the drying process, and if they are more nourished, then it is better to spend another five minutes and carefully cut everything off.

The output of products from the specified proportions.
Step 3 - drying
And this is where you have to slow down. If you want to cope with the task of making New Year's toys from salt dough in one day, you need to dry the products in the oven at the lowest temperature. Depending on the thickness of the toys, you will need 3-7 hours - put everything on a baking sheet, turn on the oven at 50-70 degrees, do not forget about the fan and wait, periodically opening the door to "release" moisture and occasionally turning the figures from side to side.

You can go the simpler way - lay out the toys on a sheet of parchment paper and leave them alone for a few days. Depending on the air temperature in the room, you will need 3-5 days for the salt dough figures to dry completely. Once a day they need to be turned over to the other side - you will see how the color of the toy will change during the drying process: the wet spot in the middle will be yellower than the white dried edges.

Do not try to speed up the drying process of toys - they will either burn out (yes, this is possible!), Or they will be severely deformed. Be patient, go for a walk, shake your abs, cook homemade marshmallows - in general, anything, just so as not to rush things.
Well-dried products are uniform in color, do not wrinkle or bend, light and pleasant.
Step 4 - painting and decorating

Need to tell something? Take acrylic, gouache or even watercolor, contours and varnishes, multi-colored rhinestones and beads, brushes and sticks, toothpicks and cotton pads, forks and felt-tip pens, pencils and needles - everything that one way or another can be adapted for drawing.

And draw. Paint. Create. Decorate. Be creative. Create. Fountain. Create. All in your hands.

Painted toys are convenient to immediately hang on all protruding parts of the house - for drying.

And finally decorate - after the first layer of paint has dried.

A very wonderful tool - spray paint: quick and easy. Lays down evenly, dries instantly, labor costs are minimal.

Children's creativity - it is so ... childish and beautiful!

Salt dough figurines can be used as Christmas decorations, as decor for self-wrapped gifts, and as figurines for other projects, such as advent calendars.

Salt dough Christmas tree. Step by step instructions with photo
Modeling from salt dough for schoolchildren.
Master class "Herringbone"
This work is intended for teachers and parents, as well as for school-age children.
Target: learn to sculpt a Christmas tree from salt dough.
Tasks:
- teach how to knead and color the dough;
- teach how to make needles by cutting salt dough with scissors;
- develop motor skills of the hand,
- develop creative abilities.
Required material:
- 1 cup flour
- 0.5 cups of fine salt,
- 0.5 cups of water,
- container and spoon,
- gouache
- beads, beads, sequins,
- stapler,
- cardboard.

Lesson progress:
Guess the riddle:Needles grow on it
Thick and prickly
And resinous cones,
Sticky, fragrant.
She's on New Year's Eve
Will come to visit us!
Slim, fluffy
With golden lights
Today we will sculpt a Christmas tree from salt dough and decorate it with decorations. There is a very beautiful song from the cartoon "New Year's Tale" Poems: I. Shaferan
Christmas tree, Christmas tree - forest aroma
Christmas tree, Christmas tree -
Forest fragrance.
She really needs
Nice outfit.
Let this Christmas tree
At the holiday hour
With every needle
Pleases us
Pleases us.
Stages of work
1. Take half a glass of water and pour it into a container. Pour half a glass of fine salt and mix well. Gradually add flour to the consistency of batter.


2. Add green gouache and mix to make a green batter.

3. Gradually add the remaining flour and mix.

4. We dump the resulting mass on the table and knead the dough with our hands. The dough should be plastic, should not stick and crumble in the hands. If the dough sticks, then add a little flour, if the dough crumbles, then add a little water.


5. Cut out a semicircle from cardboard. From the resulting dough, roll out the layer and cut out a semicircle from the dough using a template.


6. Fold the template into a cone with a stapler.

7. Gently wrap the cone in a semicircle of salt dough and glue the seam with water, moistening it a little with a brush. Gently smooth the seam with your finger.


8. We take scissors with sharp ends and begin to cut the needles in rows. It is better not to raise the Christmas tree so that the dough does not slip, and keep the scissors at an angle of 30 degrees. You need to cut the needle from the top row.


9. Knead the dough for decorations and paint it with gouache in different colors. Proportions: 0.5 cups of water; 0.5 cups of salt and a glass of flour.

10. We sculpt a star from red dough and glue it with water.

11. There are many ways to decorate a Christmas tree. The first way: we sculpt a lot of multi-colored balls, toys from colored dough and glue them on the Christmas tree with the help of water.


12. The second way: we decorate the Christmas tree with beads, beads, sequins, which we simply gently press into the dough. They hold well without glue, but if the beads fall off after drying, then you can glue them with varnish or glue.

13. When the Christmas tree is dry, you can varnish or gloss for children's creativity. Christmas tree is ready!

14. Works of my students!


Many people do it - and every time New Year's crafts with their own hands turn out to be original, in their own style, even if they are made according to the instructions. We invite you to make Christmas decorations from salt dough with your children. You can pack them beautifully - and you will get a gift for the New Year with your own hands. The problem of Christmas gifts for grandparents and family friends will be solved!
To make Christmas toys from salt dough, we need:
- salt dough (100 g flour, 100 g salt, 125 ml water)
- cookie cutters
- rolling pin
- lace doily
- ribbons
- gouache
- brush
- sponge
- souvenir bags

Making toys from salt dough:
- Knead the salt dough. We roll out the layer with a thickness of 3-5 mm. We put a lace napkin on top and roll it with a rolling pin two or three times (we are not afraid to press). We've got a very interesting terrain.

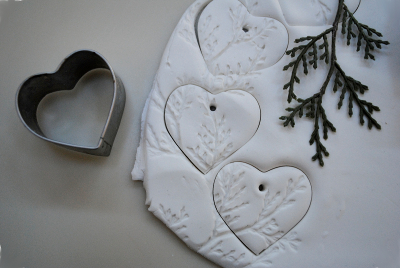
- We squeeze stars, hearts, houses, Christmas trees with molds. Do not forget to make holes - then we will insert ribbons into them.

- The first stage is over! We dry our New Year's souvenirs in the oven (convection mode, 60 degrees, 3 hours). Let it cool down properly.

- Now the fun part! We take a brush and gouache and paint. We cover the edges with dark paint - so our souvenirs will look neater (you can skip this step).

- We walk with a slightly damp sponge dipped in paint over ready-made souvenirs. So the drawing will be more noticeable. Let's dry. We cover with varnish, wait for it to dry, and then insert the ribbons.

- Now let's get to the fun part - gift wrapping. We pack three or four souvenirs in each bag, and the gifts are ready!


