Cake “Fairytale House. Recipe for a mastic cake with photo How to assemble a house from mastic
Irina Kamshilina
Cooking for someone is much more pleasant than cooking for yourself))
The most delicious delicacy is the one you prepare yourself. Creating a sweet culinary masterpiece that will captivate everyone is much more interesting than buying it. You can decorate cakes like you would in a pastry shop if you know how to make cake mastic with your own hands.
What is cake mastic
This product is a plastic confectionery mass based on powdered sugar combined with various ingredients that change its color, smell, taste and consistency. After hardening it becomes very dense. Due to this property, it is used not only for covering cakes, but also for creating three-dimensional figures. Making mastic cakes with your own hands is much easier than it might be perceived from the outside, and visually the final result is comparable to a custom-made product.
How to make mastic at home
The easiest way is to purchase a ready-made powder mixture and dilute it, but it is much more interesting to experiment with the composition yourself. Ideally, first attend an open master class from a professional telling you how to make a mastic cake with your own hands. The recipe for the confectionery mass is selected depending on the purpose of its use. With any of the combinations, after long kneading, you should get an elastic lump, similar to plasticine. To change the color, you can add a little berry juice or diluted cocoa powder.
What is cake mastic made from? The best options:
- To sculpt figures or cover: melt 300 g of marshmallows, mix with half a glass of powdered sugar (pre-sift).
- Cover the cake: melt a chocolate bar and 100 g of marshmallows, mix with 120 g of powdered sugar.
- For small soft figures: pour a spoonful of gelatin with 3 tablespoons of cool water. After a quarter of an hour, warm up and add powdered sugar (130 g).

How to make a mastic cake with your own hands
Professionals assure you that you can bake cakes from any dough you like. Delicate sponge or honey, thin shortbread or even an airy soufflé: a DIY mastic cake is equally delicious with any base. Below are 4 of the most convenient, according to experts, recipes. They are easy to master on your own, so your first experience with mastic will not have negative associations in the future.
Biscuit
Professionals call this recipe basic and use it with any layers and decoration. If you master it, you can start making custom biscuits and even teach it to others. The only caveat is that you definitely need cream for the cake. The list of ingredients is short:
- powdered sugar - glass;
- eggs 1 cat. – 8 pcs.;
- wheat flour – 240 g;
- butter – 75 g.
A simple sponge cake for a cake is created step by step like this:
- Remove the eggs and butter in advance to warm up.
- Using a mixer, beat the eggs with powdered sugar, without separating the whites from the yolks. Work at high speed, otherwise there will be no strong foam.
- When the mass turns white and increases in volume, add the twice-sifted flour in portions and mix the dough thoroughly.
- Add the butter while whisking it.
- Pour the dough into round molds with a diameter of 15-16 cm. They must first be treated with oil and sprinkled with flour.
- Bake for about half an hour at 180 degrees on the central rack.
- Before cutting, wrap the biscuits in film and place in the refrigerator for a couple of hours.

Honey cake
The structure of the cakes is very similar to sponge cakes, but not so capricious, so baking honey cakes is much easier. The composition of the test is as follows:
- premium flour - 3 cups with top;
- sugar – 200 g;
- large eggs – 2 pcs.;
- liquid honey – 2 tbsp. l.;
- butter – 100 g;
- soda – 1.5 tsp.
Instructions for preparing the cake:
- Beat the eggs, adding sugar in a stream.
- Heat honey using a water bath. At the moment of boiling, add soda. Stir vigorously until the color of the mixture turns caramel. Remove from stove.
- Combine the egg-sugar mixture with honey, add soft butter.
- Start heating again in a water bath. While whisking, add flour.
- Refrigerate the dough to allow it to thicken.
- Divide into several equal parts, roll out the cakes or cut with a mold.
- Bake on parchment for 5 minutes, setting the temperature to 200 degrees. Thin cakes – 3 minutes.

Smetannik
A quick, delicious cake without any extra effort that even housewives without culinary experience can make. Compound:
- eggs – 3 pcs.;
- sugar – 250 g;
- sour cream – 320 g;
- butter – 200 g;
- flour – 450 g;
- vanillin;
- baking powder – 15 g.
The principle of making sour cream cake with your own hands:
- Beat eggs with a pinch of vanilla and sugar.
- Add pieces of soft butter, mix thoroughly.
- Add sour cream, add flour and baking powder.
- Knead the soft dough, divide in half: cakes with a diameter of 22-24 cm. Don’t forget about leveling!
- Stretch the parchment over the form. Bake at 170 degrees for half an hour. Cut after cooling.

Chocolate
To create a beautiful cake with a distinct chocolate flavor and aroma, you can mix a few spoons of cocoa into any recipe. However, not all cut-out cakes are as beautiful as this one. The following products are used for its production:
- flour – 250 g;
- cocoa – 50 g;
- eggs – 2 pcs.;
- granulated sugar – 200 g;
- butter – 65 g;
- milk - a glass;
- soda – 1.5 tsp;
- olive oil – 50 ml;
- vanillin.
Scheme of work:
- Combine all dry ingredients and gently shake the container.
- Add beaten eggs, both types of butter (melt butter), milk.
- Beat until the dough is perfectly homogeneous.
- Pour into 2 molds with a diameter of 15-16 cm, filling them only halfway. Bake for about an hour at 170 degrees.

How to decorate a cake with fondant yourself
The cakes have cooled, cut and begin to coat with filling. The cream recipe has been chosen, the general design idea has been thought out, but there are still many questions about the process. First of all, homemade oil mastic, which is used for covering cakes, deserves attention. It consists of a tablespoon of butter, powdered sugar (200 g) and melted marshmallows (100 g). Once the ingredients are mixed, you need to:
- Treat the top of the cake with sugar syrup.
- Scatter sifted powdered sugar on the table and lay out a lump of mastic.
- Roll out thinly, wrap a rolling pin in this layer and after this step transfer it to the cake.
- Lay, leveling with the back of your hand and pressing to the sides. Be sure to go over it with a pastry spatula in the finale. A little trick: place the cake that was at the bottom of the pan on top - the cake will be even.
It is even easier to sculpt and cut out figures from mastic, since it is incredibly flexible, like dumpling dough. This is especially true for a gelatin mixture or milk mixture: you can try to form a complex craft from it for an infinitely long time. The general technology is as follows:
- Warm 100 g of condensed milk with 150 g of dry milk, stir in 150 g of powdered sugar and add food coloring if desired.
- Knead a similar dough, cool.
- Roll out the mastic on a surface sprinkled with powdered sugar, cut out the parts using a stencil, and assemble into figures. They can be connected using regular modeling or small wires (relevant for bouquets).
Video: DIY cake with mastic for beginners
Photo of beautiful cake decoration with fondant at home
You can create such culinary masterpieces for absolutely any special occasion - the birth of a child, a wedding, a marriage anniversary, a birthday, or simply if you want to please your loved ones with a beautiful dessert. Below are some interesting ideas for DIY mastic cakes that are just begging to be brought to life. For convenience, the selections are divided by age categories of recipients.
Decorating cakes with fondant for adults
This method of decorating confectionery products has gained particular popularity in relation to wedding cakes. Bouquets, rings, figurines of young people - if they are made from thick mastic, they will retain their shape longer than those made from oil. However, not only newlyweds will be pleased to receive a homemade cake:
- A confectionery product intended for a man can be shaped like a soccer ball and autographed with food coloring. A musician will love a cake in the shape of a guitar or other instrument.
- A woman will appreciate a cake decorated with roses, tulips or white lilies, or shaped like a large cosmetic bag.

Children's cakes made from mastic
Little sweet tooths will be especially happy with such a gift, because it can look like a hero from their favorite fairy tale or cartoon:
- Girls are often prepared with mastic cakes in the form of a doll dressed in a fluffy dress, or decorated with butterflies and flowers.
- Boys can make Spider-Man, Superman, or a car. More universal ideas: depict winter on the cake with a snowman and a Christmas tree or summer with green grass and the sun.

When it comes to cakes, I immediately think of huge, beautiful, festively decorated cakes. But I myself didn’t know how to decorate a cake beautifully before, I did it the usual way: sprinkled cookie crumbs on top of the cream, or packed it tightly with nuts. It turned out so-so, an ordinary tea cake. I wanted it to look like a store-bought cake made by artisans, but I wanted it to be made with my own hands. After all, homemade baked goods are much healthier than store-bought baked goods, and tastier, since we make both the dough and the cream to our own taste.
One day I decided to experiment and decorate a cake with fondant for a family celebration. To be honest, I was afraid, but in fact everything turned out to be very simple. One cake, another, and slowly filled my hand. Since then, I have been decorating homemade cakes with fondant for any occasion with my own hands: Birthday, February 23, or children's party. Mastic can turn any, even the simplest cake into a masterpiece. You can, of course, buy ready-made mastic in a store, but it’s much more pleasant to make it yourself. That's why I want to present you with a recipe for cake mastic and my favorite homemade sponge cake with a layer of fruit. The leaves on it are made of mastic, but the lilac flowers themselves are made of butter cream using a pastry syringe.
I’m still learning how to make flowers from mastic, so sometimes I use ready-made decorations in the form of mastic flowers or figurines. But maybe there will be more!
I present my step-by-step master class on decorating a cake with fondant for beginners at home.
Homemade cake with mastic
Ingredients:
For the cake:
- Flour – 1 glass;
- Sugar – ¾ cup;
- Soda – ½ teaspoon;
- Salt - a pinch;
- Eggs – 6 pieces;
- Vanillin - on the tip of the knife.
For cream:
- Condensed milk – 2 cans;
- Butter – 2 packs.
For filling:
- Kiwi – 1 piece;
- Fresh apricots (you can use jam) – 4 pieces;
- Banana – 1 piece.
For milk mastic:
- Powdered sugar – 1 cup;
- Powdered milk (you can use baby formula “Malyutka”) – 1 glass;
- Food colorings;
- Condensed milk - 6 tablespoons.
For sugar mastic:
- “Marshmallow” candies – 200 grams;
- Powdered sugar - 1.5 cups;
- Confectionery topping - to your taste.
Cooking process:
First of all, we need to prepare the base for the cake with mastic. It is better to bake the sponge cake and coat it with cream a day before you start decorating with our mastic, or at least a day before, so that the cake has time to soak, become soft and settle. After all, if you immediately decorate with fondant, it will also settle along with the cake, lose its shape and may even crack or break.
To prepare the sponge cake, beat the eggs with sugar using a mixer. For eggs to beat better, they must be chilled. Some housewives separate the whites from the yolks before whipping and put them in the freezer for a while to cool. But if you don’t want to fuss for a long time, then you can simply beat them without separating them.
So, beat the eggs for eight minutes, then add soda and continue beating for two minutes until a fluffy mass is obtained.
Flour must be sifted together with vanilla. Add to the beaten eggs in small portions, and carefully mix the dough with a spatula (not a mixer!). You need to add a little vanillin, otherwise the dough may taste bitter.
The biscuit dough is ready, now you need to grease the mold in which we will bake the cake with butter, pour the batter into it, level it with a spoon and send it to a well-heated oven to bake. Bake for about forty minutes at 180 degrees. If you have a multicooker, then preparing a sponge cake for a cake with mastic in it is even easier. In the multicooker, set the time to 65 minutes and set the “Baking” mode. The cake will be ready if, when checking with a toothpick, it remains dry.
 We made a wonderful sponge cake. Now you can remove it from the mold, place it on a board and let it cool for at least an hour. Once cooled, it cuts better, and we have time to prepare the cream with fruit.
Cake cream for mastic
 The cream is made very quickly and simply. Condensed milk should be mixed with soft butter, stir well until smooth, and then lightly beat with a mixer. Thanks to this, the cream will not be liquid and heavy, it will thicken slightly, and it will be convenient to apply it to the cakes.
Layer of cake under mastic with cream and fruit
With fruits everything is simple, you need to wash them and cut them finely, or as you like. Mix them and spread this mixture onto the crust. I sometimes do this, and sometimes I cut the fruit into thin circles, and then put them on the cake in two layers. Both methods are good, choose which one you like best.
If you don’t have fresh apricots, then jammed apricots are perfect, you just need to remove them from the jam and let the excess liquid drain by placing them in a colander or sieve.
Our sponge cake has cooled down, now we need to cut it into three parts so that we get three cake layers. This must be done carefully so that the cakes are of the same thickness. We divide the sponge cake in any usual way: with a knife, fishing line or string.
The cakes need to be turned over. The bottom cake will be the top of the biscuit, and the top will be the bottom, because of this our cake will be even on top, which will allow it to be covered with mastic more evenly.
We generously grease the first cake with condensed milk cream, spreading it generously so that there is a good layer of it. Place apricot slices on top. Carefully place the second cake layer, press it lightly, and grease it with cream again. Place banana and kiwi on top of this crust. Place the third cake on top, press lightly again and grease with the rest of the cream on top and on the sides. The sponge cake is ready, now you need to put it in the refrigerator to soak overnight.
How to make mastic for a cake
The next day we will deal with the mastic itself. If you bought it in a store, then you only need to give it the desired color. To do this, knead the mastic with food coloring and powdered sugar.
And if you make mastic yourself, then for sugar mastic you need chewing Marshallow candies. Melt them in the microwave or in a water bath. Then knead in powdered sugar, adding coloring. You need to add as much powder as the mastic takes; it should become like plasticine, become elastic, and should not stick to your hands. That's all, our mastic is ready.
Prepared by mixing powdered sugar with condensed milk and milk powder. Powdered milk can be replaced with powdered infant formula. At the time of mixing, dye is added.
 Now you can decorate the cake. Before placing the mastic on the cake, you need to level the cream on it. A hot knife will help us with this. Dip the knife into boiling water, quickly wipe it and smooth out the cream. The mastic will look neater if the cream on the cake is even. After smoothing the cream with a knife, it should be placed in the refrigerator for 30 minutes.
 Covering the cake with fondant. Sprinkle the table with powdered sugar, place mastic on it and roll it out with a rolling pin like dough to the desired thickness. Having rolled the layer onto a rolling pin, carefully place the mastic on the cake, covering it on top.
 Lightly press the mastic with your hands, and tuck the excess edges under the cake or cut them with a knife.
 Now the cake can be decorated with any ready-made figures that can be bought in the store. Or cut out mastic from plastic using cookie cutters or sculpt something with your own hands together with your children.
 And in order for the figures to stick well, the mastic needs to be lubricated with cold boiled water. They will attach well, there is no need to press down so as not to wrinkle.
 To make the edge of the mastic beautiful, it can be trimmed with a curly knife.
 We decorate the side of the cake in the form of a bouquet wrapper.
 Roll small balls from the remaining mastic and decorate the bottom of the cake with them. We wet the brush with cold boiled water and pass it over the entire surface of the mastic to give the mastic cake a beautiful glossy look.
 On my cake I made lilacs using the same cream, I just added red and blue dye. And she squeezed it out of a syringe with nozzles. If you have time, you can make lilacs from mastic using special devices in the form of stencils.
 Once you have finished decorating the cake, you need to give it shine and remove excess powder. If necessary, gently brush the cake with cold boiled water. We make stripes on the sides in the form of a grid and press in sugar peas.
Our cake is ready! It's big, beautiful and shiny!
As you can see, there is nothing complicated about making mastic at home; decorating it with your own hands is a pleasure! And the cake turns out very elegant, you won’t be ashamed to go on a visit or invite guests with it. And the cake itself is prepared quickly and tastes very good. And if you make mastic with your children, they will also enjoy the process of sculpting figures, which they will then happily eat along with the cake.
A cake with fondant was prepared especially for the Notebook website by Yulia Kostyukovich.
Bake cakes at home with our website and give your piece of warmth to your loved ones.
Anyuta wishes you pleasant creativity and a sweet life!
What is the main dish at any holiday? What is the one thing no birthday can do without? And what dessert are all guests looking forward to with pleasure? Of course it's a cake!
Today, probably the most popular are cakes made with mastic. They are beautiful, hold their shape perfectly, and the incomparable decorations made from this product can be safely eaten. Mastic cake for children is very popular, because parents can please their child by giving him a dessert decorated with figurines of their favorite cartoon characters.
But our article is intended for those who want to learn how to create delicious beauty themselves! A DIY mastic cake is not a dream, it is a completely doable task! And our master class will help you with this.
The preparation of dessert takes place in several stages. The first is to determine the type of mastic from which you are going to make the cake.
What kind of mastic is there and where to buy it?
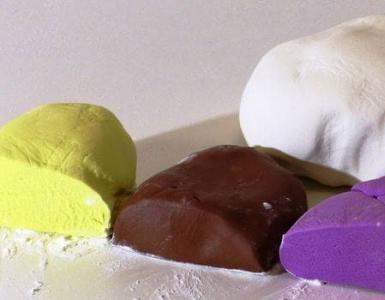
Before you start telling us how to decorate a cake with mastic, you need to be clear: what is it anyway? This is a viscous, plastic substance, very similar to plasticine. Thanks to these properties, confectioners began to do more than just make delicious desserts. In their ingenious hands real works of art are born! Often such cakes are not only eaten, it’s a shame to cut them!
There are different types of mastic, the most common of which are:
- For modeling. The name itself suggests its purpose. It is very suitable for creating jewelry and figurines. It has a consistency that is soft on the inside but hard on the outside. This quality is great, for example, for creating jewelry using silicone molds. You will find out what it is a little later.
- Floral. This mastic is ideal for creating delicate and complex decorations, such as small flowers. It contains more thickener, so it dries faster, but it rolls out thinner, is very flexible and holds its shape well. Decorating cakes with floral fondant is a very easy and enjoyable task.
- Sugar. This is what is mainly used to cover cakes (this process is also called covering).
Mastic also comes in marzipan, milk and honey.
You must understand that it is not at all necessary to have all three types of the most popular mastic in your arsenal; you can get by with regular sugar mastic. Its other types are used, rather, by professional kitchen masters for greater convenience and to save their time. Ordinary housewives who want to please their loved ones with their own sweet masterpiece can only get by with sugar mastic.
Buying it is not so easy; it is sold only in specialized confectionery stores. If there is one near your home, then you are incredibly lucky. The best option is to order delicious “plasticine” from the online store in your city. If you don’t find one, don’t despair, you can make mastic yourself. How? Read on!
How to make homemade mastic from marshmallows?
It turns out that you can make mastic yourself. And it will cost you at least 2 times less. And this is not the only plus. Many confectionery masters claim that homemade cake mastic tastes much nicer than store-bought ones.
To prepare it (about 400-500 grams) you will need:
- marshmallow soufflé - 100 grams;
- soft butter - 1 tablespoon;
- lemon juice - 1 tablespoon;
- powdered sugar - 250-350 grams.
What is it - marshmallow? Not many people have heard such a mysterious name, but everyone has seen this soufflé! These are the same white and pink Bon Paris sweets in the form of delicious pillows or braids.
There are other manufacturing companies, but this one is perhaps the most popular in Russia. Many mothers deliberately prepare a children's mastic cake exclusively from marshmallows, since they have no doubt about the harmlessness of the composition of the finished product.
How to cook?
- Place the soufflé in a bowl (not a metal one).
- Microwave it for 5-10 seconds. The mass should then become soft.
- Add 1 tbsp. l. soft butter at room temperature and 1 tbsp. l. natural lemon juice.
- Mix everything thoroughly. The mass should become soft and homogeneous.
- After this, add 1 tbsp to it. l. powdered sugar until the mixture reaches the consistency of a batter.
- Place the future mastic on the table and knead like dough, adding powdered sugar again and again until the mass becomes viscous and plastic, but elastic and does not stick to your hands, similar to plasticine.
Please note: marshmallow soufflé comes in a variety of colors. Candies can be white-pink or yellow-white-pink. If you want to get mastic of a certain color, for example pink, then you can safely melt whole white and pink pads. If you need white mastic, then the soufflé will need to be cut and only the white part melted. But marshmallows will not produce pure white. It's always a little grayish. Keep this in mind if you want to make a pure white fondant wedding cake. In this case, it is better to purchase a finished product.
Shokomastika: recipe
In addition to marshmallow mastic, there is another type that can be prepared at home. This is shockomastic. It also turns out to be viscous and plastic, its taste is unique. The only drawback is that it takes longer to dry, and it will also take a little longer to prepare.
So, you will need:
- white or dark chocolate - 100 grams;
- 2 tablespoons of liquid honey.
Cooking instructions
- The chocolate must be cut into small pieces or grated.
- The product must be melted in a water bath, but please note that the water should not boil under any circumstances. Then the chocolate will overheat, change its structure, and the mastic will not work.
- After the mass becomes liquid, add 2 tablespoons of honey, slightly warmed but not hot. Mix everything with a spoon. The mass will immediately begin to thicken.
- The resulting product must be kneaded well, like dough, for 20-30 minutes. During the process, cocoa butter will be released, do not be afraid of this, place some plate and let it calmly flow there.
Decorating cakes with chocolate fondant is less popular due to its slow drying, but is also possible. It is good for tight fitting. Shokomastic can be stored in the refrigerator, wrapped in plastic.
Coloring mastic. What do you need to know?
Before you plan to make a mastic cake, you need to clearly imagine what exactly you want to see in the end result. What color will the dessert be, how will you decorate it, will there be inscriptions on it and much more.
After you decide on the type of mastic (it doesn’t matter whether it’s purchased or homemade), it’s time to think about the color.

There are several options for coloring mastic:
- If you make it yourself, you can color it during the cooking process. Dye (dry or gel) is added at the stage of mixing the still liquid marshmallow or white chocolate. This method is only good if the entire mastic cake is the same color - both the coating and the decorations.
- You buy or make white mastic, and add a few drops of dye to the finished one, kneading the mass until it acquires a uniform, even color. Dye is added using a toothpick. It is dipped into colored gel and lines are applied to the finished mastic. Knead. Evaluate the resulting color and, if necessary, repeat the procedure. This option is good because you can paint the mastic in different colors and do it with exactly the volume that you need.
- The disadvantage of the first two options is that the color of the mastic will not be very bright. It will always be more pastel than flashy. The third option is suitable for those who want a rich, eye-catching color. It is necessary to dilute the gel dye with a few drops of vodka, apply it to a sponge and use it to quickly blot the already covered mastic cake. The color is even and bright.
So, your mastic is already ready. You decided on a color and painted it. It's time to think about the filling: what will you hide under the mastic?
What dough and filling is best to prepare for mastic?
Probably one of the most exciting questions for novice cooks is: “What kind of cake should I bake with mastic?” The most common version of the tight test is, of course, a sponge cake. It is delicate but holds its shape well. It can be cut into cakes and made into delicious dips and fillings.

The most suitable and delicious recipe for a sponge cake decorated with mastic is this:
- Beat 200 grams of soft butter at room temperature with 200 grams of powdered sugar.
- Add four eggs to the mixture and beat everything until the sugar dissolves.
- Add premium flour (300 grams), sifted through a sieve and mix everything well.
- Bake until done.
Both a sand cake with mastic and a honey cake are ideal.
But not everything is as simple as we would like. Sugar mastic is afraid of moisture. That is why biscuits intended to be covered with it should not be too generously soaked in syrups. The cream for layering the cakes should also not be very soft.
Mastic is a fairly heavy product, and such delicate cakes, such as “Bird's Milk” or “Broken Glass” with an airy and delicate soufflé inside, are not suitable for covering.
You should know that mastic should never be placed on top of whipped cream, yogurt cream or the like. In this case, it will simply melt and “flow”.
But don’t despair, you can still make your favorite layers from almost any cream inside the cake. Culinary experts have come up with a solution. In this case, the outside of your cake just needs to be coated with a special cream that is suitable for covering with mastic. That is, you will have 2 creams. Internal, to your taste (the most important thing is that the cake structure itself is strong and stable), and external, on which the mastic will be placed.
Thus, there can be a lot of taste variations. This means that your own mastic cake, made with your own hands, will undoubtedly become one and only.
Cake leveling cream recipes
What kind of magic creams are these? You probably already have this question. There are only two most popular types of leveling creams.
“Cream from boiled condensed milk with butter”

It is perhaps the most common, as it does not require much skill or time. It is necessary to mix well 200 grams of soft butter at room temperature and 150 grams of boiled condensed milk. The cream is ready!
"Chocolate ganache"
To prepare it you need:
- 2-3 tablespoons of powdered sugar;
- 30 grams of butter;
- 100 grams of chocolate;
- 110 ml cream (30-35% fat).

Let's start cooking:
- Chop the chocolate and place in a bowl.
- In a saucepan, thoroughly mix the cream with sugar, bring the mixture almost to a boil and turn off (do not boil!).
- Pour the hot mixture into the chocolate, wait a few minutes and mix thoroughly.
- Add butter and stir the mixture again. Ready!
And now, using any of these creams, the cake must be prepared for covering with mastic. It's not enough to just coat the cake. Its surface must be perfectly flat!

That’s why these creams are called leveling creams. With their help, the future mastic cake will turn out perfectly smooth and beautiful, because with any convexity of the cream, defects will be visible. To make the dessert look neat, we recommend leveling its surface in three stages.
- Spread a thin layer of cream over the top and sides of the cake; it will smooth out all the major irregularities. Cool in the refrigerator until the first layer of cream hardens.
- Cover the cake with a second, thicker layer of cream. Try to give the surface as even a finish as possible. Chill again in the refrigerator until firm.
- Heat the knife on the stove (not hot water, it should be dry). Using a hot knife, smooth the cream to an ideal, beautiful and even surface. Place the cake back in the refrigerator.
So, a huge, important stage has been passed! We already have a beautiful, leveled cake! The mastic for a birthday (or other holiday) is also ready, all that remains is to cover our gorgeous, delicious dessert.
What tools are needed to cover a fondant cake?
For subsequent work with mastic you will need the following:

- rolling pin. It can be regular (wooden) or silicone. Professional confectioners choose silicone models with a rotating handle. This is the most convenient way to roll out the mastic.
- Silicone mat. But you can do without it if the table surface is smooth and without flaws.

- Pastry iron. This is a device with which the mastic on the cake is leveled. This is an extremely convenient thing. After all, you will never be able to press the mastic onto the cake with your fingers so smoothly.
- Regular knife or round(for pizza). The latter is more convenient to work with and is necessary for cutting mastic.

- Powdered sugar. Needed for rolling out mastic to prevent it from sticking to the table.
The wrapping process. Step by step photos
How to properly cover a mastic cake? Our master class will show you this in great detail! So:

How to decorate a cake with fondant? You will find out about this very soon!
What equipment do you need to decorate cakes with fondant?
You can decorate the cake with fondant without having anything at all except scissors and a knife. Or you can buy a couple of silicone molds - and then the process of creating flowers and various figures will be simplified to a minimum! What is a mold? This is a silicone mold for making various jewelry. How to use it? Nothing could be simpler. You need to put a piece of mastic into the hole of the mold and press it tightly so that you are completely sure that it has filled every millimeter of it. The form can be placed in the freezer for a couple of minutes, then carefully remove the resulting figure or flower.

For beginners working with mastic, this is simply an ideal option. Using molds you can decorate dessert not only quickly, but also very beautifully.
You can learn to sculpt flowers and figures from mastic with your own hands. There are a large number of video lessons of this kind. After practicing a couple of times, you will surely be able to create something beautiful.
Well, another option is possible: buy ready-made cake decorations in specialized stores.
Now you know the basic principles and nuances of making a cake covered with mastic. These main stages remain unshakable for a cake of any shape and design.
Children's cakes made from mastic. Photo

For boys, the most desirable thing, of course, is a cake in the shape of a car. Making it is not as difficult as it seems at first glance. All stages of preparing sponge cake and cream remain the same. It's all just a matter of your imagination. The cake will only need to be shaped like a car body. After covering the entire dessert with mastic, you need to cut out the machine parts for decoration; this can be done with a knife or ordinary scissors, and glue them with ordinary water. Since the mastic is sugar, water acts on it like glue.

A mastic cake for a girl is undoubtedly best designed in the form of a doll.
It's much easier to make it than a machine. The cake needs to be shaped like a dome. This will be the doll's skirt. And all you need to do is stick the doll’s legs into this dome. Specialized stores sell a special top part of the doll for cakes like this. But it doesn't come cheap. Why spend money if there is practically no difference, and the doll can be washed later? After fixing, the cake can be covered with mastic in any way your heart desires. You can make folds, a train, glue bows and flowers. The upper part of the doll can also be decorated with individual pieces of mastic.

If your child is crazy about a popular cartoon character, you can make a figurine of him from mastic. Dare, create, try! And your children will say with pride and love: “Our mother is the best!”

Wedding cakes made from mastic. Photo. Nuances in preparation
These mastic cakes are especially popular. They are very beautiful, and there are a lot of ideas for their design. But it’s not at all necessary to come up with grandiose bouquets of flowers. A simple design that even a beginner can handle is by no means the worst thing.

Perhaps the easiest, but no less beautiful decoration for a wedding cake can be ordinary mastic balls or confectionery sprinkles.

Bows of various sizes can also serve as a simple but elegant solution. You can play with colors, because no one said that wedding colors must be white.

The most ordinary stripes on a cake can add real zest and elegance to a sweet dessert. A wedding cake made from mastic is actually not so much difficult to decorate as it is to “assemble”. The main difficulty in cooking is attaching its tiers if there are several of them. If there are two tiers, then usually the second is simply placed on the first. But in this case, the sponge cake should not be too soft or with a delicate filling, otherwise the lower tier threatens to be crushed under the weight of the first.

Everything becomes much more complicated when there are three or more tiers. Then a substrate of the required diameter is purchased for each of them, and each layer of the cake is placed on it. In addition, each tier is strengthened with special wooden sticks. They are used to pierce all layers (except for the very top) in several places and cut them so that their height exactly matches the height of the tier itself. Thus, the upper tier on the base will lie not just on the lower ones, but also on wooden sticks that will not bend and will firmly hold the weight of the entire cake, preventing the dessert from deforming.

Now you know how to make a mastic cake with your own hands. The master class revealed in detail all the stages of preparing this delicious dessert. And if before reading our article the task seemed impossible for you, now you are probably excited about this idea and will delight your loved ones with a wonderful, incomparable cake! We believe in you! Everything will definitely work out!
What is the main dish at any holiday? What is the one thing no birthday can do without? And what dessert are all guests looking forward to with pleasure? Of course it's a cake!
Today, probably the most popular are cakes made with mastic. They are beautiful, hold their shape perfectly, and the incomparable decorations made from this product can be safely eaten. Mastic cake for children is very popular, because parents can please their child by giving him a dessert decorated with figurines of their favorite cartoon characters.
But our article is intended for those who want to learn how to create delicious beauty themselves! A DIY mastic cake is not a dream, it is a completely doable task! And our master class will help you with this.
The preparation of dessert takes place in several stages. The first is to determine the type of mastic from which you are going to make the cake.
What kind of mastic is there and where to buy it?
Before you start telling us how to decorate a cake with mastic, you need to be clear: what is it anyway? This is a viscous, plastic substance, very similar to plasticine. Thanks to these properties, confectioners began to do more than just make delicious desserts. In their ingenious hands real works of art are born! Often such cakes are not only eaten, it’s a shame to cut them!
There are different types of mastic, the most common of which are:
- For modeling. The name itself suggests its purpose. It is very suitable for creating jewelry and figurines. It has a consistency that is soft on the inside but hard on the outside. This quality is great, for example, for creating jewelry using silicone molds. You will find out what it is a little later.
- Floral. This mastic is ideal for creating delicate and complex decorations, such as small flowers. It contains more thickener, so it dries faster, but it rolls out thinner, is very flexible and holds its shape well. Decorating cakes with floral fondant is a very easy and enjoyable task.
- Sugar. This is what is mainly used to cover cakes (this process is also called covering).
Mastic also comes in marzipan, milk and honey.
You must understand that it is not at all necessary to have all three types of the most popular mastic in your arsenal; you can get by with regular sugar mastic. Its other types are used, rather, by professional kitchen masters for greater convenience and to save their time. Ordinary housewives who want to please their loved ones with their own sweet masterpiece can only get by with sugar mastic.
Buying it is not so easy; it is sold only in specialized confectionery stores. If there is one near your home, then you are incredibly lucky. The best option is to order delicious “plasticine” from the online store in your city. If you don’t find one, don’t despair, you can make mastic yourself. How? Read on!
How to make homemade mastic from marshmallows?
It turns out that you can make mastic yourself. And it will cost you at least 2 times less. And this is not the only plus. Many confectionery masters claim that homemade cake mastic tastes much nicer than store-bought ones.
To prepare it (about 400-500 grams) you will need:
- marshmallow soufflé - 100 grams;
- soft butter - 1 tablespoon;
- lemon juice - 1 tablespoon;
- powdered sugar - 250-350 grams.
What is it - marshmallow? Not many people have heard such a mysterious name, but everyone has seen this soufflé! These are the same white and pink Bon Paris sweets in the form of delicious pillows or braids.
There are other manufacturing companies, but this one is perhaps the most popular in Russia. Many mothers deliberately prepare a children's mastic cake exclusively from marshmallows, since they have no doubt about the harmlessness of the composition of the finished product.
How to cook?
- Place the soufflé in a bowl (not a metal one).
- Microwave it for 5-10 seconds. The mass should then become soft.
- Add 1 tbsp. l. soft butter at room temperature and 1 tbsp. l. natural lemon juice.
- Mix everything thoroughly. The mass should become soft and homogeneous.
- After this, add 1 tbsp to it. l. powdered sugar until the mixture reaches the consistency of a batter.
- Place the future mastic on the table and knead like dough, adding powdered sugar again and again until the mass becomes viscous and plastic, but elastic and does not stick to your hands, similar to plasticine.
Please note: marshmallow soufflé comes in a variety of colors. Candies can be white-pink or yellow-white-pink. If you want to get mastic of a certain color, for example pink, then you can safely melt whole white and pink pads. If you need white mastic, then the soufflé will need to be cut and only the white part melted. But marshmallows will not produce pure white. It's always a little grayish. Keep this in mind if you want to make a pure white fondant wedding cake. In this case, it is better to purchase a finished product.
Shokomastika: recipe
In addition to marshmallow mastic, there is another type that can be prepared at home. This is shockomastic. It also turns out to be viscous and plastic, its taste is unique. The only drawback is that it takes longer to dry, and it will also take a little longer to prepare.
So, you will need:
- white or dark chocolate - 100 grams;
- 2 tablespoons of liquid honey.
Cooking instructions
- The chocolate must be cut into small pieces or grated.
- The product must be melted in a water bath, but please note that the water should not boil under any circumstances. Then the chocolate will overheat, change its structure, and the mastic will not work.
- After the mass becomes liquid, add 2 tablespoons of honey, slightly warmed but not hot. Mix everything with a spoon. The mass will immediately begin to thicken.
- The resulting product must be kneaded well, like dough, for 20-30 minutes. During the process, cocoa butter will be released, do not be afraid of this, place some plate and let it calmly flow there.
Decorating cakes with chocolate fondant is less popular due to its slow drying, but is also possible. It is good for tight fitting. Shokomastic can be stored in the refrigerator, wrapped in plastic.
Coloring mastic. What do you need to know?
Before you plan to make a mastic cake, you need to clearly imagine what exactly you want to see in the end result. What color will the dessert be, how will you decorate it, will there be inscriptions on it and much more.
After you decide on the type of mastic (it doesn’t matter whether it’s purchased or homemade), it’s time to think about the color.
There are several options for coloring mastic:
- If you make it yourself, you can color it during the cooking process. Dye (dry or gel) is added at the stage of mixing the still liquid marshmallow or white chocolate. This method is only good if the entire mastic cake is the same color - both the coating and the decorations.
- You buy or make white mastic, and add a few drops of dye to the finished one, kneading the mass until it acquires a uniform, even color. Dye is added using a toothpick. It is dipped into colored gel and lines are applied to the finished mastic. Knead. Evaluate the resulting color and, if necessary, repeat the procedure. This option is good because you can paint the mastic in different colors and do it with exactly the volume that you need.
- The disadvantage of the first two options is that the color of the mastic will not be very bright. It will always be more pastel than flashy. The third option is suitable for those who want a rich, eye-catching color. It is necessary to dilute the gel dye with a few drops of vodka, apply it to a sponge and use it to quickly blot the already covered mastic cake. The color is even and bright.
So, your mastic is already ready. You decided on a color and painted it. It's time to think about the filling: what will you hide under the mastic?
What dough and filling is best to prepare for mastic?
Probably one of the most exciting questions for novice cooks is: “What kind of cake should I bake with mastic?” The most common version of the tight test is, of course, a sponge cake. It is delicate but holds its shape well. It can be cut into cakes and made into delicious dips and fillings.
The most suitable and delicious recipe for a sponge cake decorated with mastic is this:
- Beat 200 grams of soft butter at room temperature with 200 grams of powdered sugar.
- Add four eggs to the mixture and beat everything until the sugar dissolves.
- Add premium flour (300 grams), sifted through a sieve and mix everything well.
- Bake until done.
Both a sand cake with mastic and a honey cake are ideal.
But not everything is as simple as we would like. Sugar mastic is afraid of moisture. That is why biscuits intended to be covered with it should not be too generously soaked in syrups. The cream for layering the cakes should also not be very soft.
Mastic is a fairly heavy product, and such delicate cakes, such as “Bird's Milk” or “Broken Glass” with an airy and delicate soufflé inside, are not suitable for covering.
You should know that mastic should never be placed on top of whipped cream, yogurt cream or the like. In this case, it will simply melt and “flow”.
But don’t despair, you can still make your favorite layers from almost any cream inside the cake. Culinary experts have come up with a solution. In this case, the outside of your cake just needs to be coated with a special cream that is suitable for covering with mastic. That is, you will have 2 creams. Internal, to your taste (the most important thing is that the cake structure itself is strong and stable), and external, on which the mastic will be placed.
Thus, there can be a lot of taste variations. This means that your own mastic cake, made with your own hands, will undoubtedly become one and only.
Cake leveling cream recipes
What kind of magic creams are these? You probably already have this question. There are only two most popular types of leveling creams.
“Cream from boiled condensed milk with butter”
It is perhaps the most common, as it does not require much skill or time. It is necessary to mix well 200 grams of soft butter at room temperature and 150 grams of boiled condensed milk. The cream is ready!
"Chocolate ganache"
To prepare it you need:
- 2-3 tablespoons of powdered sugar;
- 30 grams of butter;
- 100 grams of chocolate;
- 110 ml cream (30-35% fat).
Let's start cooking:
- Chop the chocolate and place in a bowl.
- In a saucepan, thoroughly mix the cream with sugar, bring the mixture almost to a boil and turn off (do not boil!).
- Pour the hot mixture into the chocolate, wait a few minutes and mix thoroughly.
- Add butter and stir the mixture again. Ready!
And now, using any of these creams, the cake must be prepared for covering with mastic. It's not enough to just coat the cake. Its surface must be perfectly flat!
That’s why these creams are called leveling creams. With their help, the future mastic cake will turn out perfectly smooth and beautiful, because with any convexity of the cream, defects will be visible. To make the dessert look neat, we recommend leveling its surface in three stages.
- Spread a thin layer of cream over the top and sides of the cake; it will smooth out all the major irregularities. Cool in the refrigerator until the first layer of cream hardens.
- Cover the cake with a second, thicker layer of cream. Try to give the surface as even a finish as possible. Chill again in the refrigerator until firm.
- Heat the knife on the stove (not hot water, it should be dry). Using a hot knife, smooth the cream to an ideal, beautiful and even surface. Place the cake back in the refrigerator.
So, a huge, important stage has been passed! We already have a beautiful, leveled cake! The mastic for a birthday (or other holiday) is also ready, all that remains is to cover our gorgeous, delicious dessert.
What tools are needed to cover a fondant cake?
For subsequent work with mastic you will need the following:
- rolling pin. It can be regular (wooden) or silicone. Professional confectioners choose silicone models with a rotating handle. This is the most convenient way to roll out the mastic.
- Silicone mat. But you can do without it if the table surface is smooth and without flaws.
- Pastry iron. This is a device with which the mastic on the cake is leveled. This is an extremely convenient thing. After all, you will never be able to press the mastic onto the cake with your fingers so smoothly.
- Regular knife or round(for pizza). The latter is more convenient to work with and is necessary for cutting mastic.
- Powdered sugar. Needed for rolling out mastic to prevent it from sticking to the table.
The wrapping process. Step by step photos
How to properly cover a mastic cake? Our master class will show you this in great detail! So:
How to decorate a cake with fondant? You will find out about this very soon!
What equipment do you need to decorate cakes with fondant?
You can decorate the cake with fondant without having anything at all except scissors and a knife. Or you can buy a couple of silicone molds - and then the process of creating flowers and various figures will be simplified to a minimum! What is a mold? This is a silicone mold for making various jewelry. How to use it? Nothing could be simpler. You need to put a piece of mastic into the hole of the mold and press it tightly so that you are completely sure that it has filled every millimeter of it. The form can be placed in the freezer for a couple of minutes, then carefully remove the resulting figure or flower.
For beginners working with mastic, this is simply an ideal option. Using molds you can decorate dessert not only quickly, but also very beautifully.
You can learn to sculpt flowers and figures from mastic with your own hands. There are a large number of video lessons of this kind. After practicing a couple of times, you will surely be able to create something beautiful.
Well, another option is possible: buy ready-made cake decorations in specialized stores.
Now you know the basic principles and nuances of making a cake covered with mastic. These main stages remain unshakable for a cake of any shape and design.
Children's cakes made from mastic. Photo
For boys, the most desirable thing, of course, is a cake in the shape of a car. Making it is not as difficult as it seems at first glance. All stages of preparing sponge cake and cream remain the same. It's all just a matter of your imagination. The cake will only need to be shaped like a car body. After covering the entire dessert with mastic, you need to cut out the machine parts for decoration; this can be done with a knife or ordinary scissors, and glue them with ordinary water. Since the mastic is sugar, water acts on it like glue.
A mastic cake for a girl is undoubtedly best designed in the form of a doll.
It's much easier to make it than a machine. The cake needs to be shaped like a dome. This will be the doll's skirt. And all you need to do is stick the doll’s legs into this dome. Specialized stores sell a special top part of the doll for cakes like this. But it doesn't come cheap. Why spend money if there is practically no difference, and the doll can be washed later? After fixing, the cake can be covered with mastic in any way your heart desires. You can make folds, a train, glue bows and flowers. The upper part of the doll can also be decorated with individual pieces of mastic.
If your child is crazy about a popular cartoon character, you can make a figurine of him from mastic. Dare, create, try! And your children will say with pride and love: “Our mother is the best!”
Wedding cakes made from mastic. Photo. Nuances in preparation
These mastic cakes are especially popular. They are very beautiful, and there are a lot of ideas for their design. But it’s not at all necessary to come up with grandiose bouquets of flowers. A simple design that even a beginner can handle is by no means the worst thing.
Perhaps the easiest, but no less beautiful decoration for a wedding cake can be ordinary mastic balls or confectionery sprinkles.
Bows of various sizes can also serve as a simple but elegant solution. You can play with colors, because no one said that wedding colors must be white.
The most ordinary stripes on a cake can add real zest and elegance to a sweet dessert. A wedding cake made from mastic is actually not so much difficult to decorate as it is to “assemble”. The main difficulty in cooking is attaching its tiers if there are several of them. If there are two tiers, then usually the second is simply placed on the first. But in this case, the sponge cake should not be too soft or with a delicate filling, otherwise the lower tier threatens to be crushed under the weight of the first.
Everything becomes much more complicated when there are three or more tiers. Then a substrate of the required diameter is purchased for each of them, and each layer of the cake is placed on it. In addition, each tier is strengthened with special wooden sticks. They are used to pierce all layers (except for the very top) in several places and cut them so that their height exactly matches the height of the tier itself. Thus, the upper tier on the base will lie not just on the lower ones, but also on wooden sticks that will not bend and will firmly hold the weight of the entire cake, preventing the dessert from deforming.
Now you know how to make a mastic cake with your own hands. The master class revealed in detail all the stages of preparing this delicious dessert. And if before reading our article the task seemed impossible for you, now you are probably excited about this idea and will delight your loved ones with a wonderful, incomparable cake! We believe in you! Everything will definitely work out!