Mastic cake (step by step) - feel like a real pastry chef. Do-it-yourself mastic cakes: mastic and cake recipes
Mastic cakes are the pinnacle of confectionery craftsmanship. To please the sophisticated consumer, the cake must be not only tasty, but also beautiful. A few years ago, cakes decorated with mastic appeared on the market. The fashion for such culinary decor came from America and instantly spread, since cakes covered with mastic, decorated with sugar figurines and flowers cannot but cause delight.
Following the confectioners, ordinary housewives also mastered the skill of decorating cakes with sugar dough. After reading this article, you will have no questions left on how to make mastic for a cake with your own hands, no doubt that everyone can do it. There are a huge number of recipes for making cakes, but there are basic popular recipes that we will consider in this article.
Types of mastic
Mastic It is a thick plastic paste based on powdered sugar. She can cover cakes and confectionery (gingerbread, cookies), make inscriptions, sculpt various figures. There is white and colored mastic. If the jewelry is not supposed to be used for food, it is permissible to add ordinary gouache as a dye. Otherwise, special food colorings are used.
Mastic prepared at home is conventionally divided into three types:
Dairy- a plastic, pliable mass based on condensed and powdered milk, rolls out well and thinly, does not tear, so this mastic is well suited to the recipe for wrapping cakes, creating sugar ribbons, lace, frills.
Sugar-gelatin (pastilage)- used for modeling, plastic, dries quickly, solid in a thickened state, therefore it is not used for wrapping tori.
Marshmallow mastic- prepared from airy marshmallow marshmallows, can be used for any purpose, depending on the additional ingredients, convenient for housewives who bake and decorate cakes infrequently.

Before you prepare the mastic for the cake, you need to clearly understand what kind of decor you will create. The choice of mastic depends on this.
Mastic is completely harmless. It does not contain complex or expensive components, so every housewife can try to make mastic cake decorations with their own hands and gradually achieve mastery.

In order for the mastic to turn out to be of high quality, plastic, which is a pleasure to work with, you must follow simple rules:
Use fine powdered sugar, otherwise the sugar dough will tear
When kneading the mastic, watch its density, adding a little more powdered sugar, you will also get a mass that will tear
So that the finished mass does not stick to your hands, periodically send it to the refrigerator.
Ready-made mastic can be stored in the freezer for up to 4 months
Dry dye before adding to the mastic is recommended to be mixed with a few drops of water or lemon juice
Before telling how to decorate a cake with mastic at home, it is worthwhile to dwell on whether all cakes and cream are combined with sweet dough decorations.
Experienced cooks advise the following:
- There are no special requirements for cakes. You can use biscuit, sour cream, shortbread dough, prepare a traditional honey cake.
- If it is necessary to decorate a soufflé cake with fondant, the cake needs to be given additional rigidity, for example, to make a cake edging from thin biscuit dough. Otherwise, the cake may lose its shape.
- The soufflé should not come into contact with the mastic, as it will begin to melt.
- Cream for a layer of cakes can also be any - butter, sour cream, custard, cottage cheese. But the cream directly under the mastic for the cake can be protein-oil, oil with condensed milk, ganache (chocolate + whipped cream). It should be thick so that the sugar dough does not get wet, losing its appearance.
- For biscuit cakes, you can prepare a delicious filling for a cake of fruit, pieces of bizet, soufflé. Biscuit cakes will give the cake the necessary rigidity.
- You can not coat the cake under tight with sour cream, cream based on whipped cream or yogurt.
- To make the product look beautiful and neat, the surface of the cake must be leveled before covering with mastic. This is done with a cream.
Before covering the finished cake with mastic, it must be leveled. If a cream is used to make the cake, on which the mastic will not flow, level the cake with this cream. Otherwise, you need to prepare a special cream.
You will need a knife with a wide, even blade or a special tool - a spatula, as well as a turntable (for decorating round cakes). You can do without a table, but it greatly simplifies the process.
It is better to align the cake in three stages. First you need to coat the cake with a thin layer of cream and let it harden. At this stage, the crumbs are smoothed out. Next, the product is smeared with a thicker layer, irregularities are removed and again the cream is allowed to harden. At the finish, to give the surface a perfect smoothness, the knife is heated and the cream is leveled with a hot knife. Take out to the cold again.

You can also see how mastic cakes are made in the video
Step-by-step recipe for milk mastic for cakes

Milky mastic is suitable for covering thorites, making flower petals, leaves, small parts. Mastic roses work especially well. It is not suitable for figurines, because it dries for a very long time. Milk mastic is not as cloying as pastilage, it has a pleasant creamy taste.
Ingredients for the recipe:
- powdered milk 1 cup
- powdered sugar 1 cup
- condensed milk 150 g.
- lemon juice 1 teaspoon
Cooking method:
- Mix powdered sugar and milk powder. Sift through a fine sieve.
- Gradually add condensed milk and lemon juice. Knead until the dough is smooth, elastic and sticky to your hands. Lemon juice can be omitted, but in this case, the mastic dries longer.
- Wrap the mastic in cling film and place in the refrigerator.
Advice: Roll out the fondant on starch, not powdered sugar. In this case, the mastic does not stiffen, it becomes supple and tender. To get a beautiful mastic cake as in the photo with a glitter effect, you need to apply cognac on top of the mastic with a brush.
See how the process of making milk mastic looks like in the video
Do-it-yourself sugar jelly mastic for a cake

If you want to sculpt figurines from mastic with your own hands for a children's cake, prepare sugar-gelatin mastic. This mastic cake recipe is suitable for sculpting figures. It is plastic and pliable, like plasticine, dries quickly, and is prepared from affordable, inexpensive ingredients. And the cake, decorated with figurines, looks chic.
Ingredients for the recipe:
- powdered sugar 1 kg.
- glucose 2 tbsp. spoons
- butter 1 tbsp. spoon
- boiled water 80 ml.
- gelatin 7 g.
Cooking method:
- Pour gelatin with warm water and leave to swell for 30-40 minutes.
- On low heat or in a water bath, dissolve the gelatin so that there are no lumps, then strain.
- Add glucose to gelatin and mix well until smooth. Let cool.
- Gradually add powdered sugar to the cooled mass. When the mass becomes thick, continue kneading on the table until the sugar dough stops sticking to your hands. You may need more powder than indicated in the recipe, so always have powder in reserve.
Important! Glucose for making cakes is sold in specialized stores, and not in pharmacies, despite the same names. The same applies to glycerin, which is used to lubricate hands while working with mastic. This is not the glycerin that is sold in pharmacies for external use.
Advice: You can paint over the mastic with dyes from ordinary products: orange - carrot juice, yellow - saffron, turmeric, pink - beet juice, raspberries, cherries, blue - red cabbage, brown - cocoa powder, melted chocolate.
For the preparation of another variety of sugar-gelatin mastic, see the video
Marshmallow mastic

The easiest way to make a mastic cake with your own hands for beginners is from marshmallow chewing marshmallows. This type of mastic is considered universal, suitable for covering cakes and modeling. If you use colored marshmallows, you do not need to look for dyes, you immediately get a colored mass.
Ingredients for the recipe:
- marshmallow 100 g
- powdered sugar 250 g.
- lemon juice 2 tbsp. spoons
Cooking method:
- Place marshmallows of the same color in a microwave-safe bowl, drizzle with lemon juice, and microwave for 1 minute. If you don't have a microwave oven, melt the marshmallows in a water bath.
- Knead the mass, resembling chewing gum, with a spatula.
- Sift powdered sugar onto a work surface. Put the mass and knead like dough. Remember that hot mass can absorb more powdered sugar. After kneading the rate indicated in the recipe, let the mastic cool. If the cooled mastic will stick to your hands. Add more powder.
Creative decoration of cakes
As soon as you learn everything about mastic for cakes and what it is, an endless field for creativity will open before you. There are countless options for decorating cakes with mastic. The cake can be decorated with bows, ribbons, a do-it-yourself children's cake for a boy can be made in the form of a typewriter, decorated with figures of your favorite cartoon characters, for a girl - with animals, dolls, fairy-tale characters. Men and women will be interested in getting a cake related to their activity - a suitcase with money, a stack of shirts, a car wheel.


A good idea for a birthday is a cake with the signs of the zodiac, for example, a scorpion from mastic or fish.


Endless possibilities for decorating with flowers. How to make flowers for a mastic cake with your own hands step by step - see the video recipe
In this article, we will talk in detail about how to make a cake with mastic with your own hands for beginners. Sugar mastic is a plastic product and can be molded from it, as from ordinary plasticine. However, outdoor mastic dries quickly. So, you need to store it before decorating the cake in cling film, which wraps the product tightly. You can decorate the cake with berries, for example.
How to store mastic
It is recommended to store the mastic not in the refrigerator, but at room temperature. Condensation can form in the refrigerator under the cling film, which must be wrapped around the sugar mastic so as not to dry out. The product absorbs water quickly and becomes sticky because of this. As a result, it is almost impossible to work with mastic. Therefore, a dry, cool and dark place is chosen for storage.
When working with this confectionery material, you should try to stay away from water. Contact with liquid leads to the fact that the mastic dissolves, stains and ugly marks appear on it.
How to paint mastic
Do-it-yourself mastic cake for beginners: the master class begins with the fact that white mastic will need to be painted. This is done using special dyes that are blown in the form of a paste or gel. Please note that liquid dyes, no matter how high-quality and expensive they are, are not suitable for mastic.


What is important when coloring:
First, the product must be thoroughly kneaded to get an elastic and soft texture;
Then make a small indentation in the center;
Using a match, take a little dye and put it in the recess. A match can be used to add even the same color only once;
Close the hole with paint and knead the mastic again. To achieve color uniformity, you will need to roll the ball, and then knead the product;
Sprinkle with powdered sugar so that the mastic is not sticky to your hands when working. You can also use starch instead of powdered sugar;
Interesting! When preparing a mastic cake with your own hands, for beginners, the question of how to make a marble color is interesting. It's also simple. You will need to roll up the roller and fold it in half, roll it up again and fold it again. As a result, colored stripes will appear. Then fold a mastic roller with a snail and roll everything out.
How to cover a cake with fondant
It's time to do what to cover the cake with mastic. For beginners, we will describe this laborious process step by step and in detail. It is best to put the cake on a stand that can be twisted. Lubricate the surface with cream. Mastic for work must be elastic. It is required to make a dome out of it, which has a smooth surface.

Advice! Pay attention only to the appearance of the mastic, because the inside is completely unimportant for the overall decoration.
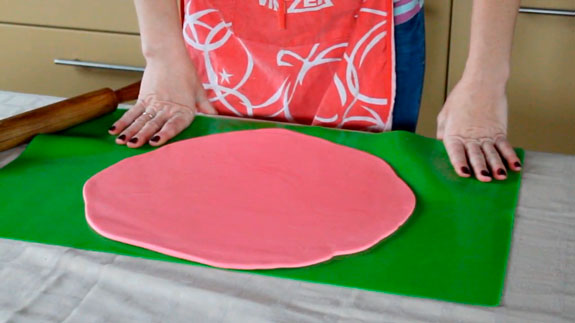
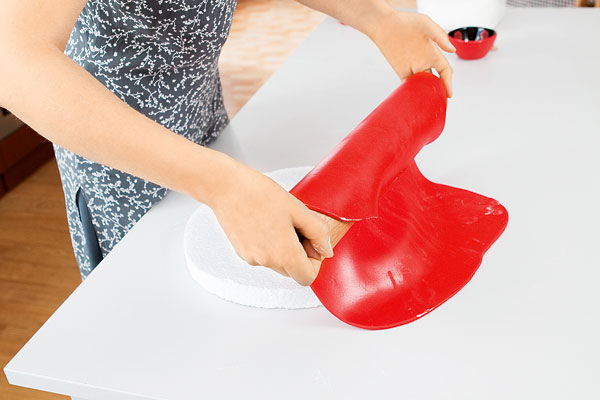
A clean dry rolling pin is taken, she needs to roll out the product. Remember to dust the surface with starch or powdered sugar to prevent the product from sticking. When the shape of the mastic is round and the same in thickness (3-4 mm), you will need to check the density. Next, put the rolling pin in the center and throw the mastic over the rolling pin.
Now comes the most accurate stage, on which the result of all work depends. You will need to hold the rolling pin on both sides, lifting the layer of mastic. Attach the layer to the side of the cake and lay on the surface of the cake, making rotational movements and rolling the product off the rolling pin.

When the whole cake is covered, the mastic must be gently pressed with your palms, smoothing out the wrinkles that may form during work. Do this with your palms, because your fingers will leave marks on a sensitive product.
It remains only to cut off the remaining mastic with a sharp knife. Just remember to leave about a centimeter from the edge of the cake. The rest of the mastic can be collected, put in a sealed bag and sent for storage. It is important to collect only clean scraps that do not have crumbs from the cakes or traces of cream. As a simpler dessert, you can cook
Content
Decorating cakes with mastic is a whole art, just like the creation of the confectionery paste itself. We have already described the recipes for making mastic dough, but we will talk about how to work with it and how to decorate the cake with mastic without any problems in this article.
Mastic is used in different cases - pies are covered with it, various figures, decorations and various auxiliary details are made from it.
How to easily wrap a cake
If you follow fairly simple rules and requirements, then this process will not only bring pleasure, but also an excellent result. Decorating confectionery with mastic does not take much time, and we need the following for this:
- actually the cake itself;
- mastic;
- powdered sugar;
- cream for mastic paste;
- rolling pin;
- knife;
- confectionery spatula.
It is better to choose a biscuit cake, its cakes need to be soaked in syrup, spread with cream and put in the refrigerator so that the cream has time to harden. You can do this several times: once smear with cream under the mastic and send it to the cold, then take it out and carry out the manipulations again.

Now we take ready-made purchased mastic or prepared in advance with our own hands, knead well.

Now you need to measure the cake in order to understand what size to roll out the mastic dough. Remember that pastry dough is rolled out on a table, which is first sprinkled with starch or powdered sugar. The thickness of the dough should not be less than 3-4 mm, otherwise it will tear. You need to roll out a good beautiful canvas so that it completely covers the cake and its sides too.
The next point is to carefully take the mastic, you can wind it on a rolling pin, and transfer it to the cake, smooth it and fix it, but we do it very carefully.

To cut off excess dough, put the cake on a stand, so it will be more convenient to work with it.
For the following steps, we need a pastry spatula, with its help we will finally level and smooth.

Carefully correct the bottom of the cake with a knife and our handsome man is ready. It remains only to decorate it with mastic figures, flower arrangements or an inscription.

That's what a handsome man can come out of if you master decorating cakes with mastic.

By the way, the material with which we cover the cake can be embossed and even openwork. To do this, you will need various tools, embossed rolling pins, stencils and wheels, with which you can make such beauty as in the photo. The textured cover adds even more charm to the cake.

Highlights at work
The first time working with this confectionery material will be quite difficult, but this is only the first time. And if you arm yourself with a few useful tips, then the first pancake may well turn out not lumpy:
- mastic is not covered with a wet confectionery product, as well as on cream, richly soaked, too wet cakes, etc.;
- water or egg white is used to glue parts;
- if the mastic is left in the open air for a long time, it will dry out, so it is better to make decorations in advance;
- mastic cake decoration is best installed immediately before serving. Otherwise, if the cake is in the refrigerator along with decorations, they will absorb moisture and fall off;
- leftovers can be stored in the refrigerator for up to two weeks, in the freezer - up to two months, first it must be tightly wrapped with a film;
- the mastic should not be rolled out too thin, otherwise it will be difficult to work with it: it will tear, and even under a thin layer all the flaws of the cake are better visible;
- to make the products shine, cover them with a solution of honey and vodka after you decorate your cake;
- use powdered sugar of the finest grinding, if grains come across in the mastic, it will inevitably tear;
- use special paints for coloring mastic or natural dyes;
- it is better to create figures from mastic using silicone molds, they are easier to work with;
- for sculpting, you will also need stacks - these are the tools that are used when sculpting from plasticine.

At the same time, the question: how to decorate a cake with mastic at home combines a lot of other equally important issues. Let's try to understand each of them.
Is any cake suitable for covering with fondant? Almost any cakes are suitable: biscuit, shortbread, honey. But, for example, cakes made from tender soufflé, bird's milk will not be able to withstand the weight of the mastic, so it is better not to use them for these purposes.
Do I need to somehow prepare the cake for wrapping? It should be as perfectly level as possible. The instruction is as follows: for this, the cake must first be coated with a thin layer of cream and put in the refrigerator. This will remove excess crumbs from the surface. Then you can already apply a thick layer and then put it back in the refrigerator. And the final stage is to smooth out all the bumps with a hot knife and again in the refrigerator.
What cream is suitable for mastic? It is necessary to choose such a cream and impregnation, from which the mastic paste would not flow. It is not worth and not recommended to use a cream based on yogurt, whipped cream, sour cream and others. Mastic loves cream based on butter and condensed milk.

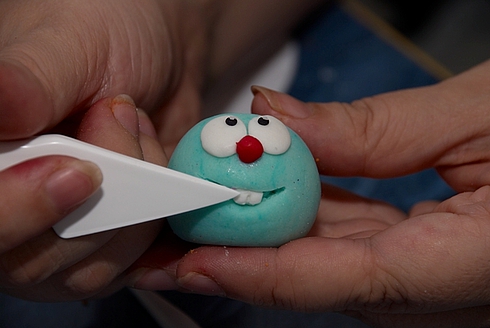
Features of working with mastic when sculpting figurines and other decorations
Very often, various figures are made to decorate a children's cake - these are all kinds of cartoon characters, favorite soft toys and not only soft ones. Often, to create such decorations from mastic, special tools and skills are not required, but it would be nice to have various confectionery tools in your arsenal, similar to those used when sculpting from plasticine, then silicone molds and other gadgets will not even interfere.
So, let's figure out how to decorate a children's cake? The most ideal thing is to build on the preferences of the birthday man. Children often order a cake in the form of "wheelbarrows", "Luntik", "Shrek", "Angry Birds", "Little Pony", "Masha", "Pokemon" and other heroes. But if there are no special preferences, then dream up yourself or choose something that will not be difficult to create. For example, these may not be voluminous, but flat figures that you simply lay out on the cake. Use different cookie cutters or templates. And you can immediately lay out the whole picture on the cake with the help of paste. This is an option for decorating a cake with mastic for beginners.

Of course, the item is more complicated - these are voluminous figures made of mastic paste, but even here you should not be afraid of anything. Especially if you have silicone molds, but if there are none, then imagine that the mastic is ordinary plasticine. Sculpt to your health! You can even follow the instructions for sculpting plasticine figures, the processes are almost the same.
Everyone can prepare a delicious cake for the holiday. An interesting recipe is also not a problem to find in our time. It remains only to do everything according to the instructions and a chic confectionery product is already ready to be served on the festive table. Although ... a birthday cake without decoration is like a beautiful lady at a party in a dressing gown. Therefore, no matter how wonderful a homemade cake is, it must be properly decorated.
Decorating a cake at home requires certain skills. Therefore, before preparing and decorating a culinary masterpiece for a big celebration, it makes sense to practice a little on simple confectionery. After all, no one bothers to decorate homemade cookies prepared on a regular day off.
It is equally important to think over the composition in advance, otherwise unforeseen difficulties may arise during the design process.
It's a good idea to stock up on some pastry tools for decorating. Of course, the inquisitive collective mind of the almighty Internet will find a way to do without them, having adopted an ordinary spoon or fork, you will also find master classes on this dyeing option below. But if you plan to decorate cakes with a certain frequency, then it is better to simplify your task. Well, now it's time to talk directly about the means and methods of decorating homemade cakes.
Decorating a homemade cake with cream
Cream is one of the most famous and popular ways to decorate a cake. No wonder most store confectionery products are decorated with numerous roses, cream borders and other oily trinkets.
buttercream recipe
Making a real pastry cream based on butter is a rather tricky process. If you wish, of course, you can tinker, but such physical and financial costs are completely inappropriate for decorating a homemade cake. It is fashionable to prepare a high-quality and simple oil cream with just two ingredients:
- butter- 100 g;
- condensed milk- 5 tablespoons.
A detailed step-by-step recipe for making a simple butter cream for decorating a homemade cake with a photo. To prepare the cream, the butter must be taken out of the refrigerator in advance. When it becomes soft, it must be beaten properly with a mixer. When the oil becomes fluffy, you need to pour condensed milk into it and continue to beat until a homogeneous and airy mass is obtained. The simplest cream for decorating a homemade masterpiece is ready. By the way, for its preparation, you can use not only ordinary condensed milk, but also its cooked version. In this case, the cream will acquire a pleasant beige hue, and it will taste like a classic crème brulee.

Natural homemade food coloring
Of course, decorating a cake exclusively with white cream is boring. And for coloring creamy treats, you can use any food coloring. They can be purchased at the store in the form of powders, or you can cook it yourself, for example:
- a little saffron diluted in a small amount of water will make the mastic yellow;
- juices of beets or cherries - red;
- carrot juice - orange;
- decoction of spinach - green;
- cocoa brown.
The cream is easy to work with. It is better, of course, to use a special syringe with different nozzles for decoration. With this tool, you can draw real masterpieces on a confectionery product. However, you can get by with an ordinary packing bag or a bag folded out of paper with a neatly cut corner. When you press the bag, the cream is evenly squeezed onto the surface of the cake. Having practiced even with the help of such a primitive tool, you can decorate any cake with borders, and inscriptions, and roses with petals.
After the decoration of the surface of the cake is over, the dessert must be put in the refrigerator so that the cream freezes a little. And the leftover cake is also best stored in the refrigerator. In this case, the cream will be edible for at least three days.

homemade icing recipes
Another wonderful and most importantly simple way to decorate a homemade cake is icing. You can make frosting with just three ingredients:
- powdered sugar- 3 tablespoons;
- milk- 1 tablespoon;
- butter- 50 g.
Melt the butter over low heat in a crust and let cool slightly. Then add the sugar ingredient to the butter and mix well. Then add milk and mix again. The finished mass is also white milk icing for decorating a homemade cake. It can be smeared on the surface of the biscuit and allowed to harden.
You can also make chocolate icing. Only the proportions of the products should be slightly different:
- powdered sugar- 3 tablespoons;
- milk- 2 tablespoons;
- butter- 30 g;
- cocoa- 1 tablespoon.
Mix cocoa powder with powdered sugar. Pour milk into the resulting mixture, mix well again and put on fire. When the mass boils, remove the crust from the heat and stir in the butter. The chocolate icing is ready to be applied to the cake.
You can also make real confectionery glaze - ganache. This is a denser variety of this "finishing" material. And to prepare it you need to take:
- chocolate- tiles (180-200 g);
- butter- 50-70 g.
To get a ganache, just melt the chocolate and mix it with melted butter.

Decorating a cake with fondant at home
This is not to say that this is a very simple way to decorate cakes. However, with a certain skill and a sufficient amount of practice, you can make real works of art with the help of mastic from your confectionery.
Mastic is a sweet, plastic mass, somewhat reminiscent of plasticine in its characteristics. You can cut out various figures from it, or you can simply “wrap” the entire cake with it, decorating it on top in some original way. Volumetric mastic compositions can also be made as a decoration for a homemade cake, but when dried, they can begin to crumble, so it is better to use other “materials” for this.

confectionery mastic recipe
Many recipes for making mastic have been invented. However, at home, it is easiest to make milk mastic. For this you will need:
- condensed milk- 200 g;
- powdered milk- 150 g;
- powdered sugar- 150 g;
- lemon juice- for improvement.
Mix powdered sugar and milk powder thoroughly. Then gradually pour the condensed milk into the mixture, kneading the dough. The result should be a homogeneous, elastic mass. We must immediately make a reservation that the amount of dry products is indicated approximately. If the resulting mass sticks to the hands, then a little more powder should be added to it. It happens the other way around: the dough does not want to stick and crumbles in your hands, then you will need to pour 1-2 teaspoons of lemon juice into it. And a few more words about the ingredients. For mastic, you should take powdered sugar of the finest grinding. Moreover, this product must be sifted through a sieve. This guarantees a quality end result.
The resulting mastic is almost white in color. To sculpt colored figures from it to decorate a homemade cake, food coloring must be added to the mass. They have already been mentioned in the description of the preparation of mastic. Working with mastic is quite simple. A ball of “dough” is rolled out on a surface covered with starch or powdered sugar, after which the canvas can be applied to the cake for its “covering” or decorative elements can be cut out of it. Some confectioners advise rolling the mastic between two regular packing bags. In principle, this is also possible. You can connect several elements of mastic by slightly wetting the gluing places with plain water.
It is worth warning that mastic should not be covered with biscuit cakes soaked in syrup or sour cream. Such impregnation will easily dissolve all decorations. There are no other serious restrictions on the use of this material. The mastic left after decorating the cake should not be thrown away. It is perfectly stored in the refrigerator, provided that the material is tightly wrapped in two or three ordinary plastic bags.

Marzipan for cake decoration
Marzipan can be a great option for decorating a homemade cake. This material can cover the surface and make a wide variety of decorative elements out of it.
What is marzipan? This name hides a delicate and elastic nut mass, perfect for decorating a homemade cake. In confectionery stores, you can probably buy it ready-made. However, marzipan can be made independently. To do this, you only need to purchase:
- almond- cup;
- granulated sugar- cup;
- water- a quarter of a glass.
Peel the nuts and roast on a dry baking sheet in the oven until golden brown. Grind the finished nucleoli with a blender or grate on a fine grater. Boil a thick syrup from sugar and water and pour ground nuts into it. Stir the mixture properly and cook for 3 minutes. Pour the mass into a bowl, generously greased with butter, and let cool. Remove the finished marzipan from the bowl, pass through a meat grinder and you can start decorating the cake.
Working with marzipan is as easy as working with mastic. A “lump” of material is rolled out, after which they cover the cakes on top with it or cut out figures and other elements from it. If marzipan spreads during rolling, then powdered sugar should be added to it and kneaded well. If the product, on the contrary, is too dense, then it should be sprinkled with warm water. After such a procedure, it will roll out much easier.
One thing to keep in mind is that marzipan needs some time to harden properly. So confectionery creativity should be done in advance - at least 8 hours before the culinary masterpiece is taken out to the guests.

Icing
Icing or ice pattern is another great way to decorate a homemade cake. Usually this technique is used in the confectionery business when decorating wedding cakes. However, no one bothers to decorate a cake with icing, for example: for New Year's Eve.
Icing is rightfully considered a universal decor method, since such patterns do not spread and adhere well to any confectionery surface. A similar decoration looks like an ice pattern on glass. To make such an ornament you will need to take:
- powdered sugar- 500 g (usually takes a little more);
- egg whites- 3 pcs.;
- lemon juice- 3 teaspoons;
- glycerol- 1 teaspoon.
First, chill all ingredients. Then carefully crack the eggs, separate the whites from the yolks and transfer to a clean fat-free bowl. The last procedure can be carried out by simply wiping the inside of the dish with a slice of lemon.
Beat the whites with a mixer at the lowest speed. You don’t need to beat for a long time - two minutes is enough. Now you can add the rest of the ingredients to the proteins and continue to beat the mixture until it turns white. Cover the bowl with the finished “ice” mass with a film and put it in the refrigerator for an hour. During this time, all the formed bubbles should burst. Ready! However, working with this material without special equipment will not work. You will have to purchase a confectionery syringe with special nozzles.
Aising needs to be transferred to a syringe. In this case, the nozzle on the tool must be put on the narrowest. With this material, you can draw lace, make various inscriptions, decorate borders, etc. The only restriction is that the surface of the confectionery product should not be sticky or have a tendency to run off. But icing fits perfectly on mastic or hard glaze.

Wafer homemade cake decoration
Waffles are a good material for decorating a homemade cake. The scope for imagination here is not limited to anything. With the proper skill on a waffle plate, you can make a portrait or draw a magnificent still life. Of course, this should be done exclusively with food paints. From a waffle plate, you can also make any volumetric elements for decoration.
One is bad. Ordinary wafer cakes are not very suitable for such purposes. They get wet or break. So you have to buy special wafer paper. It is produced in two types. More dense - it is good just for applying images (often sold with an image already applied) and very thin - it can be cut into parts. However, not in every locality such confectionery delights can be purchased. Therefore, it’s easier to still get by with the usual waffle cake.
It’s worth starting with the fact that such a workpiece should be cut to give the desired shape only with a very sharp knife. It is also advisable to moisten it in warm water. Otherwise, the waffles will just crumble.
After applying the pattern, the cake should be carefully laid on the surface of the cake. Just to begin with, this very surface needs to be made perfectly smooth. Materials such as mastic or thick glaze are perfect for leveling. So that the waffle layer does not move out, the back side of the cake must be smeared with something sticky. For this purpose, thick sugar syrup, jam or honey is perfect.
In order to apply the "glue" the cake must be placed on a smooth surface. The adhesive layer must be evenly applied to the surface with a special brush. If there is no such tool in the house, then you can even out the adhesive mass with a spoon.
The prepared waffle cake should be laid on the cake, covered with a napkin and gently leveled, squeezing out the air inside. The edges of this pattern can be decorated with cream or whipped cream.
With figures cut out of waffles, they do about the same. They are lubricated on one side with an adhesive and placed in the right place. Volumetric figures can also be assembled from waffle parts. For example, the body and antennae of a butterfly can be made from cream, and wings made from wafers can be stuck next to it.

Chocolate at home, for decorating the cake
Chocolate is the most affordable material for decorating a homemade cake. You can buy it at any store, and working with sweet tiles does not require any complicated tools.
The easiest way to decorate a cake with chocolate is to sprinkle with shavings. To do this, you can simply grate the chocolate and sprinkle the entire surface of the cake smeared with cream. Having worked longer, you can make a pattern or an inscription from chocolate chips. To do this, you first need to cut out a stencil of the desired pattern from paper, put it on the surface of the confectionery masterpiece, and then evenly sprinkle with chocolate chips. When the stencil is removed, only the desired image will remain on the creamy surface. Of course, the choice of chocolate in this case depends on the color of the background. On a light cream, a regular chocolate pattern looks good, and on a brown cream, a pattern of white chocolate chips will look contrasting.
The topping can also be made more interesting if the chocolate is not grated, but cut into thin chips using a conventional vegetable cutter. The resulting curls look very impressive, being in themselves a wonderful decoration.

Chocolate is also good because it can be melted. Many culinary publications write that chocolate bars should be turned into a liquid mass in a steam bath. In fact, this is not entirely correct. It is better to melt the chocolate over low heat in a ladle, stirring it constantly. Alternatively, you can also use the microwave. But in the pore bath, chocolate will absorb part of the condensate and it will no longer be possible to make a normal pattern out of it. But it's time to get back to embellishment.
The resulting chocolate mass can be drawn into a culinary syringe and with its help draw a wide variety of patterns. In order for the pattern to turn out to be an openwork nozzle for the tool, you need to choose the thinnest one. If there is no syringe at hand, it does not matter. You can put the chocolate mass into a regular packing bag, make a small hole in it with a darning game and start decorating the cake.
However, you should not draw directly on the surface of the confectionery. It is better to pre-apply the desired pattern on parchment paper or foil, and then circle the contours of the pattern with a liquid chocolate mass. The sheet with the applied pattern must be carefully transferred to the refrigerator for solidification. After some time, the base must be carefully separated from the chocolate patterns, and the resulting parts should be laid out on the prepared surface of the cake.
To create such decorations, you can use not only paper or foil. A wonderful decoration for a cake can be made by pouring melted chocolate over a clean tree leaf. Then the blanks must also be sent to the refrigerator, and then the natural leaf should be separated from the chocolate one. By the way, it is better to apply chocolate on the back of the leaf, then the real “veins” will be visible at the decorative leaf.
With the help of special stencil molds from chocolate, you can cut out a wide variety of figures. To do this, the melted chocolate mass must be poured onto a cold, buttered baking sheet and leveled with a knife. When the mass is almost solidified, you can start cutting out the figures with molds.
And you can do without molds by simply cutting the chocolate layer into various geometric shapes: squares, triangles, rhombuses and other “wedges”.

Whipped cream
This is also a good way to decorate a homemade cake. In principle, you can buy a can of ready-made whipped cream, but this is too banal. It is better to make whipped cream yourself, especially since it is not difficult at all. For this you need to take:
- cream (fat content not less than 30%)- 0.5 l.
The trick to whipping cream is its temperature. To make everything turn out, the dairy product must be cooled for 4-5 hours in the refrigerator. The container in which the cream will be whipped and the whisk with which this process will be carried out should also be cold. Speaking of capacity. It is better to take a larger bowl for whipping, since the cream will increase significantly in volume in the process of working on it.
Now about the process itself. The first minute the product must be whipped at the lowest speed, and then it can be increased. The whole action should take 7-8 minutes. It is not necessary to beat longer, the cream from this can lose all airiness.
The classic version of whipped cream can be modified. For example, sugar or powdered sugar can be dissolved in a dairy product before whipping (the latter is preferable). Vanillin or vanilla sugar will add a pleasant aroma to whipped cream. Can be added to cream and any food coloring. Then the finished cream will become colored.
Some sources suggest adding gelatin there as well. However, this should not be done. Whipped cream keeps its shape just fine, but you need to put it on a slightly sticky surface. Otherwise, the decoration may "slide".
And working with whipped cream is as easy as working with cream. Especially if the kitchen has a pastry syringe. Only unlike desserts with cream, it is advisable to eat a cake with whipped cream immediately. They still don't hold their shape very well.

Decoration of homemade meringue cakes
Meringue towers look very impressive on any cake. Of course, you can’t decorate a cake with crispy hemispheres alone. Putting such a decoration should be on a surface smeared with cream, icing or at least jam. You can cook meringue at home if you have:
- egg whites- 5 pieces.;
- sugar- 250 g.
Crack the eggs carefully and separate the whites from the yolks. Pour the whites into a large container and beat with a mixer until a strong foam. After that, you need to start pouring sugar into the mass. This should be done gradually - 1-2 tablespoons, while continuing to beat the mixture. The mixer speed should not be too high, but it should not be too small either. In total, the whole process takes 12-15 minutes.
Put the finished protein mass on a baking sheet covered with greased baking paper. You can spread it using an ordinary tablespoon or the same confectionery syringe. Baking time at 100°C is approximately 1.5-2 hours, depending on the size of the meringue.

Fruit for decoration
What could be easier than decorating a homemade cake with fresh fruit or delicious fruit slices? Perhaps this is a rhetorical question. This design option could indeed be considered the simplest, if not for one "but". Fruits do not really tend to fit on the cakes baked for the cake. So you can’t do without cream, icing or jelly.
The choice of "substrate" largely depends on the fruit. For strawberries, plain buttercream is the best option. Not so now exotic bananas go well with chocolate icing. But the win-win option, of course, is jelly. How to make it? This will be discussed below. In the meantime, a couple of words about fruits.
To decorate the cake, any options for natural goodies are suitable. You can take both fresh fruits, and canned or frozen. In principle, even jam is suitable. After all, this is also a fruit, only in a processed form.
Fresh strawberries can be beautifully cut into halves and covered with them on the surface of the confectionery. Small berries - raspberries and blackberries, can be laid whole, dividing the cake into several contrasting triangular sectors. From exotic fruits, you can make whole compositions. In short, the fantasy here is practically not limited to anything.

How to decorate a jelly cake
So it's time to talk about how to decorate a homemade cake with jelly. Theoretically, you can buy a concentrate of this product in the store, dilute according to the instructions and decorate the cake with it. This is even a very good option, allowing you to get a wonderful decor element without much effort. Although in fact, jelly is not so difficult to make on your own. To do this, you need to have at hand:
- fruit juice- 0.6 l;
- powdered sugar- 200-250 g;
- instant gelatin- 1 sachet.
Allow gelatin to swell in one glass of juice, then melt in a water bath. After that, pour the remaining juice into the mixture, pour in the powder, mix everything well and refrigerate. You don't need to let the jelly dry completely. It just needs to be a little tight.
Place the finished cake in a detachable form so that the sides rise above the cake layers by about 30 mm. Remove the prepared jelly mass from the refrigerator and put it into a mold. You can immediately put fresh fruits on the surface of the jelly and send the cake to the refrigerator for 12 hours.
What to do with the rest of the jelly? It can be put into molds and stored in the refrigerator. When they have cooled a little, put them on a jelly surface that has not yet hardened.
By the way, it is not necessary to make jelly from one juice. You can take several varieties of multi-colored fruit drinks, divide the surface of the cake into sectors and make a colorful fill. And you can make the surface plain, and put colored figures on it.

Finished confectionery (sweets and marmalade)
Without particularly straining, you can decorate a homemade cake with ready-made sweets or marmalade. Of course, caramel or lollipops are not suitable for decoration. But chocolates, chocolates, wafer rolls and even M&Ms are excellent material for decorating homemade confectionery.
Lay sweets on a surface covered with cream or icing. Moreover, the cream is preferable, because it is less sweet. Finished confectionery products can decorate not only the surface of the cake, but also its end part. For this, for example, waffle tubes placed vertically are perfect.
It is interesting to decorate the cake with the help of ready-made multi-colored marmalade. The easiest option is to lay out a surface for them in the form of a pattern or inscription. You can do it smarter too. Marmalade melts perfectly in the microwave in just seconds. You can work with the prepared mass in the same way as with jelly. Only the marmalade hardens faster - only 3-4 hours.
You can draw whole pictures with liquid marmalade. True, in this case, it is better to cover the surface of the cake with mastic. Then, using a confectionery syringe with the thinnest nozzle and melted chocolate, you need to apply the contours of the drawing to the surface of the future masterpiece. When the chocolate has cooled, you can fill the corresponding places in the pattern with liquid marmalade of the desired color.

Sprinkle for decorating homemade cake
Well, if all the above methods seem complicated, then you can do it quite simply - sprinkle the surface of the cake with some kind of bulk material, for example: powdered sugar, cocoa or purchased multi-colored sprinkles.
It is worth remembering that the topping will not stick to a dry surface. Therefore, before proceeding with the design of a homemade cake, its top and sides should be smeared with something sticky: cream, icing or jam. It is necessary to apply the dressing immediately after smearing, until the “sticky” base has hardened.
As a rule, no housewife has any difficulties with sprinkling the top surface of the cake. But to decorate the ends of a confectionery product with such material is quite problematic. But this is only if you do not know one secret. In order to sprinkle on the sides, you need to put the cake on a piece of fabric, pour the desired material around it directly onto the fabric, and then gently press the fabric to the side of the cake. Most of the topping will stick to the sides.

Just a cake sprinkled with something will turn out delicious, but the decoration will look too boring. A stencil will help correct the situation. From ordinary paper, you can cut out any pattern or inscription, put it on the surface of the confectionery and start sprinkling. When the stencil is removed, the desired pattern will appear on the cake.
Sprinkling can be done not only with one material. Thanks to stencils, you can also make drawings from different contrasting materials, for example: all from the same cocoa and powdered sugar. What else can be sprinkled on the cake? Yes, basically anything. As a “finishing material”, you can use crushed nuts, biscuit or waffle crumbs, instant coffee, grated chocolate, etc.
That, in fact, is all. Creative success and bon appetit!
Video "Cake Decoration"
Mk from Nairka
Master class from the site cakecentral, thanks to the author for MK !!!
Wedding Dress.

We are going to make everything edible in the wedding dress cake. Of course, you can also use this to create an evening dress.
Bake two biscuits - 1 half bowl, 12 cm hemisphere and the second small form with a diameter of 12 cm. The bigger the cake, the bigger your biscuit molds.

We collect the cake, spreading the layers with your favorite cream. Then put in the refrigerator for impregnation.


Meanwhile, we are going to make the torso. Take a piece of brown fondant. Make two small balls, rolling until smooth in your hands. Also roll up a large piece in your hands until you have no more wrinkles/lines. This will be the body. Start making the waist by rolling one side of the smaller ones between your palms.


You can use your fingers or tools to make small indentations in the paste to highlight the neck and the two beginnings of the arm. Shape it more and more, and more slowly and more neck of the hand. When the waist gets bigger just roll it between your palms again. make sure the waist is a little thinner. Bring the ends of the neck, arms and waist together, placing the torso on a flat surface and slowly turn it a little. Next, we will press the chest to the torso. Yeah, I know it doesn't look that good, but we're going to cover it up with a dress afterwards. You can attach the chest by pressing the knifetool to the sides and make it stick to the troso. And then smooth it out a bit so it looks natural.


We form a skirt. Roll out a large round piece of fondant like you would for a cake and simply place it over the cake right in the middle and push it through the reinforcing skewer. I want the dress to be pleated, so I'm going to make more pleats by carefully lifting up part of the dress and fold it a bit and then do the opposite. Trim the skirt all around with your wheeltool and give the skirt the dimensions and width you want. Now it looks like this one is on top. Thread the torso onto a skewer until it touches your skirt.


Roll out a small piece of fondant. In doing so, we create the upper part of the garment. With a little water or glue apply it to the torso covering the chest. Before installing just try it on the torso a few times and cut what you don't need until you create your own dimensions. I used my wheeltool and just cut it right on the torso. Just be careful not to make deep cuts.


Now the fun begins! Your cake already looks like a dress and you can start decorating the dress however you want! I'm going to do all the little beads/pearls by just going around the whole dress with icing. I'm also going to use icing for all the other designs on the dress, but you can of course make your dress the way you want it yourself with extra coats of putty, or even draw a pattern on it or stencil or whatever!


You can decorate the top of the waist and make him even a necklace.


