Recipe: Cake with M&M's and Wafer Rolls - Sponge Cake with Strawberries and Bananas. Sweet creativity: decorate the cake with chocolate
Let's add a glass of sugar.

Beat in a strong foam, add flour and vanilla, mix.

Lubricate the multicooker bowl with butter, pour the dough and bake for 60 minutes.

We cool the finished biscuit, wrap it in cling film and send it for several hours, and preferably overnight in the refrigerator. This is necessary so that the biscuit is juicy without impregnation. I baked two biscuits for the cake.

Now let's start making the cream. The first cream we will have is strawberry, the second vanilla. Divide half a liter of sour cream in half. In one part, add 1/3 cup sugar and strawberries. I have frozen strawberries beforehand, I need to let it thaw a little.

Whisk sour cream with sugar and strawberries.

For the second cream, simply beat sour cream with 1/3 cup sugar and vanilla.

Sour cream must be taken with high fat content and, of course, the freshest and most delicious. I have 26% fat. From cocoa, 2 tbsp. l. sugar, milk and 1 tbsp. l. butter vprim chocolate icing.

Everything is ready, let's start assembling the cake. We cut each biscuit into four parts with a thread.

We cut off two cakes along the edges, making them a little smaller in diameter, this will be the second tier of the cake.

We call the first cake with strawberry cream.

The second vanilla cream, put banana slices on top.

Top the banana with chocolate icing. I forgot to take a picture of this step. We alternate the cream until the cakes are over. I baked a cake with double the norm of products, so the cake turned out to be tall. Whisk butter with 2 tbsp. l. sugar and 50 g strawberries.

We coat our entire cake with a thin layer of butter, now strawberry butter.

We put the cake in the refrigerator for several hours so that the butter hardens. This procedure is necessary so that the wafer rolls do not soften, and M & M s do not color the cake, and do not turn into unappetizing, colorless dragees. The cake is ready, it remains only to decorate. We put the wafer tubes with a fence along the edge of the cake, and the halves of the tubes along the edge of the second floor.

Pour the M&M dragee into the center of the cake. To prevent the tubes from falling apart, we tie them with a ribbon.

And now the packed cake is ready to go to the children's entertainment center.

Unfortunately, I couldn't take a cross-sectional photo.
Cooking time: PT03H30M 3 hours 30 minutes
Wafers are used to decorate confectionery in the form of pictures, crumbs, tubes. They are quite capricious in work, break easily and require a special approach - using a gel to smear the pattern on wafer paper, laying on a sticky but non-greasy surface of the cake and careful handling of the decorated cake. But on sheets of waffle dough, you can print any pattern or pattern, even a photo of the hero of the occasion.
Wafers are an excellent material for decorating baked goods. They are durable and keep their shape.
Today, the most commonly used types of waffle-based decorations are:
- Images. Any image can be printed on wafer paper - pictures of cartoon characters, a portrait of a birthday person, any beautiful picture.
- Border. It is a long rectangular strip of wafer paper with a pattern printed on it. It comes in different widths. It bends well without cracking or breaking. Helps close any unevenness on the sides of the cake and give it a finished look.
- Roses, butterflies, hearts, flowers. Such figurines are usually painted in various colors, they can be both voluminous and flat.
- Small round or square business cards, images of money, calendars, emblems of car brands.
- Thematic pictures depicting representatives of various professions.
Manufacturing technology
Wafer paper - almost white dough-based sheets with a neutral, not pronounced taste and a slightly porous structure.
Today, two types of such paper are made, designed for various types of decoration of confectionery:
- Thin, soft, flexible. It is more transparent, so it is necessary to take into account the color of the cake coating, on which the sheet of wafer paper will be attached. Ideal for creating borders, three-dimensional figures, because it bends well without cracking.
- Thicker paper is not as transparent, but also more fragile. It doesn't bend well and can't be cut. From it, they mainly make whole sheets for decorating the top of the cake and flat figures of butterflies, flowers, stars.
The image on wafer paper is created using special food paints. The picture is completely edible. The image is applied to a layer of paper on the printer. Such blanks are stored only in a dry place without exposure to sunlight. In a sealed form, the shelf life is more than 12 months, then the paper may lose its properties, burst. The composition of wafer sheets includes flour, eggs, water, salt, stabilizers.
Laying methods
Most often, a special decorgel is used to lay a sheet of wafer paper with an image:
- The gel gives the layer elasticity, slightly gelling it, it becomes shiny and sweet. The image from using the gel becomes a little brighter.
- Gels also come in different types: neutral, flavored, "mirror glaze" and so on.
- The cream can be applied on both sides of the picture or decor element. First, it is applied in a thin layer on the wrong side, and on the surface - only after laying on the cake.
- Use a wide bladed knife or pastry palette to apply. When applying, do not put pressure on the picture, make a uniform layer of the same thickness. If you apply the gel with a brush, it is better to use not a silicone one, but a regular one with bristles. Brush only once and in one direction to avoid damaging the wafer sheet.
- Immediately after gelling, the paper is placed on the cake, otherwise it will get wet and it will become impossible to transfer it.
- Squeeze out the air from the center of the sheet to the edges with a small, lint-free cloth. If bubbles nevertheless form, pierce them with a thin needle and gently release the air to the center of the air pocket.
- The coating of the cake is also important when laying the sheet on the gel. It should be a cream without butter, whipped cream, jam or light confiture.
- It is impossible to store such a cake in the refrigerator for a long time, since drops of water or condensation can blur the image. Fat will leave spots on the picture. When transferring the cake, try to keep it level, do not bend or tilt to avoid deformation of the picture.
Styling without gel:
- The top layer of the cake should be as even and dry as possible.
- The waffle pattern is laid exactly in the center on a dry surface.
- To keep it, its edges must be fixed. For these purposes, you can use butter cream, sugar icing (icing), going to the edges of the picture. It is optimal to use a pastry syringe or a bag with a nozzle. The picture for decoration should have edges so that in the process of strengthening it does not cover part of the image.
- If the picture is simply laid out on a sticky fat-free cream, it will hold up perfectly, but will quickly get wet. Therefore, a cake decorated in this way should be served immediately to the table.
- You can also attach a waffle decoration to the mastic coating. To do this, just smear the edges of the picture with plain water or vodka, wait a couple of seconds, transfer the picture to the cake and smooth it with your hand or a napkin.
Create a border
A cake with a border of ready-made wafer rolls or even long rectangular wafers looks very beautiful and unusual.


To prepare a cake with wafer rolls, we need the following components:
seven tablespoons of sugar (tablespoons), four eggs and five tablespoons of flour (also tablespoons), three tablespoons of cocoa powder (tablespoons), one bag of gelatin (25 grams), one pack of fresh good butter, one can of condensed milk, two tablespoons of cognac, one spoonful of coffee (instant), one glass of peeled walnuts or hazelnuts), chocolate bar, store tubes about six hundred grams. The tubes are sold with chocolate and milk filling. Both are suitable for a cake.
Recipe Cake with wafer rolls:
Cooking dough and cakes.
First, separate the egg whites and yolks. Eggs must be very cold. Now we take only proteins and pour sugar. With a mixer or on a combine (if any), beat the whites with sugar, as a result, a dense foam should come out. We also grind the yolks, but separately from the proteins. Now we try to carefully introduce the pounded yolks and flour. Flour must first be sifted! We also add cocoa powder. Now we stir the mass, the cake mold must be greased with butter, and you can also sprinkle with flour. The oven heats up to 200 degrees. We pour our mass into a mold and put it in the oven. Bake the crust for about twenty minutes. The readiness of the cake can be checked with a thin wooden skewer, a toothpick. We take out the finished cake, let it cool slightly. Then it must be removed from the mold (carefully!). Cut the cake into two - three parts, as it turns out.
Now let's prepare the cream.
First, the butter must be softened, just leave it on the kitchen table. Pour a bag of gelatin with warm water (a glass). After half an hour, excess water from the gelatin must be drained, and the dissolved transparent jelly must be placed in a water bath. This will make the gelatin dissolve faster. Then beat the butter with condensed milk + gelatin. Here we also add a spoonful of coffee. We beat. If the cream is not brown enough, you can add more coffee. Melt the chocolate in the microwave and add to the cream too. Now a beautiful thick cream needs to be cooled a little and then we grease our cakes + chopped nuts with it and lay out the cakes one by one. We lay out the tubes on the sides of the cake and tie them with a ribbon. The top of the cake must be greased with the remaining cream and cocoa powder can be sprinkled on top. Pour cocoa into a strainer and sprinkle cake through a strainer. Now we put this beauty in the refrigerator. The cake needs to soak for six to seven hours.
Bon appetit!
Sugar decorations, edible beads, waffle pictures, and even chocolate lace can be found on sale.
There are silicone molds on store shelves., molds and lace rolling pins - all the attributes for independent decoration.
How to use and not spoil the cake, but turn it into a work of culinary art, read on.
Try to design a homemade cake on a given topic. You will need patience to decorate. Or choose a quick way - bake an anthill and pour chocolate over it.
If you are ready to spend time and effort on a beautiful design, there are ways to decorate with your own hands:
- Spices. This is an easy way that does not require much effort. Cover the cake with cinnamon or poppy seeds, you can make a sprinkle of cocoa using special stencils.
In this way, you can decorate not only confectionery pastries, but also a pancake cake.
- Meringue. With small airy flowers, you can decorate both the entire product as a whole and its parts. Such decorations are commercially available or you can make your own.
- Icing. This glaze is used not only to decorate gingerbread, but also to cover cakes and sweets.
The icing adds a glossy sheen and your creation will be brilliant in every way.
- Cream. The most important component, which is used not only for layering cakes and for decoration.
For decoration, use a dense thick cream ice cream or charlotte, decorate with cream using a confectionery syringe.
- Jelly. Cheesecakes or cottage cheese pies are decorated in this way. Colored jelly with pieces of bananas or other fruits creates a spring mood.
- Chocolate. Classics of the genre! Chocolate can be used to make icing, cream or draw directly on the cake.
Chocolates, cookies, wafer rolls are helpers for the implementation of sweet ideas. Even a beginner in the confectionery world can do this way of decorating.

By the way, an unusual decoration with fresh flowers and “naked” cakes have come into fashion.. Red velvet with open sides, decorated with fruits or confectionery sprinkles, looks very impressive.
How to bring your culinary fantasies to life? There are several secrets.
Use the table for calculating the weight and tiers of the cake for the number of guests:
How to decorate a cake with protein custard at home
Not every cream is suitable for decorating a cake. Protein, cream of whipped cream, oily custard, cottage cheese keeps its shape well.

But sour cream or ordinary custard for Napoleon it’s not possible to decorate volumetrically, it is better suited for a layer. Protein custard has a delicate taste and light texture.
To prepare such a cream, you need a few ingredients:
- Proteins - 3 pieces.
- Sugar - 6 tablespoons.
- Water - 50 milliliters.
Recipe such a cream requires care and precision. The hardest part is making the sugar meringue.
You can decorate with raw protein cream, but the custard method is safer and suitable for baby food.
First you need to brew the syrup.
Heat a mixture of water and sugar over low heat. The mixture will be ready in 10-15 minutes. The syrup should thicken and stretch, but not caramelize.
Important! Do not overdo the syrup, otherwise the cream will be spoiled.
Whilst the syrup is cooking, whisk the egg whites. It is best to chill them in the refrigerator for easier whipping.
The crucial moment is to pour the hot syrup into the whites in a thin stream to brew the cream. With this method of preparation, all microbes are destroyed. Whip the whites until the mass has completely cooled.

Cream is ready. It has an elastic shape and is suitable for decorating any cake. If you have a pastry bag at your disposal, then use nozzles to create flowers of different shapes.
You can also decorate the sides or sides with cream, layer biscuit cakes.
An easier option is to cover the entire cake, thus hiding the bumps, sprinkle with grated chocolate and walnuts. Add food coloring to create a vibrant cream color.
How to decorate a cake with various fruits and juicy berries
Sometimes there is not enough time to bring confectionery fantasies to life, and the guests are already on the doorstep, then fruit decor is what you need.

If the cream does not work out for an inexperienced hostess, then the fruit will not spoil anything. Use grapes, orange slices, garnish with blackberries or strawberries, whichever berries are commercially available.
So that the biscuit cakes are not soaked with berry juice and softened, decorate the cake, smeared with a layer of cream or icing.
For decoration, use not only fresh fruits, but also canned ones. To do this, drain the excess juice.
Choose products that match the color scheme and taste. Before making bright compositions, wash and dry the fruit.

The decoration with a strawberry with a ponytail or orange rings in a peel looks spectacular. Try making a citrus flower by folding orange circles like petals.
To create a fruit paradise, even use frozen berries. Raspberries, blueberries do not lose their shape when defrosted, you can decorate with frozen cherries, red currants.
To please the berries with their appearance, use the method of gradual defrosting. From the temperature difference, the berries can fall apart.
Decorating the cake with sweets: chocolate, sweets, ememdems
Chocolate decor is ideal for decorating at home. Even a child can use this method.
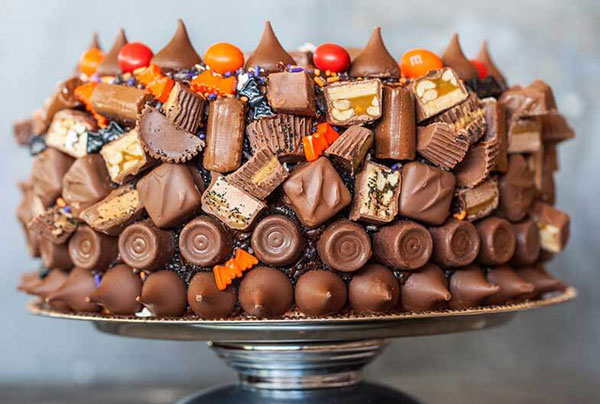
Invite your little one to help you. The kid will fantasize and create sweet pictures with the help of mmdems, sweets and chocolate.
This method will save time. For registration, you can use:
- Raffaello sweets and others.
- Dragee or raisins in colored breading.
- Peanuts in glaze.
- Marshmallow, marmalade.
- Zephyr.
- Wafer rolls.
- Oreo cookies, Snickers or brand name sweets.
Decorate the cake as your fantasy dictates. Combine colors, lay out inscriptions from pills. To decorate, the sweets must stick, so grease the cakes with cream. This way the candy will stick better.

Make a fence of wafer rolls for the cake and decorate with an openwork ribbon. You can use Kit-Kat or Twix sticks. You need to mount on cream walls.
If you're willing to spend more time, melt the chocolate, draw butterflies, hearts, or roses on parchment using a pastry bag. After hardening, quickly transfer the drawing to the cake.
Beautiful decorations for children's mastic cakes
Such figurines became popular. Buy or make them yourself. To do this, we need mastic. There are several recipes. Mastic is made from gelatin, milk powder and even condensed milk.

Delicious and simple - marshmallow recipe:
- Marshmallow - 200 grams.
- Butter - 5 grams.
- Water - 5 milliliters.
- Powdered sugar - 100 grams.
- Starch - 10 grams.
The recipe is quick. Take a chewing marshmallow of the desired color, sprinkle with water, add a piece of butter, send it to the microwave for 10 seconds.
The marshmallows will double in size. In the hot mass, add portionwise powdered sugar, dye and knead. Sprinkle the table with starch if necessary.
Attention! Sift the powdered sugar thoroughly so that the mastic is smooth. Do not add a lot of powder, otherwise the dough will crumble.
You can cover the entire cake with fondant. Sour cream cake will not keep its shape; it is better to prepare honey or bird's milk for mastic.

Use an oil cream as a base for mastic. From the marshmallow mass, you can fashion bears, cars or cartoon characters - whatever you think of.
Important! Use natural ingredients, syrup or juice as dyes. You should not use alcoholic beverages for impregnation, but add vanillin or orange zest for flavor.
Original decorations for cakes and cupcakes for birthdays and holidays
For children's parties, prepare a cake in the shape of a number, decorate with multi-colored cream or sprinkle with marzipan decor.
Blind sugar figurines from your favorite cartoons and please your baby with an edible hero. Decorate a cake for a man with real bottles of whiskey or rum. Such miniature options are sold in souvenir departments.

Make snowmen! Decorate them with Christmas cupcakes. And for Easter, mastic chickens sitting in green cream will be relevant.
Mom for the anniversary, prepare a two-tiered cake, decorated with a festive inscription on top. Such a large dessert will be relevant for wedding events.
First birthday is a real event. Small bottles, nipples, booties cause tenderness. You can fashion tags, write with chocolate the height and weight of the baby.
For a little girl's holiday, prepare a cake in the form of a cupcake dress decorated with pink cream. Decorate a cake with cars for boys and flowers for girls.
It is worth proceeding from the interests and age of the birthday man. Cake, prepared with love and care, will be the best gift for the holiday.
Useful video
Every housewife, when starting to bake a cake, wants the cake to be very beautiful and tasty.
But not everyone has the skills of a pastry chef to decorate the cake with incredible roses and flowers, not everyone can make a suitable cream for this.
But do not despair, because the cake can be decorated so that everyone gasps.
There are many ways to decorate a cake without special skills, you just need to use the right products.
I present to you several ways to decorate cakes.
1. The first way is to decorate the cake with savoiardi cookies. Savoyardi cookies are no longer a novelty and can be found in almost every supermarket or baked on your own. This is a very simple way. On the sides of the cake, you put cookies, tie them with a beautiful ribbon, and put berries, fruits, chocolate, dragees, etc. on top.


2. The second way is to decorate the cake with thin waffle tubes. This method is similar to the first method, only tubes are used instead of cookies.


 4. Another way is to decorate the cake with powdered sugar using lace or any stencil. Everything is done very simply, but in the end it turns out very beautiful and aristocratic. All you need for this:
Choose a stencil (lace, paper figures, etc.)
- Put the stencil on the product.
- Sprinkle with powdered sugar.
- Carefully remove the stencil.


 5. The next method is a little more complicated, but still the result is worth it to “torment” a little - decorating with chocolate lace and various fins.
On a sheet of parchment paper, using melted chocolate, draw a variety of patterns or shapes.
Let the chocolate harden.
- Carefully remove the frozen figures from the paper and transfer them to the cake.


