Preparation of salt dough for modeling. There are three main methods for drying dough.
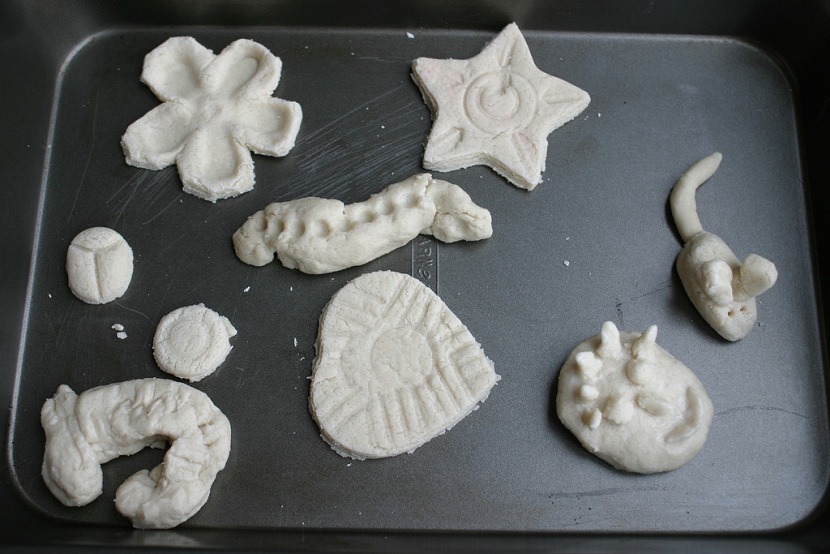
You can make a huge number of crafts from salt dough, for example: flowers, animals, various figures, inscriptions, numbers, toys, paintings and whatever you want! Modeling from salt dough is called bioceramics. The advantage of salt dough is that it is convenient to work with, this material is absolutely harmless and crafts made from it will delight you for several years. In this article, we will look at how to make crafts from salt dough with your own hands.
You will need: a glass of wheat flour, a glass of extra salt, half a glass of cold water, a bowl.

Recipe

The finished salt dough should not stick to your hands or crumble. It should be cool and comfortable to sculpt. I recommend watching the video master class!
There are two most common ways to dry salt dough. The first way: the finished craft will dry itself. The main thing is that direct sunlight does not fall on it, otherwise it will crack. The craft can be put on a flat surface and wait a few days. The second way: the finished craft is dried in the oven for 3 to 6 hours (depending on the size of the craft). Drying takes place intermittently. One approach is 1-2 hours. For quick drying in one go, set 75-100 degrees in the oven, and then the craft will dry in an hour. At a temperature of 120 degrees, the craft will dry in 30 minutes, but it is better to dry it naturally.

There are two most common ways to color salt dough. The first way: after drying, the finished craft is painted with acrylic paints or gouache using a brush. The second way: food coloring is diluted in water, then added during the preparation of the dough. When the craft is completely painted and dried, it must be covered with a transparent manicure or furniture varnish in 2-3 layers. Each layer must dry before applying the next. In this way, the craft will last for a long time.

You will need: dyed salt dough, stack, clear nail polish, toothpick.
Master Class

Salt dough asterisk is ready!
Salt dough caterpillar

You will need: dyed dough, knife, pva glue, toothpick, pendant, transparent nail polish.
Master Class
- Roll out the sausage.
- Cut it into 6 equal parts.
- Roll up the balls.
- Glue 5 balls together.
- Glue the head.
- Blind the nose and eyes, then glue them.
- Use a toothpick to pierce the hanging spot.
- Dry the craft.
- Attach the hanger.
Salt dough caterpillar is ready!
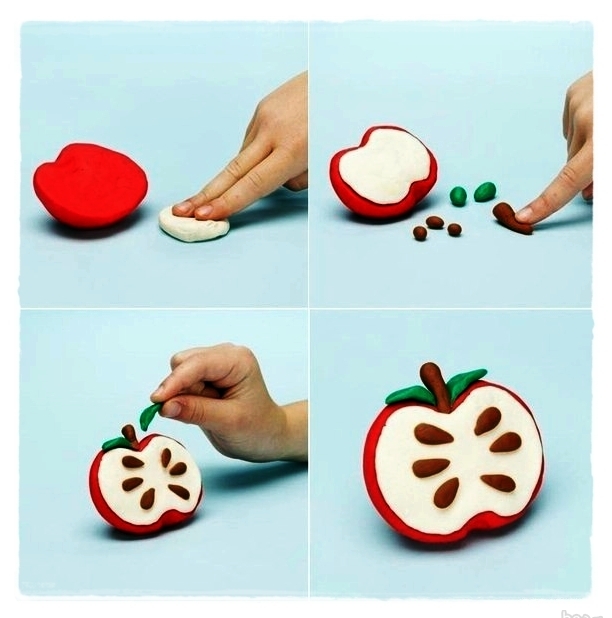
salt dough apple
You will need:
Master Class
- Blind half an apple, make the inside flat, pressing it to a flat surface.
- Blind a thin flat center and glue to the main part.
- Roll up 6 seeds and a stick, then glue to the apple.
- Blind the leaves, then glue them.
- Dry the craft.
- Cover with varnish and wait until completely dry.
Salt dough apple is ready!
Salt dough elephant

You will need: dyed salt dough, pva glue, clear nail polish.
Master Class
- Blind the elephant's body by rolling an elongated ball.
- Blind 4 legs in the shape of plump sausages.
- Blind the proboscis.
- Blind the ears of an elephant in this way: roll up 2 flat cakes, glue cakes of the same shape of a smaller size in a different color to them.
- Blind a small ponytail.
- Blind your eyes.
- Assemble the elephant in the following sequence: glue the legs to the body, then glue the proboscis, then the ears, eyes and tail.
- Dry the craft.
- Cover with varnish and wait until completely dry.
Salt dough elephant is ready!
You will need: salt dough, foil, a vase for sweets or a similar plastic container, gouache, a brush, a transparent nail polish, a modeling board, a knife or a stack.
Master Class


You will need: salt dough, nail scissors, pva glue, acrylic paints or gouache, nail polish brush.
Master Class
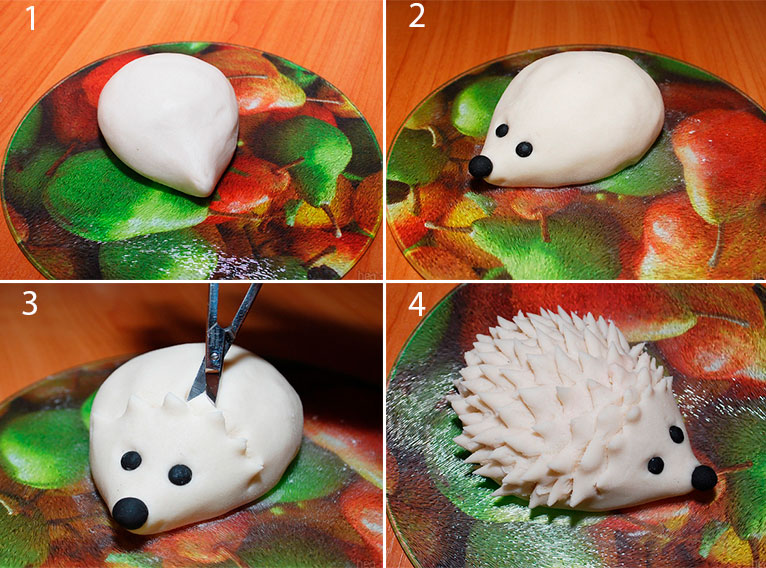
Salt dough hedgehog is ready!
Owl (eagle owl) from salt dough
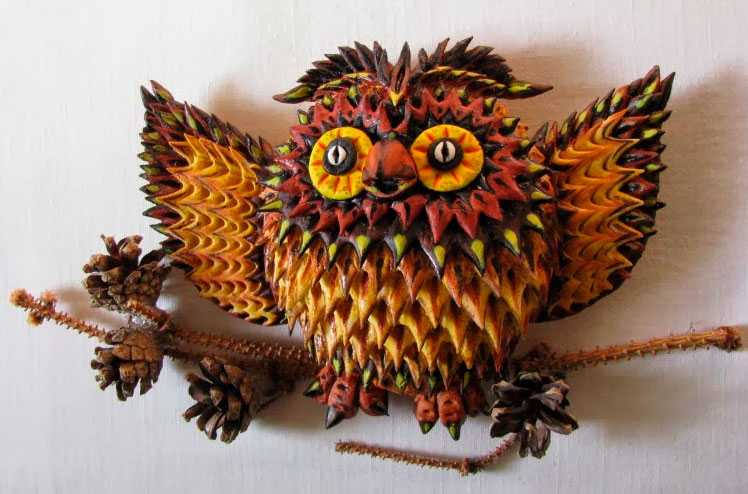
You will need: salt dough, pva glue, nail file, nail scissors, acrylic paints or gouache, brush, wooden board with pendant, transparent nail polish.
Master Class

Salt dough owl is ready!

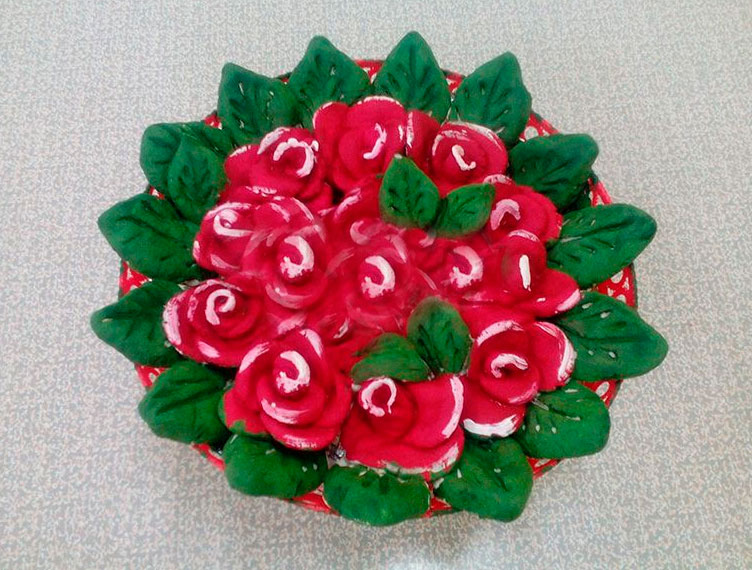
You will need: salt dough, the base on which the craft will be attached, for example, a plank or plate, a stack or a knife, a sheet of paper, a simple pencil, a garlic crusher, a rolling pin, pva glue, acrylic paints or gouache, a brush, a transparent nail polish, a carnation.
Master Class

Salt dough fruit basket is ready! I recommend watching the video master class!

You will need: salt dough, a knife, a rolling pin, a simple pencil, a sheet of paper, sandpaper, acrylic paints or gouache, a brush, a transparent nail polish, a glue gun or pva, a base for crafts, for example: a board with a frame, a transparent nail polish.
Master Class

Salt dough pencil

You will need: water, flour, extra salt, a cardboard jar for the frame, PVA glue, scissors, a piece of decorative cord or corrugated paper, gouache, a brush, a button, stacks, acrylic varnish for crafts, a toothbrush.
Master Class
- Knead the salty dough in this way: pour a glass of flour, a glass of salt, add water, then knead to the desired consistency of modeling. Separate part of the dough, add beige gouache, then knead.
- Roll out the cake with a thickness of 10-15 mm.

- Apply PVA glue to the outer rim of the jar and wrap with dough. Cut off the excess with a stack, and smooth the joints with a damp brush.
- Create a small dotted texture with a toothbrush on the surface of the dough.
- Knead the brown dough, roll it into a cake 10-15mm thick.

- Cut a 2" wide strip of brown dough and glue it to the bottom of the jar.
- Make 2 large bases for owl eyes from white dough, then glue them.
- Make a beak from brown dough and glue it.
- Blind eyes from turquoise dough and glue them.
- Roll up 8 strips of pink dough, twist 4 flagella from them and make a bow, then leave it to dry for 2 hours.
- Form owl wings with brown dough drops, then glue them on.

- Weave bundles of beige dough and glue on the neck of the jar.
- Roll up a sausage from white dough, draw a lace texture with a stack and glue it as a collar under the beak.
- Put the craft in a warm place for a day.
- Paint the lower part and wings with brown gouache and decorate with white dots.

- Draw pupils and eyelashes with black gouache, wait until the paint dries, then draw white highlights on the eyes.
- Glue a pink bow over the wing.
- glue a button with a bow from a corrugated strip onto the lace.
- Cover the craft with varnish and wait until it dries completely.
Salt dough pencil is ready!
Dachshund from salt dough

You will need: salt dough, simple pencil, scissors, cardboard, paints, brush, rope, toothpick, foam sponge, clear varnish, PVA glue.
Master Class

Salt dough dachshund is ready!
Mushroom mushroom from salt dough

You will need: salt dough, light bulb, paints, brush, foil, cardboard, masking tape, superglue, PVA glue, paper napkins, clear varnish, stack.
Master Class

Mushroom mushroom from salt dough is ready! I recommend watching this video!
Funny pigs from salt dough

You will need: salt dough, paints, brush, foam sponge, stack, thin string, toothpick, black helium pen, PVA glue.
Master Class

Funny pigs from salt dough are ready! I recommend watching this video!

You will need: salt dough, baking sheet, rolling pin, knife, sheet of paper, acrylic paints, brush, ribbon, water, shoehorn, pencil, sandpaper, clear nail polish.
Master Class

For those parents who are afraid to give plasticine to a too small child, but want the baby to learn to sculpt from childhood, salt dough has been created. Previously, only a mother could cook this for her child, but today its factory version has taken a full-fledged place next to other goods in children's toy stores. Although this mass was not invented yesterday, for many it still remains a kind of mystery.

Peculiarities
The positive role of modeling in the development of a child has long been beyond the slightest doubt - it has a good effect on both the physical and mental components. At the same time, it is quite obvious that the earlier you start, the more impressive results could be achieved. At the same time, plasticine is the main material for children's creativity today, it is not recommended for use by children under 3 years old, and in the future its use is desirable in the presence of adults.
In this context, dough can be an excellent alternative for young children. Made at home, it differs little in its composition from what is used for home baking, except that it is cooked a little differently, and almost always with the addition of a huge amount of salt, because this is the only way to ensure that the child does not pull the clay into the mouth.


However, even if it pulls, it's okay, because the product is made exclusively from edible ingredients that do not require much chewing and are easy to swallow.
Industrial production somewhat expands the range of ingredients - the composition may include additional plasticizers, dyes, and even sparkles. Usually, manufacturers are guided by the same theoretical suitability for food, although sparkles are unlikely to be useful for a child's body. At the same time, not all companies follow this moment so carefully, selling softer types of plasticine under the guise of modeling dough.


Since we are talking about consistency, it should be noted that modeling dough has another important indicator for kids - it is very soft. Such a mass does not need to be pre-kneaded, it is immediately ready to create masterpieces. At the same time, this feature does not allow the material to keep an overly complex shape with small details. The mixture is very afraid of open air - it dries out on it, losing elasticity and becoming brittle. Finished products from it, if desired, can be preserved by special drying or baking.

What is needed?
First of all, modeling dough helps the child develop fine motor skills of the hands and train the muscles of the fingers, and also greatly contributes to the development of imagination and creative inclinations. However, only adults see the purpose of the mass in this way, while the kids themselves perceive children's dough as another toy from which you can create various crafts that you can then be proud of if the end result is successful.
For sculpting large volumetric figures with small details, this material is not very suitable, since it holds its own weight rather poorly. For this reason, it is much more often used for sculpting small figures, creating various compositions from them, and also as a raw material for creating three-dimensional paintings.


If, when focusing on achieving the first two goals, you still have to think about whether your plan will work out or not, then you can look for inspiration for paintings almost anywhere. Plots are most often taken from nature - children sculpt simple landscapes, animals, flowers, the same sun. However, you can not stop there - if you have talent, at later stages you can move on to making serious images, or at least heroes of your favorite cartoons. Fairy-tale castles, fairies - yes, even Shrek and Fixies!
It must also be understood that different types of crafts are regarded differently by children themselves. Toddlers usually want toys, so they are more interested in voluminous figures. Compositions and paintings are already real creativity, it is not intended for play, but it will help to gain recognition, respect and praise from others; therefore, such modeling results will be more interesting for older children.


How to knead with your own hands?
Many housewives, realizing that the recipe for the mixture is actually very simple, prefer not to buy the mass, but to knead it on their own. It is very easy to do this, given that the ingredients that make up the composition are usually found in any apartment, and if not, they can be bought literally everywhere. Making the mass yourself will be much cheaper than buying, and in terms of properties, it will not be inferior to many varieties of store products - you just need to know the correct proportions.
If you are far from a master yet, but still want to try making homemade plasticine yourself, pay attention to the best recipe in terms of simplicity. The materials used for cooking will surprise you with their simplicity - the mass is made from flour and salt, the composition also includes ordinary water. The exact proportions differ due to the fact that the final mass can be of different density, but usually they are indicated as a glass of flour and half a glass of salt per half a glass of water, and then experiment.


For a more elastic state, a tablespoon of vegetable oil is also added, and an extremely improved version is prepared with citric acid (two teaspoons).
However, not ordinary dough is used for modeling, but custard. The described ingredients are not just mixed, but placed in a saucepan over medium heat. The exact time is never given, because pots and stoves vary greatly, but if the modeling mass has thickened and become homogeneous, it's time to pull it out.
In the process of heating, the mixture must be stirred in order to achieve a uniform mass, but even after removing it from the pan, it is again diligently kneaded on a flat surface sprinkled with a small amount of flour. The finished dough keeps its shape well, does not stick to hands and does not contain lumps.


Of course, home-made types of plasticine do not end with this recipe alone. In fact, you can get a thick notebook and write it all over with different plasticine recipes, but another recipe that involves alternative ingredients and made with starch. To do this, two cups of ordinary baking soda are mixed with a cup of corn starch and half a glass of water, after which the procedure is similar to that already described above. Salt is not included in this recipe, so young children can simply eat this type of mass.
For greater durability, crafts also use a recipe with PVA glue - products from it are somewhat reminiscent of papier-mâché. A glass of finely ground salt is mixed with the same amount of flour, where a mixture of about half (or a little more) a glass of water and a tablespoon of glue is gradually poured. You should stop adding water at the moment when the future "paper" dough stops absorbing it. After that, the mass is thoroughly mixed, since the salt grains do not have time to dissolve in it, and the recipe does not require heat treatment.


How to make colored dough at home?
Making salt dough at home does not require much effort, but you want the result to be like Play-Doh (play-do) - bright and beautiful. To do this, dyes are added to the dough - this is possible both at the stage of preparation, and in the presence of a ready-made colorless mass.
To achieve the desired effect, you can use special food colors, which are sold in many culinary stores. They are liquids that are mixed into water during cooking (if it is in the recipe), and after cooking, such a dye can be mixed into a colorless dough. Experts point out that in this way you can color the dough easily and quickly, but the result may not be very impressive - the mass will acquire a shade rather than a color, and for the normal brightness of the purchased dye, you need a lot.


By the way, you can not buy a dye, using all the same natural ingredients. Most often, juices of vegetables and fruits are used in this role: beets give a red color, carrots give an orange color, and so on.
Such juice can be squeezed out yourself or bought, as an alternative, any drinks of the corresponding color will fit. To give the dough a yellow tint, various mild seasonings are often used, brown - coffee or tea. However, it is worth considering that such a substance is not at all a specially selected dye, so the result may turn out to be even more faded.
You can color the dough not with food coloring, but ordinary gouache- the diagram looks exactly the same. At the same time, it is not at all difficult to get such paint, because it is used for creative education in children's educational institutions, and it is inexpensive, but the color gives a very bright one, which is what we need. True, it is noted that such an ingredient very much liquefies the mass, therefore, when using this method, adding a certain amount of flour is mandatory.


How can you paint the finished product?
Dyeing dough as a raw material is suitable for creating simple crafts, but complex compositions with a large number of multi-colored details are easier to make from a solid mass, which then, after drying or baking, will be painted on top. At the same time, the specificity of the material dictates its own characteristics of the coloring procedure.
People with extensive experience with modeling dough indicate that it is best to paint finished crafts with acrylic paint, because only so you can ensure that the product will not get dirty, and the colors on it will not be smeared. It is acceptable to use watercolor, but since dry dough is very afraid of water, the paint should be mixed extremely thickly - this will help it not to spread.

When painting with watercolors, the risk of smearing the contours is still high, so the figure must be be sure to varnish after staining. Gouache is also used for coloring finished products, but in order for it to adhere normally to the surface of the figurine, it must first be mixed with a small amount of PVA glue.
Varnishing, by the way, is recommended for all types of dyes, because it can protect the surface from accidental water ingress, and bright colors from fading. Liquid varnish is absorbed into the craft, which requires repeated varnishing and is a procedure for many days, but the result is bright, and not just shiny.
Thick varnish is also used, but is still less common.


How to dry?
In dried form, dough crafts last much longer, but in order for them not to fall apart over time, it is necessary to endure the procedure. It should be noted that there is no exact description of it anywhere - it all depends on the specifics of the source material and the exact drying parameters.
Modeling dough hardens even just on open air- beginners usually rely on this method. The main disadvantage of such drying is the drying time: the dough dries on average one millimeter deep per day, so even a small voluminous figure can dry for weeks.
You can speed up the process by organizing drying on radiators, but there is also a risk here - due to the heterogeneity of the consistency (soft dough inside, hard outside), the product is likely to deform.

For this reason masterpieces are best baked, and the microwave is not suitable for such purposes at all - you only need to use the oven. There are many detailed descriptions of the process indicating the exact duration and temperature, but in fact, no one knows exactly how long the dough craft dries in the oven - it depends on the shape of the craft and the shape of the oven.
It is even noted that the baking sheet can also influence the procedure - black provides more efficient drying, and therefore it is necessary either to lower the temperature by twenty degrees, or to reduce the baking time.
In general, baking lasts several hours at a temperature that gradually increases from 50 to 150 degrees. If the dough was pre-colored, the upper temperature limit is 125 degrees, since the dye will collapse with more intense heating. The baking process is not forbidden to stretch for several days. You can check the conditional readiness of the product with the help of the sound that it makes when gently tapping on the surface - the solid filling responds with a sonorous, peppy sound.


How to store?
Even though baby salt dough can be kneaded at any time, moms still prefer to find a way to keep the mass for a certain long time, rather than re-preparing it every time the child has a corresponding need. It should be noted here that such a mixture will definitely dry out and lose elasticity, but there is a difference - in a month, or in a couple of days.
The most obvious way to store the mass, used by industrial manufacturers, is the storage tightness. The store product is sold in special jars with a tight lid, and if any are left in the house after the last purchase, it is best to use them. As an alternative, you can Lotno wrap the pieces of dough in cellophane or polyethylene, however, this method is already less reliable.


Refrigeration can also help prevent drying out, as cold generally slows down most chemical processes.
If you need to save the finished product, then, first of all, you need to carefully protect it from water ingress, since even a small drop will leave a very noticeable mark. To give strength to the figurine, it is best to bake it - then it will become quite hard, and not very susceptible to external mechanical stress. Additional varnishing of the baked product will protect it even from accidental ingress of moisture, so you can be proud of the creation for a long time.


Edible pastry for pie decorations
If your child makes really interesting figurines and makes them out of potentially edible material, you can use this in home cooking as well. If the kid is already old enough to understand that it still won’t work to play with dough products for a long time, he will most likely be glad to have the opportunity to pleasantly surprise everyone by taking a direct part in creating the pie. It means, of course, not puff, and not even ordinary pizza dough, but the mass that you can make with your own hands is perfectly molded, and most importantly, it amazes with its taste!
The first recipe is very simple - half a cup of Nutella is kneaded with the same amount of flour, adding a tablespoon of powdered sugar. The finished mixture becomes much thicker than regular Nutella, which allows it to hold its shape, but still tastes very much like the original ingredient.


All children at an early age are fond of sculpting all kinds of figures. This develops fine motor skills, imagination, logic and other skills. Previously, solid Soviet plasticine was used for this purpose, which was not very malleable in work, but was made from natural ingredients. Today, the market is full of all kinds of bright modeling products, but it does not inspire confidence in most mothers. Therefore, today our magazine will tell you how to knead salty dough, which will become an ideal material for modeling with your little one.
The main thing in the article
Varieties of salt dough for modeling
 Testoplasty- it is this term that today is called classes, where salt dough is used as the main element for work. Testoplasty is actively used in medicine, both in psychology and for the development of premature and lagging children. As for the material used for classes and modeling, its “palette” is quite diverse. There are various options for batches:
- Classical.
- Brewed.
- Edible.
- From the microwave.
- Without the use of water.
- On a boil.
- With starch.
- Color etc.
It should also be noted that such material for sculpting figures, prepared at home, can be divided into three types:
- classical- great for the smallest children who do not yet have "work experience";
- hard dough, designed for large, voluminous figures;
- plastic dough, from it you can sculpt miniature details of figures. Older kids love to work with him.
Below we will tell you how to knead the material for modeling according to different recipes.
In addition to having a good time with your child, the process of kneading such a dough can turn into an exciting game.
Salt dough for modeling at home: what do you need?
 Flour is the main ingredient. It is from her that 80-85% depends on what material for work will be in the end. Therefore, do not skimp and choose good wheat flour for kneading dough.
Salt dough even by name suggests the content in itself salt. Preference should be given to salt having small grains, such as extra class salt. Since grains of coarse salt can come across in the finished plasticine, which complicates the process of making figures.
Also, do not forget about additional materials. These include:
- the container in which the kneading is done;
- a baking sheet for the made figures;
- board and props for modeling;
- for decorating figures, a brush and paints (gouache, watercolor);
- beads, buttons and other decorative items, etc.
Important: Please note that recipes often indicate proportions in ratios, but you should know: the mass of salt and wheat flour is different, respectively, for the same mass indicated in the recipe, there will be a different volume. So, 0.5 tbsp salt \u003d 1 tbsp flour.
Classic salt dough for modeling: a step by step recipe
 Initially, we present the dough recipe, which is considered to be classic, that is, the main one. For kneading you need to purchase:
- One tbsp - salt.
- One st - flour.
- Half st - water.
- Vegetable oil - 1 tbsp.
Preparing the dough is quite simple:

Recipe for colored dough for modeling with a photo
To make it more interesting for children to spend time modeling, you can knead colored material for sculpting figures. And how, now we will tell. 
We prepare the following components:
- 300 g - flour.
- 300 g - salt.
- 200 g - water.

As for dyes, ordinary food can be used, but they can remain on the skin of the hands or natural, such as:
- turmeric- will give the material a yellow color;
- beet juice- will make it pink, burgundy (depending on how much juice to add);
- cocoa- Color brown.
We knead the dough like this:

When using turmeric and cocoa powder, dilute with water to a creamy consistency and also mix into the dough.
Dough for modeling, brewed on fire

Choux pastry can be not only for cakes or pasties (by the way, about pasties, you will find excellent dough for them). So, choux pastry is an excellent material for working and creating all kinds of shapes. In order to knead it, you need to stock up:
- One glass of flour.
- A quarter of a tablespoon of salt.
- Half a glass of water.
- Sunflower oil in the amount of 1 tbsp.
You can make a dough batch by following the instructions below:
- Add flour to salt in a separate bowl. You can add dye if you like. But it should be exclusively food, since the dough is intended to be played with children.
- Boil water, when it boils - pour in vegetable oil.
- Send dry ingredients to water and boil. Don't forget to stir.
- When the dough is brewed and becomes a lump, it needs to be kneaded, just wait until it cools slightly. The mass should not stick to the hands.
How to cook salt dough in boiling water?

When preparing dough in boiling water, glycerin is introduced. It adds shine to the finished product. We prepare the following products:
- One st - steep boiling water.
- One st - flour.
- A quarter st - salt.
- 2 tbsp - cream of tartar.
- 2 tbsp - oils.
- 1/4 tsp - liquid glycerin.
- Dyes (food).
The dough is kneaded like this:
- Combine dry ingredients.
- Pour boiling water into a container, add oil, pour in glycerin, pour food coloring.
- Add dry ingredients, stirring.
- When the brewed dough has cooled slightly, knead.
- So much flour is added so that the dough loses excessive stickiness.
Salt dough from starch: an alternative recipe for soft mass

You can replace wheat flour when preparing homemade plasticine with starch. Such a dough is no different from the classic version. You will need:
- Starch (preferably from potatoes) - 1 tbsp.
- Soda - 2 tbsp.
- Water - 1/2 tbsp.
Dough without flour is prepared like this:
- Combine starch with soda in a deep bowl.
- Pour in a thin stream of water. At the same time, stir the mass.
- Send to the stove and brew.
- When the dough comes together, lay it out.
- Once it has cooled slightly, sprinkle with starch and knead.
How to make salt dough for modeling without water?
Are you wondering how to knead the dough without using water? Let's knead together. Preparing the ingredients:
- 150 g - flour.
- 1 tbsp - sunflower oil.
- 1 tbsp - cream of tartar.
- 150 g - salt.
Now we will describe the way how to cook it:
- Pour all the ingredients into a container with a thick bottom.
- Put this container on the stove, boil, stirring.
- Remove the thickened mass from the stove, leave for a while to cool, knead.
Cream of tartar is freely available in stores that sell spices.
Salt dough with citric acid with photo

Another interesting way to make material for games with children. For kneading you need:
- Two tbsp - flour.
- One tbsp - salt.
- Two tbsp - water.
- Citric acid - 1 tbsp.
- Sunflower oil - 1 tbsp.
Preparing the dough:
- Boil water, add oil.
- Mix all dry ingredients.
- Pour water into the dry mixture in a thin stream.
- The dough initially has a rather liquid consistency, but under the influence of hot water it is steamed, becoming a lump.
Now for the coloring of the dough: 
- Dilute the dyes with water and knead them into the dough in order to give it color.
- For greater effect, you can use multi-colored sparkles that interfere with the colored dough.
Children really like this unusual sparkling material for sculpting all kinds of figures.
How to make salt dough for modeling with glycerin?

It should be noted right away that kneading according to this recipe is an excellent option for sculpting small products. Working with such material will take even the most fastidious fidgets. By the way, about how to take your hyperactive toddler, read: "". It is very pleasant to work with him, as the dough is distinguished by its softness and suppleness. We prepare the following products:
- One and a half st - flour.
- One tbsp - salt.
- Half st - water.
- Glycerin - 2 tablespoons (sold in pharmacies).
- Dry wallpaper paste - 2 tbsp.
To knead a pliable, soft mass, you need to do the following:
- Mix all dry ingredients.
- Attach glycerin and inject water in portions. Knead the dough with a spoon.
- When it comes together, knead it with your hands.
- If necessary, add more flour, the mass should not stick to your hands.
Play Dough plasticine recipe at home

Plow Dough has become one of the newest materials for developing all kinds of skills in a child, but it is not cheap. Therefore, we offer a variant according to which the dough intended for modeling turns out to be no worse than Plau Dough plasticine. We prepare the following ingredients:
- One st - flour.
- Half st - salt.
- Half st - water.
- 2 tsp - citric acid.
- 1 tbsp - sunflower oil.
- 1 tsp - glycerin.
- Food coloring.
Play Dough is prepared according to the following recipe:

Play dough that glows in the dark
In order for the plasticine to emit light, you need a lamp, but not a simple one, but an ultraviolet one. Under its rays, the dough you cooked will emit light. 
To mix this material you will need:
- One st - flour.
- Incomplete st - salt.
- 1 tbsp - vegetable oil.
- 2 tsp - tartar.
- Vitamin B - 1-2 tablets or 1 ampoule.
Kneading secrets:
- Grind vitamins into powder, if they are in tablets.
- Combine vitamin B with flour, add salt and cream of tartar.
- Add oil and water.
- Boil over low heat until a lump is formed.
- Take out the dough and knead with your hands if necessary.
Vitamin B can be purchased at a pharmacy, B100 (a vitamin supplement used by athletes) is also actively used. The secret of the luminous dough lies precisely in the B vitamins, as they glow in the ultraviolet.
How to make salt dough for modeling: the easiest recipe
In 5 minutes you can prepare an excellent composition. Preparing the ingredients: 
- One st - flour.
- 2 tsp - soda.
- 1 tsp - oils.
- Incomplete st - salt.
- One st - water.
We make a batch like this:
- Mix all dry ingredients first.
- Add water and oil, send to the stove and cook until smooth.
- Sticking the dough to the spoon with a lump indicates its readiness.
- After the composition has cooled, knead it well with your hands.
You can play with your own DIY modeling dough for several weeks. For storage, it is placed in an airtight container and sent to the refrigerator. You can also wrap it in cling film, but it will be stored for no more than a week. If you expect to play with the mass for 1-3 days, then you can store it hermetically sealed at room temperature.
Salt dough for modeling: video recipes
Attention - in all this salt dough will help as well as possible. And it's not hard to cook it. To do this, we need only a little water, flour and salt.
Salt dough recipes
Homemade mass for modelingIn principle, the recipes are very similar to each other. Main ingredients: flour, salt and water. Only such components as citric acid, cream of tartar and the presence of food colorings differ.
But among these recipes there are those that are prepared without flour or water . The method of preparing home-made plasticine is also different: in the microwave, on the stove, or you just need to knead it with a spoon.
Homemade mass for modeling can be stored in the refrigerator few weeks (in a closed bag or a plastic container with a lid).
To clearly show you mold making process(and also: do-it-yourself finger paints and colored cereals), I recorded a video 🙂
If you want to receive the video to your email, enter your coordinates in the form below - and I will try send you video as soon as possible, and - detailed step by step PDF instructions making all developing materials with your own hands.

I have deep respect for all my readers, so your data will never be shared with third parties and you will never receive spam, I guarantee.
So, enter the data in the form and get a video of the preparation of all educational materials today 🙂:
Mass for modeling No. 1
Ingredients:
- 1 glass of flour;
- 1 glass of cold water;
- ½ cup salt;
- 2 teaspoons of cream of tartar;
- food coloring for color;
Cooking method:
Mix flour with salt, gradually adding water. Add cream of tartar, oil and food coloring. Cook over medium heat until a ball forms. We knead the mass well when it cools down.
Mass for modelingNo. 2 (cook on fire)
Ingredients:
- 1 glass of flour;
- 1/2 cup warm water;
- 1/4 cup salt;
- 1 tablespoon of vegetable oil;
- food coloring for color;
Cooking method:
Mix flour with salt and pour all the ingredients into boiling water. Cook while stirring over low heat. As soon as the mass for modeling takes the form of a ball, put it on a floured surface. When it cools down, knead until it does not stick to your fingers and becomes elastic.
Mass for modeling No. 3 (knead in boiling water)
Ingredients:
- 2 cups of flour;
- 2 cups of boiling water;
- ½ cup salt;
- food coloring;
- a few drops of glycerin (for shine);
Cooking method:
Mix flour with salt, cream of tartar and butter. Add to boiling water, stirring constantly. Next, you need to add food coloring and glycerin. We knead well when the mass has cooled down. It is necessary to reach a state when stickiness disappears (if necessary, add flour).
Mass for modeling No. 4 (cooking in the microwave)
Ingredients:
- 2 cups of flour;
- 2 glasses of water;
- 1 glass of salt;
- 1 tablespoon of vegetable oil;
- 1 tablespoon of cream of tartar;
- food colorings;
Cooking method:
It is necessary to mix all the ingredients (first flour and salt, then add water, oil, cream of tartar and dyes) and pour the resulting mass into a baking dish. We close the form with a lid and put in the microwave for 4-5 minutes (at medium microwave speed). We form the mass into a bun and knead when it cools down.
Mass for modelingNo. 5 (cooking without water)
Ingredients:
- 300 grams of flour;
- 325 grams of salt;
- 2 tablespoons of wine vinegar;
- 2 tablespoons of vegetable oil;
- food coloring;
Cooking method:
 Salty dough
 Flour must be mixed with salt and wine vinegar. Next, add vegetable oil and food coloring. We put the pan on a small fire and stir until a thick mass forms. We let our future mass for modeling cool down and knead it well.
Mass for modelingNo. 6 (cooking without flour)
Ingredients:
- 2 cups of baking soda;
- 1 cup starch ;
- 1/2 glass of water;
- food coloring;
Cooking method:
Mix baking soda and starch. Add water little by little, stirring constantly. Cook over low heat until the dough forms a ball. Next, we studim and knead the mass for modeling.
Mass for modelingNo. 7 (with jelly)
Ingredients:
- 1 glass of flour;
- 1 glass of warm water;
- 2 tablespoons of salt;
- 2 tablespoons of cream of tartar;
- 2 tablespoons of vegetable oil;
- approximately 100 grams of jelly;
Cooking method:
Mix all the ingredients and put in a saucepan over medium heat to cook until a ball forms. When the mass has cooled, it must be well kneaded. If it sticks to your hands, add flour.
Mass for modelingNo. 8 (with citric acid)
Ingredients:
- 2 cups of flour;
- 2 cups of boiling water;
- ½ cup salt;
- 2 tablespoons of vegetable oil;
- 2 tablespoons of citric acid;
- 1 teaspoon of glycerin;
- food coloring;
Cooking method:
Mix flour, salt, citric acid thoroughly. Add vegetable oil to boiling water and pour into flour. We knead the dough. We knead until the mass for modeling becomes smooth and pleasant to the touch.
Mass for modeling No. 9 (plain, salty)
Ingredients:
- 1 glass of flour;
- 1 glass of cold water;
- 2 cups of salt;
Cooking:
Mix flour and salt, add water in portions, constantly stirring the dough. Knead the mass well, first with a spoon, and then on a floured surface until a bun forms. If necessary, add flour so that the mass does not stick to your hands.
Mass for modeling #10 (our favorite)
 Our modeling mass
 I like this recipe the most because it is quite simple, does not contain products that are not always on hand (for example, cream of tartar or citric acid). The mass does not need to be cooked, which personally suits me very well 🙂
Ingredients:
- 1 glass of flour;
- 1/2 cup cold water;
- 1/2 cup fine salt;
- Food coloring;
- Glycerol;
Cooking:
Mix salt with flour and add water in portions. We knead well. If the mass sticks to your hands, add a little flour, if it crumbles - a little water. That's all. Very simple.
About food coloring , if they are not at hand, they can easily be replaced with analogues. For example, green can be obtained by adding a few drops of brilliant green to the dough, brown - cocoa, red - cherry juice, purple - blackcurrant, yellow - turmeric.
I did this, first kneaded the dough, and then divided it into pieces and added natural dye to each ( turmeric, black currant and green ).
 natural dyes
 Food coloring can be added both at the very beginning of cooking to the dough itself, and later at the stage when the dough is ready.
I hope the recipes for the mass for modeling come in handy!
Good and fun creativity and modeling to you!
All the best!
Sincerely,
Marina Kruchinskaya
"We have already touched on salt dough modeling. There was only one recipe for making salt dough and just a couple of tips. Whereas salt dough modeling is a vast area in which to go deeper and deeper. Therefore, the topic Salt dough - recipes and modeling methods This is a topic that really deserves to be explored. Especially if you work with her directly, or just want to work with her in the future.
Salt dough - recipes and modeling methods are different and multivariate, since sculpting from salt dough is a great pleasure and joy! And therefore, almost every master creates his own recipe. And also the name of his technique - testoplasty, hospitable, bioceramic, flour salt.
So, salt dough recipes
The recipes describe the volumetric proportions of the ingredients. The most commonly used is such a simple recipe, which is used for simple models - without fine details and complex elaboration.
- 200 g = (1 cup) flour
- 200 g = (0.5 cup) salt (fine, NOT rock).
- 125 ml water
Please note that salt is heavier than flour, so they are the same in weight, and in terms of volume, salt takes about half as much.
For thin relief figures, add to your choice:
- 15-20 g (tablespoon) of PVA glue or
- starch (tablespoon)
- wallpaper glue (previously stir it with a small amount of water)
Strong dough for large products:
- 200 g flour
- 400 g salt
- 125 ml water
Dough for fine work:
- 300 g flour
- 200 g salt
- 4 tbsp glycerin (available at the pharmacy)
- 2 tbsp glue for simple wallpaper + 125-150 ml of water pre-mix.
For kneading, it is better to use a mixer - this will simplify the task, and the dough will turn out better.
Universal recipe for salt dough: 2 cups of flour; you can add dry starch to the flour, without leaving the norm of two glasses. For example, 1.5 cups flour + 1/2 tbsp. starch. With the addition of starch, the dough will become more elastic. Fine details, for example, flower petals, are especially good from such a test.), 1 glass of salt, 1 incomplete glass of water, about 180 g, you can add 2 tablespoons. spoons of PVA glue. Instead of water, you can cook a starch paste.
Mix all ingredients. Knead the dough until the mass becomes homogeneous And elastic If the dough turns out to be watery, then you can knead it further, adding a little flour until it becomes elastic.
Water can be replaced with starch jelly, then the mass will be much more plastic. Kissel do it like this:
Dissolve 1 tablespoon cornstarch in 1/2 cup cold water. Heat 1 cup of water in a small saucepan until boiling. Pour the starch solution into the boiling water, stirring. When the contents of the pan thicken and become transparent, turn off the heat. Let the jelly cool and pour it into the flour and salt mixture instead of water.
Salt Dough Coloring Methods
Salt dough can be tinted with food coloring, watercolor or gouache. You can also color while preparing the dough, introducing the dye during kneading, and the finished product itself is already on the surface.
An excellent chocolate color is obtained by adding cocoa. You can experiment with other natural dyes - soot, beet juice, carrots, ocher, etc. You can brown the salt dough product in the oven for a natural color.
When tinting, keep in mind that after drying, the color will become less saturated, but if you cover the craft with varnish, it will become brighter again. What varnish can be used? Acrylic and artistic is very good. It is also possible to use a conventional water-based construction material for breathable surfaces, i.e. for parquet or wood.
Features and methods of preparing salt dough:
There are a few things you can't do with salt dough. So, for example, you can’t add pancake flour (or flour with any other additives) to salted dough, since the figures will rise like good pie dough and crack when dried.
Also, you can not add iodized salt, large inclusions do not dissolve, subsequently the dough is not homogeneous - into a grain. Likewise, you can not add rock salt without first dissolving.
About water. So, in the test it is best to use very cold water; be sure to add in parts of 50 ml after each addition, knead (due to the fact that different flours may require different amounts of water).
Salt is first mixed with flour, and only then water is poured into the finished mass.
Salt dough is stored in a plastic bag or a tightly sealed container. It is better to take out salt dough from a plastic bag in small pieces, since lumps of dough quickly become covered with a crust and when rolled out or molded, these dry crusts spoil the look.
And one more thing, if the figures are thick (more than 7 mm), then after the first stage, you need to remove the excess dough from the back (the Drawing is in Khananova’s book, on the page - in books)
The dough may be too soft. Then proceed as follows: mix a tablespoon of flour with a tablespoon of salt at the bottom of a bowl. Press the ball of dough into this mixture and then knead it. Do this until the dough becomes more dense.
You can sculpt or cut out figures immediately on a baking sheet. The baking sheet should first be moistened with water, in which case bubbles will not form between the product and the surface of the baking sheet, therefore, the surface of the product will be even and stable.
Everything that falls off is just wonderful and, most importantly, it is not noticeably glued with PVA glue.
Swelling or crackling of salt dough crafts occurs in three cases:
- If the flour is incorrectly selected. For greater strength, you can add rye flour to the dough (the color will be warmer and there should be no crackling) (for example, a glass of ordinary + a glass of rye, 1 to 1), 50 gr. starch - also give the dough elasticity and prevent cracking. You can also add PVA glue, since it also gives plasticity and prevents the dough from rising.
- If drying is not done correctly (see next section)
If crackling occurs after painting, this means that the product has not completely dried out (the product continues to dry and the air needs to go somewhere), so the surface of the paint or varnish is cracking. Do not rush to paint or varnish the product, so that later you do not regret and do not redo it.
Frequently asked question: how to dry salt dough?
Drying is best in the air in natural conditions, but this is a long time (complete drying can take a week or more - especially if the humidity during drying is high - as salt draws moisture), so you can dry it in the oven, following a few rules.
- The oven must be at the lowest temperature
- It’s good if drying goes with the oven lid ajar
- You can not put products in a hot oven immediately, heating should occur gradually. As well as pulling the product out of the oven, it is better if it cools down gradually instead of with the oven
- It is ideal to dry in several stages: an hour dried on one side, turned the craft over, dries from the inside out. I still take breaks between drying, it dries in the oven for an hour - it dries itself for a day - then again for an hour and a half in the oven on the back side.
The drying time of a salt dough product depends on the thickness of the product itself. And also from the applied manufacturing recipe. So, dough containing butter, cream, etc. dries much longer than dough without oil-containing additives.
To avoid cracking the product, you can dry it in three to four stages, in the oven at the very minimum and always with the lid open for about an hour and a half, then a break for two or three hours, or all night, the craft dries itself, and then again turn on the oven to minimum with the lid open.
With natural and oven drying, the craft must be rotated at each stage of drying, i.e. hour dries with the front side, rests, turned over at the next stage and dries with the reverse side.
Thus, we have covered the basic recipes and methods for modeling salt dough.
Successful creativity!

Based on materials http://solo-nebo.narod.ru/recept-s ovet.html http://www.mama-pa pa.com.ua/page/170.html


