Experiments with lemon juice for schoolchildren at home. "The Magical Properties of Lemons"
It turns out that the lemon, to which we have become accustomed since childhood, is a storehouse of chemicals, among which we are interested in limonene and citric acid. With their help, we will conduct experiments with lemon.
How to inflate a balloon with a lemon
In order to inflate a balloon with a lemon, we need the following:
- vinegar - 3 tablespoons,
- soda - 1 teaspoon,
- lemon juice,
- funnel,
- Glass bottle,
- glass Cup,
- insulating tape,
- balloon.
Dissolve soda in a glass of water and pour into a bottle. Mix lemon juice and vinegar and add to the bottle. Then we quickly pull a balloon over the neck and wrap it with electrical tape for tightness.
The reaction of lemon juice, vinegar and baking soda occurs with the formation of enough carbon dioxide to inflate the balloon.
By the way, you can not only inflate, but also burst a balloon with a lemon.
How to use a lemon to launch a rocket
The main active ingredients in this chemical experiment are citric acid and soda. We will also need:
- Glass bottle,
- wine cork,
- colored and toilet paper.
Let's build a rocket first. To do this, we glue “stabilizers” made of colored paper to the wine cork on the sides. Dissolve 3 tablespoons of citric acid in a glass of water and pour into a bottle. Carefully wrap 1 teaspoon of soda in toilet paper so that it does not crumble. Carefully, but at the same time, quickly throw this bundle into the bottle, immediately and not too tightly cork. After a while, the rocket will pop out of the bottle!
The principle of experience is the same as that of the previous one. The rocket is propelled by carbon dioxide released as a result of the reaction of citric acid and soda.

Lemon Volcano
To create a lemon volcano, we need:
- lemon,
- soda,
- plastic pallet or wide flat plate.
Cut the lemon in half. Squeeze juice from one half, this part will no longer be needed. At the second half, cut off the top and cut out the core like a volcano vent. Spoon gently soften the "mouth" of the volcano. Now add soda to it. The lemon will start bubbling like a volcano! To keep the reaction going, add pre-squeezed juice and soda to the core. If you think the volcano is a little weak, make a solution of liquid soap in water and add it to the same. A beautiful effect can be achieved by adding aqueous solutions of various food dyes to the volcano. This experiment truly gives the broadest flight of fancy!

Lemon Invisible Ink
Before we did similar experiments with lemon, now we will make real invisible ink! To do this, take half a lemon, a cotton swab and a cup of water. Mix lemon juice and water in a 1:1 ratio in a cup. Dip a cotton swab in the resulting solution and write some secret message on paper. After the liquid dries, traces of the inscription will not be visible at all. Now, to read the invisible text, it will be enough to heat the paper a little, for example, by holding it over an incandescent lamp. The written words will clearly appear on paper!

Lemon battery
Lemon is able to produce a chemical current! Now we will conduct another very informative experiment. For it we need:
- lemon,
- steel nail or paperclip
- a copper coin or a piece of copper wire,
- two wiring,
- Light-emitting diode.
Having previously cleaned the contacts, insert them into the lemon at a distance of at least three centimeters from each other. The copper contact will be a plus, the steel contact will be a minus. The longer the contacts are, the higher the voltage generated will be. Now we connect the wiring contacts in the lemon with the legs of the LED. It is important to observe the polarity here, because. The LED only conducts current in one direction. Usually the legs are made of different lengths: short minus, long plus. Those. we connect the wire from the steel contact with a short leg, from the copper one with a long one. If suddenly the LED does not light up, swap the wiring.

Lemon - stain remover
The property of lemon to discolor various substances can be studied by the following very simple examples. Drop iodine on a cotton pad. Then squeeze a few drops of lemon juice onto the iodine stain. The stain is gone! This property is familiar to us from everyday life. By adding a slice of lemon to strongly brewed black tea, we can observe that the tea has brightened. The more acidic the lemon, the better it exhibits its bleaching properties.
By the way, we have a good experience with iodine and starch, which clearly demonstrates the discoloration of substances with acid.

As we have seen, the lemon is perhaps the most scientific fruit, and experiments with the lemon are very varied. Experiment with us and be sure to repeat it at home!
Emotions received in childhood are the most vivid and unforgettable, so I always try to give my kids as much time as possible, walking in parks, visiting puppet theaters, dolphinariums and other places. But, such events, if organized almost daily, require a lot of time and effort, which is very problematic to find when you have two small children. Therefore, you have to look for other ways to entertain the kids and provide them with a little magic at home or on the playground. Experiments with soda were a real find for me, and for children an amazing holiday.
Until quite recently, I did not even suspect that experiments with soda, vinegar, citric acid, as well as other simple ingredients, would cause incredible impressions on children. To date, my collection of easy experiments includes more than 15 different options. With the most interesting tricks that every child will be interested in, I want to introduce modern mothers. I am sure that they are also looking for ways to entertain the baby with something interesting and exciting.
So, we begin our acquaintance with the most attractive experiences, the first of which will be a favorite children's entertainment.
Many people know that kinetic sand provides an opportunity to create a wide variety of figures, build beautiful towers and other structures. In order not to acquire an expensive mass, you can take a few minutes and prepare this composition with the children, and then make the desired masterpiece.
To create kinetic sand from soda, you will need:
- detergent for dishes;
- baking soda;
- spoon and bowl.
coca cola and soda
The soda experience, which delights not only children but also adults, requires three simple components:
- bicarbonate of soda;
- a small piece (about 7-8 cm) of a plastic pipe, the diameter of which will allow it to be inserted into the neck of the bottle;
- drink "Coca-Cola" - 2 liters.
This experience will allow you to get an amazing fountain, the height of which can reach a 2-meter mark, so it is better to experiment outside.
 Before enjoying the splendor of the spray jet, you will need to make a cut in a piece of pipe (cut not completely). When installed on the neck of the bottle, this cut should be at a distance of 5-6 cm from the bottom of the part. This is done so that the full volume of soda immediately enters the contents of the container. A piece of paper is inserted into the incision to hold the soda in the pipe. As soon as the required amount of powder is filled up (about 2 tsp), the soda “holder” can be pulled out. When the dry matter is combined with Cola, a powerful reaction will occur, and the brown drink will rush to the sky.
How to make a soda bomb
Household life hacks with soda are known to a wise housewife, but many do not even suspect that this powder can be used to play with children by making water bombs with their own hands. The recipe for this entertainment is very simple:
- Pour soda powder into a deep container;
- Add gouache of the desired color;
- Pour in a small amount of water to get a fairly thick mass;
- Make a soda bomb the size of a tennis ball;
- Leave the finished product to dry for a day.
 After the specified time, prepare a solution of citric acid in a bowl (it should be very weak), and invite the baby to throw a bomb into the liquid. He will be happy to throw small balls into a container and watch the “reviving” water, captivating with its long seething.
A very interesting solution would be to use such bombs in "contact" with another liquid. Pour 1 tsp into a glass. citric acid and add a small amount of sparkles there. Pour the contents with water, then “enrich” the solution with vegetable oil (3-4 tablespoons).
Now you can prepare for the appearance of a miracle and dip the soda ball into the composition. Flying drops of oil and glitter will impress not only your child, but also you.
Rocket on vinegar and soda
Opening a bottle of champagne, each of us does it with the utmost care, knowing that the cork can easily “break out” and rush to the ceiling. The explanation for this is very simple. A huge number of bubbles, "born" as a result of fermentation, are in a hurry to break out. A similar situation can be created at home and launch a rocket. This experiment is somewhat reminiscent of the previously mentioned one, where soda and Coca-Cola were used.
 When the rocket is launched, sodium bicarbonate will interact with vinegar. This chemistry experiment requires you to do the following:
- Match the "rocket model" to match the neck of the bottle. The selected cork option should fit snugly into the neck without falling into the container. This cork can be modified to look like a rocket to make it more interesting for the child;
- Fill a glass container with table vinegar (should take up 1/3 of the container);
- Take a small piece of toilet paper and place 1-2 tsp there. soda, then carefully wrap;
- Immerse the prepared bundle in a bottle, cork with a prepared cork.
All you need to do is shake the bottle lightly and point it upwards. The launch of the rocket will be without delay.
What rocket will turn out - look at the video.
Soda smoke bomb
A soda smoker will be an interesting experiment. This is a color option that is guaranteed to make a lasting impression.
You will need the following components:
- granulated sugar - 40 g;
- sodium bicarbonate - 1.2 tsp;
- potassium nitrate - 60 g;
- dye of the desired color shade - 3 tsp
 Mix sugar with saltpeter in a container and put on a very low fire. The heated components should be stirred continuously, making sure that the mixture does not burn. As soon as the composition turns into a homogeneous mass and acquires a golden hue, you should add baking soda, and after a few minutes pour in the dye. Without removing the container from the fire, and stirring, you should wait for the reaction to appear. As soon as foam forms, the flue is ready. It should be removed from the fire and cooled. Place the mixture at room temperature in a toilet paper or paper towel tube. We insert the wick, and the product is ready for use.
Smoke bomb made of saltpeter and flour
A smoke bomb is one of the entertainments that attracts not only boys, but also girls. Using flour and baking soda, you can create a chimney that will not disappoint with its effect.
To prepare a smoke bomb, you need to take:
- wheat flour - 100 g;
- potassium nitrate (nitrate) - 100 g.
- toilet paper or old newspaper.
In addition, you will need a container for mixing the components and a container for creating the checkers themselves. Many have managed to make them from empty deodorant bottles, but personally I did not succeed. I used cardboard tubes left over from paper towels (I think you can also take from under foil, baking sleeves, etc.), clogging one of the sides.
 You need to prepare a mixture of flour and potassium. To maximize smoke emission, you should first grind potassium nitrate in a separate container. Immerse the resulting mixture into the space of the container, and insert a filter into the middle of the mass (it can be a fireplace or hunting match).
Lighting the wick should be done with extreme caution as you may burn your fingers.
By conducting experiments with soda, you can not only have a good time with your child, but also open up a huge educational world of chemistry for him. The result of each experiment will raise many questions, hypotheses and assumptions, thanks to which the children will slowly plunge into the world of knowledge.
 Whichever of the experiments you decide to conduct, remember the precautions and safety measures, especially if there are children nearby. Make sure that when in contact with soda compounds and other substances, they do not rub their eyes and do not pull their “inventions” into their mouths. Soda, in combination with the other components mentioned, can give many pleasant moments, but negative ones are also possible, so experiments should be carried out with extreme caution.
For several weeks in a row, we have been buying up all the soda and vinegar in all the nearby stores. And all because we decided to do all the experiments in which soda and acid are present. Svyatoslav has reached the age when he feels like a real experimenter. Conducting experiments is now his favorite entertainment and exciting pastime. And the younger one is already in a hurry to move the chair to the table and sit down closer, accompanying everyone with funny exclamations.
I must say that experiments are not only an interesting sight, but also an occasion to reflect on what is happening (for an older child), to put forward hypotheses why this is happening. And sometimes repeat the experience, changing the components. Sometimes the desired result does not occur, for example, due to low acid concentration or excess air where it should not be. And then - this is also a result, a reason for reflection, repetition of experience, and correction of inaccuracies.
For reference: The interaction of baking soda with vinegar is called a neutralization reaction. Its essence lies in the fact that acid, when interacting with alkali (soda), neutralize each other, releasing carbon dioxide.
The main ingredients of all the experiments listed below are soda and acid. In some cases, I use citric acid at a concentration of 1-2 teaspoons per glass of water. And sometimes - 9% table vinegar.
So let's start our journey through soda experiments.
1. Volcanic eruption.
This is one of my favorite childhood experiences! Everyone probably knows him, but for the complete collection I cannot but mention him here. After repeated repetition of the violent reaction of soda with acid, the child, sooner or later, will have a question, why does this happen in nature? Tell him that the earth is made up of a core, mantle, and crust, and sometimes holes form in the earth's crust called volcanoes. Through the mouth of the volcano, hot molten lava, as well as ash and gas, escapes from the depths of the earth. Also find on the map still active volcanoes or tell us about the most powerful eruptions that destroyed cities in antiquity.
For experience you will need:
Tray or dish
Soda, vinegar, a little paint or dye, liquid soap.
Plastic bottle
There are many ways to make a volcano. The most common is to take a plastic bottle as a base, then sculpt a mountain around this bottle. This can be done from salt dough, hardening mass for modeling, plasticine.
Also, in warm weather, a mountain can be made of sand right in the sandbox by placing a bottle inside.
What we do:
Pour soda and dye into the bottle, add a couple of tablespoons of detergent.
Then carefully add the acids.
The volcano starts spewing soapy foam.
Our last volcano was molded from salt dough, tinted with cocoa, and a depression was made inside. Our volcano dried on the windowsill for about 5 days, after which it has been working hard for a week, spewing lava every day.  And this is a photo from ours, taken a few years ago.
  2 experience. Inflate the balloon
What we do:
About 1/3 of the bottle is filled with acid.
Pour soda into the balloon through the funnel.
We put balloons on the neck of the bottle, and gradually pour the soda from the balloon into the bottle.
Result:
The balloon begins to inflate due to the release of carbon dioxide. 

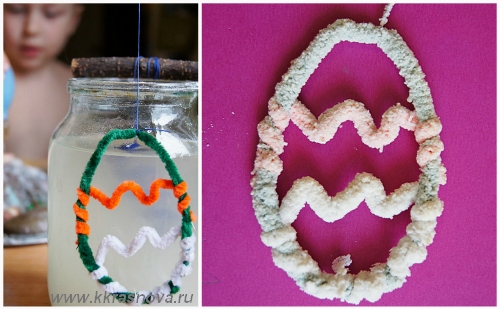
3 Growing crystals from soda
Pour hot water into a glass or jar. Add soda and stir. When the soda stops dissolving, it means that there is enough “food”. I added about 15 tablespoons of baking soda just to be sure 🙂
We hang objects on a thread on which we will grow a crystal. I took chenille wire, but you can hang any object. We tie the thread to the stick and install it on the jar. We are waiting for about a day.
Why is this happening: When the liquid cooled, the soda stopped dissolving and began to settle on the thread with the figure. When the water saturated with soda began to evaporate little by little, the crystals began to “grow.
In winter we spent experience in growing crystals from salt And, such crystals are even more interesting and "crystalline" than soda.

4 Drawing on soda
With the help of soda, dye and acid, you can create patterns. This is one of the unusual drawing methods that is worth trying.
There can be many variations of such a drawing. First, you need to pour soda into a wide dish and evenly distribute it. And then there are variations.
Dyes: can be diluted with water and drip on soda. And you can use dry dyes and fill with a pattern, and only then drip liquid.
Acid: You can drip acid into soda, or you can sprinkle soda with citric acid crystals and drip with water.
And of course, various devices can be used as a source of liquid: pipettes, syringes, syringes, spray from a spray bottle.
First, we dripped dyes diluted in water with dissolved citric acid onto the soda.  And in another version, they sprinkled soda with citric acid, then applied a pattern with dyes, and sprayed water into the dish with a spray, and this is what happened.
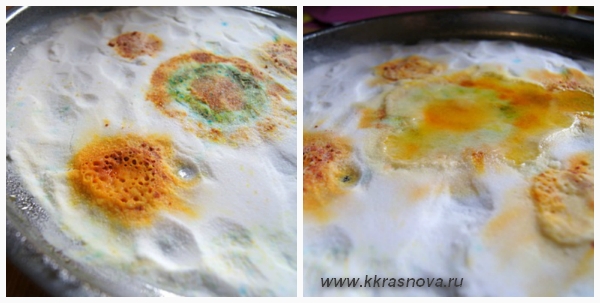
 after everything is mixed, you can take a stick and draw, mixing all the colors. The applied pattern does not spread, but "keeps its shape"
  And little Timothy is madly in love with all our ugliness, and, naturally, he cannot resist touching it all 🙂
5. Soda bombs.
For this experiment, it is necessary to make soda bombs in advance.
How to do: in a bowl, mix soda and gouache + a few drops of water to knead a thick mass. The mass should be well molded by hand. We make lumps from this mass and leave to dry for a day.
And here's what happens:  And already these lumps can be thrown into acidic water and watch how they begin to hiss and bubble and gradually color the water.
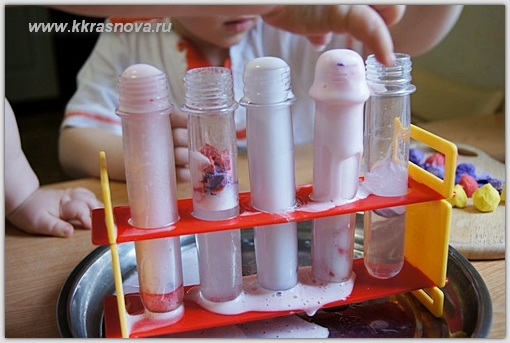
 Another unusual way to use such soda bombs is to add oil to the glass.
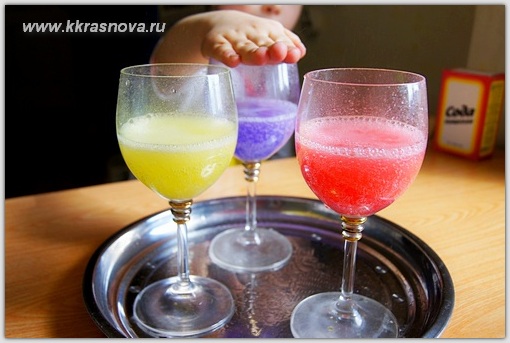
At the bottom of the glass, I poured citric acid and sparkles, added water and vegetable oil.
Then we add a soda ball to the glass and watch the sparkles and oil droplets fly. 
 This experience becomes even more spectacular if you throw an effervescent tablet instead of soda balls, watch this video
6. Ice from soda
Many children love to freeze and melt ice, and by adding soda to water, this process becomes even more interesting and unusual for a child.
First of all, you need to make a concentrated soda solution and distribute it in forms.
When the ice is ready, put it on a dish.
To melt ice, you will need hot water with dissolved citric acid, about 1-2 teaspoons per glass.
We give the child a syringe or syringe and watch how the ice melts with splashes and bubbles.  Variations: Add some treasures, such as beautiful beads, to the ice molds before freezing, then the child will be even more enthusiastic about getting them from pieces of ice.
7. Dancing Rice
We add dark rice to the water (you can use any cereal) - the cereal settles to the bottom.
Then add a spoonful of soda, stir thoroughly. 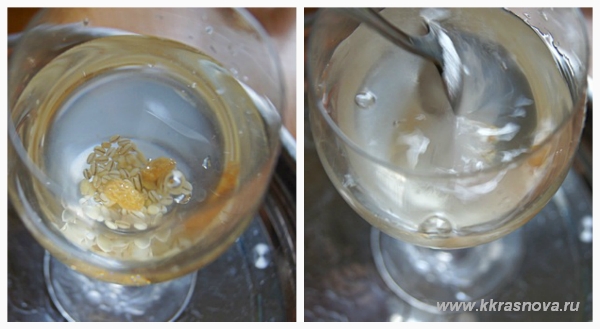 We start pouring vinegar into the glass.
Each grain of rice is covered with small balls and begins to “dance” in the glass, rising up and then falling down. 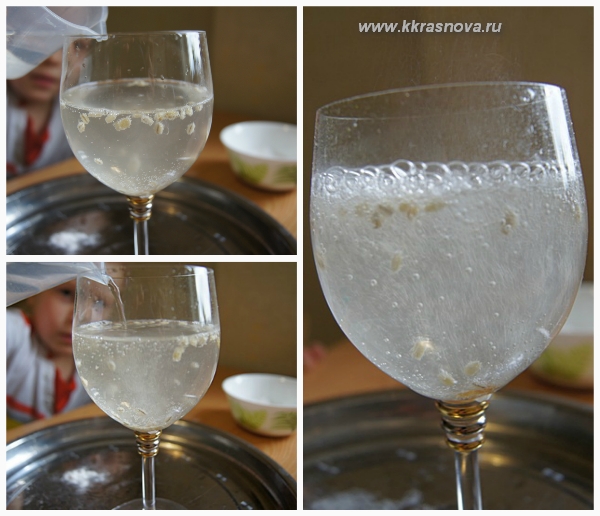 After the dance begins to subside, you can add dye to the water and watch how it is distributed over the glass.
  8 Soda explosion
This experience has become one of the favorite outdoor experiences, along with the volcano.
It is done very simply:
Put 2 tablespoons of baking soda in a paper towel and wrap.  Pour acid tinted with dye into the bag. Before pouring liquid into the bag, it is necessary to check the bag for the absence of small holes, otherwise the resulting carbon dioxide will begin to escape from the bag and the explosion will not work. This is the reason we didn't get this experience the first time!
When an experience doesn’t work out for some reason, this is a great way to reflect with your child on why it happened, put forward hypotheses and remove obstacles. 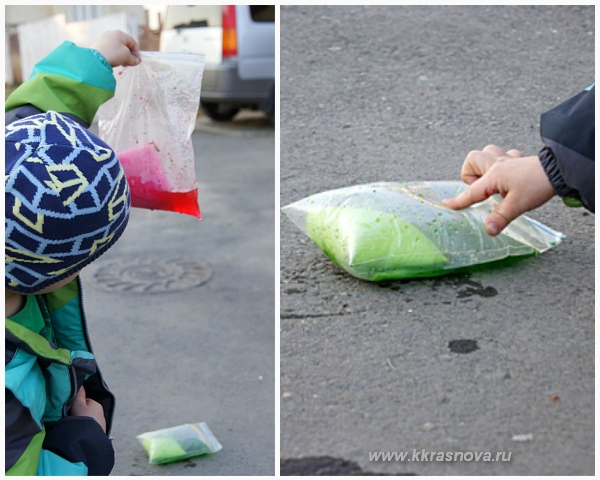 Everything went great the second time! Explosion of the package with a loud BOOM and the flowing liquid. There is no splash from the explosion, so you can not run far 🙂
 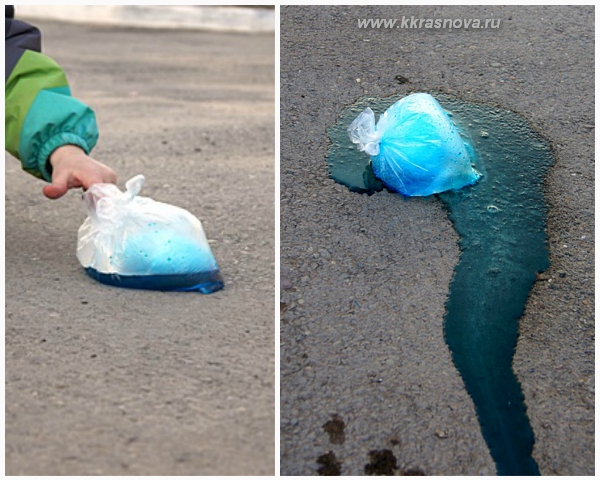 9 Rocket launch
Everyone probably remembers how champagne shoots at the ceiling when you shake the bottle. That's about the same, with the help of soda and vinegar, you can launch a "rocket" in the room.
First, we try on a cork to the bottle, it should not fall inside. At the request of the child, we decorate the cork “under the rocket”.
In a bottle, pour 1/3 of table vinegar.
Put a teaspoon of baking soda in a piece of toilet paper and roll it into a roll. 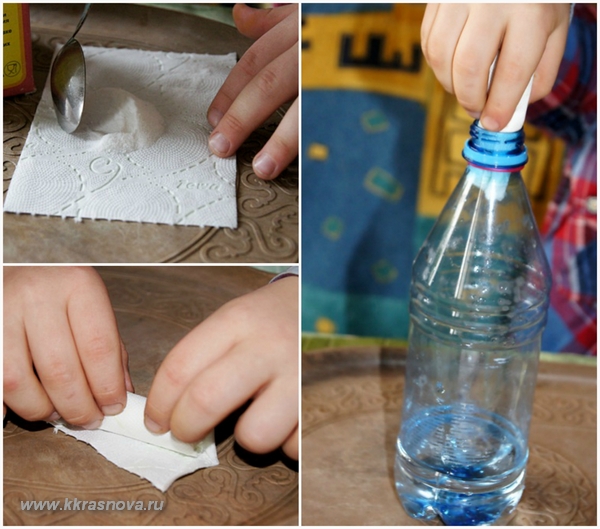 We lower the bundle with soda into the bottle and close it with a cork. Watching a rocket launch.
10 Making a carbonated drink.
We will need 2 drinking straws. We make an incision on one of them and connect them so that the tube becomes even longer (of course, if necessary, in case one tube is not enough to connect two vessels)
In the bottle cap with an awl, we make a hole for the tube.
Insert the tube into the lid.  We prepare a drink in a glass, which we will carbonate.
We lower the free end of the tube into a glass of sweet water.
Pour 3 teaspoons of soda into the bottle, then add vinegar and quickly close the lid with a straw.
Alternatively, you can first pour acid into a bottle, and then throw a package of soda, as in the previous experiment. Then the reaction will not begin so rapidly, just in order to have time to tighten the lid.  Result: Carbon dioxide rushes into the glass through a tube, filling our water with air bubbles.
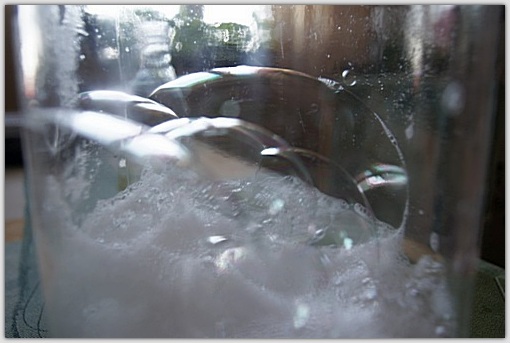
11. "Bubbles in the Bank" is one of the strangest experiences. But since such an experience exists, we cannot pass it by.
I must say right away that we did it several times in various variations in order to get the promised result. But the result was still different.
So, for the experience, we need a three-liter jar, soda, vinegar and soap bubbles. At the bottom we pour soda, pour vinegar. The reaction begins with the release of carbon dioxide. And now we take bubble and start blowing them into the jar.
Promised results- soap bubbles hang in the center of the jar due to the "cushion" of carbon dioxide!!! 
12. And finally, let's add some fire. We observe how carbon dioxide puts out the fire. Let your child understand why this is happening. 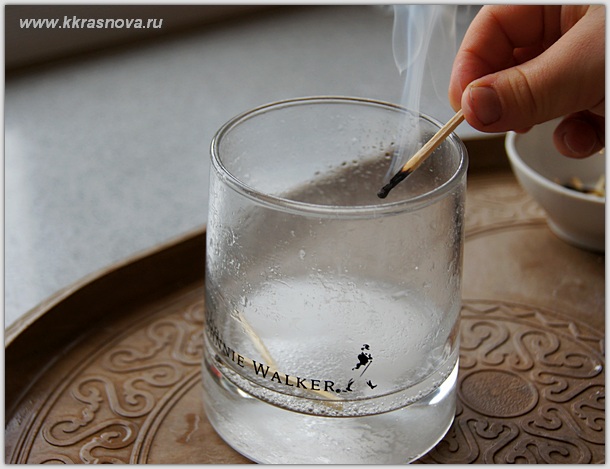
Also, be sure to try "snow" from soda. See more about this
AND that's not all soda experiments! In the next article, I will talk about experiments with soda that are carried out in Montessori classes.
For the development of the child, it is necessary to use all possible means, including experiments for children, which prepared parents can conduct at home. This type of activity is very interesting for preschoolers, it helps them to learn a lot about the world around them, to take a direct part in the research process. The main rule that moms and dads should follow is the absence of coercion: classes should be held only when the child himself is ready for experiments.
Physical
Such scientific experiments will interest the inquisitive baby, help him gain new knowledge:
- about the properties of the liquid;
- about atmospheric pressure;
- on the interaction of molecules.
In addition, under clear parental guidance, he can easily repeat everything.
Bottle filling
Prepare your inventory in advance. You will need hot water, a glass bottle and a bowl of cold water (for clarity, the liquid should first be tinted).
The procedure is as follows:
- It is necessary to pour hot water into the bottle several times so that the container warms up properly.
- Pour out hot liquid completely.
- Turn the bottle upside down and lower it into a bowl of cold water.
- It will be possible to see that water from the bowl will begin to fill the bottle.
Why is this happening? Due to the action of the hot liquid, the bottle was filled with warm air. Cooling down, the gas is compressed, as a result of which the volume occupied by it decreases, forming an environment with reduced pressure in the bottle. Water, acting, restores balance. This experiment with water can be done at home without any problems.
With a glass
Every kid, even at 3-4 years old, knows that if you turn over a glass filled with water, the liquid will pour out. However, there is an interesting experience that can prove the opposite.
Procedure:
- Pour water into a glass.
- Cover it with a piece of cardboard.
- Holding the sheet with your hand, carefully turn the structure over.
- You can remove your hand.
Surprisingly, the water will not pour out - the molecules of cardboard and liquid will mix at the moment of contact. Therefore, the sheet will hold on, becoming a kind of cover. The child can also be told about atmospheric pressure, that it is both inside the glass and outside, while in the container it is lower, outside it is higher. Due to this difference, water does not pour out.
This experiment is best done over the pelvis, because gradually the paper material will get wet and the liquid will drip.
Developmental experiments
There are a lot of really interesting experiments for kids.

Eruption
This experience is rightfully considered one of the most exciting and therefore loved by children. To carry it out you will need:
- soda;
- red paint;
- citric acid or lemon juice;
- water;
- some detergent.
First, you should build the “volcano” itself, making a cone of thick paper, fastening it around the edges with tape and cutting a hole on top. Then the resulting blank is put on any bottle. To look like a volcano, it should be covered with brown plasticine and placed on a large baking sheet so that the “lava” does not spoil the surface of the table.
Procedure:
- Pour soda into a bottle.
- Add paint.
- Drop detergent (1 drop).
- Pour in water and mix well.
To start the "eruption", you need to ask the child to add a little citric acid (or lemon juice). This is the simplest example of a chemical reaction.

Dancing worms
This simple fun experiment can be done with both preschoolers and younger students. Necessary equipment:
- corn starch;
- water;
- baking sheet;
- paints (food coloring);
- music column.
First you need to mix 2 cups of starch and a glass of water. Pour the resulting substance on a baking sheet, add paint or dye.
It remains only to turn on loud music and attach a baking sheet to the column. The colors on the blank will mix in a chaotic manner, creating a beautiful unusual spectacle.
We use food
To make an experiment - unusual, interesting for the baby and informative - it is not at all necessary to purchase sophisticated equipment and expensive materials. We offer you to get acquainted with very simple options available for execution at home.

with egg
Necessary equipment:
- a glass of water (high);
- egg;
- salt;
- water.
The bottom line is simple - an egg immersed in water will sink to the bottom. If you add table salt to the liquid (about 6 tablespoons), then it will rise to the surface. This physical experience with salt helps to illustrate the concept of density to the baby. So, in salted water, it is more, so the egg can stay on the surface.
You can also show the opposite effect (which is why it was recommended to take a tall glass) - when plain tap water is added to the salted liquid, the density will decrease and the egg will sink to the bottom.

invisible ink
A very interesting and simple trick that at first will seem like real magic to the baby, and after the explanation of the parents will help to learn about oxidation.
Necessary equipment:
- ½ lemon;
- water;
- spoon and plate;
- paper;
- lamp;
- cotton swab.
If there is no lemon, you can use analogues, such as milk, onion juice or wine.
Procedure:
- Squeeze citrus juice, add it to a plate, mix with an equal amount of water.
- Dip the swab into the resulting liquid.
- Write with it something understandable to the child (or draw).
- Wait for the juice to dry, becoming completely invisible.
- Heat the sheet (using a lamp or holding it over a fire).
Text or a simple drawing will become visible due to the fact that the juice has oxidized and turned brown when the temperature rises.
color explosion
The little ones can enjoy a fun experience with milk and paints, which can be easily carried out in the kitchen.
Necessary products and equipment:
- milk (preferably high fat);
- food coloring (several colors - the more, the more interesting and brighter it will turn out);
- dishwashing liquid;
- plate;
- cotton buds;
- pipette.
If dishwashing liquid is not available, liquid soap can be used.
Procedure:
- Pour milk into a bowl. It should completely hide the bottom.
- Let the liquid stand for a while to bring it to room temperature.
- Using a pipette, carefully drop several different food colors into a plate of milk.
- Lightly touching the liquid with a cotton swab, you need to show the baby what is happening.
- Next, a second stick is taken, dipped in detergent. It touches the surface of the milk, delays for 10 seconds. It is not necessary to mix colorful stains, a careful touch is enough.
Then the kid will be able to watch the most beautiful - the colors begin to "dance", as if trying to escape from the soap stick. Even if you remove it now, the "explosion" will continue. At this stage, you can invite the child to participate on his own - add dye, immerse a soap stick in the liquid.
The secret of the experience is simple - the detergent destroys the fat contained in the milk, which causes the "dance".
With sugar
For children 3-4 years old, various experiments with food will be very interesting. The child is happy to learn about the new qualities of his usual food.
For this entertaining entertainment you will need:
- 10 st. l. Sahara;
- water;
- food coloring in several colors;
- two spoons (tea, tablespoon);
- syringe;
- 5 glasses.
First you need to add sugar to the glasses according to this scheme:
- in the first glass - 1 tbsp. l.;
- in the second - 2 tbsp. l.;
- in the third - 3 tbsp. l.;
- in the fourth - 4 tbsp. l.
Add 3 tsp to each of them. water. Mix. Then you need to add a dye of your color to each of the glasses and mix again. The next step is to carefully take the colored liquid from the fourth glass with a syringe or a teaspoon and pour it into the fifth, which was empty. Then, in a similar order, colored water is added from the third, second and, finally, from the first glasses.
If you act carefully, colored liquids will not mix, but, layering on top of each other, will help create a bright unusual pyramid. The secret of the trick is that the density of water changes depending on the amount of sugar added to it.

With flour
Consider another interesting experience for children, simple and safe. It can be carried out both in kindergarten and at home.
Necessary equipment:
- flour;
- salt;
- paints (gouache);
- brush;
- sheet of cardboard.
Procedure:
- In a small glass, mix 1 tbsp. l. flour and salt. This is a blank, from which in the future we will make paint of the same color. Accordingly, the number of such blanks is equal to the number of colors.
- In each glass, add 3 tbsp. l. water and gouache.
- With the help of paint, ask the child to draw a picture on cardboard using a brush or cotton swab, for each color.
- Place the finished creation in the microwave (power 600 W) for 5 minutes.
The paints, which are the dough, will rise and harden, making the drawing voluminous.
Lava lamp
Another unusual children's experiment allows you to create a real lava lamp. After looking just once, even a novice researcher will be able to repeat the experience with his own hands, without the help of adults.
Necessary equipment and materials:
- vegetable oil (glass);
- salt (1 tsp);
- water;
- food coloring (several shades);
- glass jar.
Procedure:
- Fill the jar 2/3 full with water.
- Add vegetable oil, which at this stage forms a thick film on the surface.
- Add food coloring.
- Slowly pour in the salt.
Under the weight of salt, the oil will begin to sink to the bottom, and the dye will make the spectacle more colorful and spectacular.

With soda
To demonstrate to a preschool child, a soda experiment is perfect:
- Pour the drink into a glass.
- Dip a few peas or cherry pits into it.
- Watch how they gradually rise from the bottom and fall again.
An amazing sight for a kid who does not know yet, peas are surrounded by bubbles of carbon dioxide, which brings them to the surface. Submarines operate on a similar principle.
With water
There are several cognitive optical experiments, which, for their simplicity, are very curious.
- The missing ruble
Water is poured into the jar, an iron ruble is lowered into it. Now you need to ask the baby to find a coin by looking through the glass. Due to the optical phenomenon of refraction, the eye will not be able to see the ruble if it is directed from the side. If you look into the jar from above, the coin will be in place.
- curved spoon
Let's continue to explore optics with a preschooler. This easy but visual experiment is carried out as follows: you need to pour water into a glass and lower a spoon into it. Ask your child to look sideways. He will see that at the border of the media - water and air - the spoon seems to be curved. Taking out a spoon, you can make sure that everything is in order with it.
The child should be explained that a ray of light is bent when passing through water, which is why we see a changed image. You can continue the water theme and lower the same spoon into a small jar. Curvature will not occur, since the walls of this container are even.

This biological experiment will help the child get acquainted with the world of wildlife, observe how a sprout is formed. For carrying out, beans or peas are needed.
Parents can offer the young botanist to moisten a piece of gauze folded several times with water, put it on a saucer, place it on a pea or bean cloth and cover with wet gauze. The task of the baby is to carefully monitor that the seeds are moistened all the time, check them regularly. After a couple of days, the first shoots will appear.

Photosynthesis process
This plant and candle experience is best for younger students who know that trees and grasses absorb carbon dioxide and release oxygen.
The gist is this:
- Carefully place burning candles in two jars.
- In one of them put a living plant.
- Cover both containers.
Observe that in a jar with a plant, the candle continues to burn, since oxygen is present in it. In the second bank, it goes out almost immediately.

Entertaining
We catch electricity. This small and safe experience could very well be done with toddlers.
- One inflated balloon is placed on the wall, several others lie on the floor.
- Mom invites the child to put all the balls on the wall. However, they will not hold and fall.
- Mom asks the baby to rub the ball on her hair and try again. Now the ball has been attached.
After that, you need to tell that the “miracle” happened due to the electricity that was generated when the ball was rubbed against the hair.
Another option for the curious is the foil experiment. It is done like this:
- A small piece of foil should be cut into strips.
- Ask the baby to comb her hair.
- Now you need to lean the comb against the strip and watch. The foil will stick to the comb.
You can also demonstrate to the children the “Missing Chalk”. To do this, a piece of ordinary chalk is placed in vinegar. The limestone will begin to sizzle, shrink in size. After a while, it will completely dissolve. This is due to the fact that chalk, when in contact with vinegar, turns into other substances.
Experiments with preschool children are a great opportunity to develop their curiosity, to answer many questions in a clear and understandable way. In addition, by offering kids a variety of experiments, attentive parents will help them to outline their own range of interests at an early age. And the research itself will be a great and fun pastime.
Head: Spirina Olga Alexandrovna Primary school teacher Orzhitskaya OOSh.Lomonosov 2015.
- Theoretical part
- Relevance.
- Goals and objectives of the project
- Lemon - what is it?
- About the birthplace of the lemon.
- Interesting facts about lemon.
- Lemon legends.
- The effect of vitamin C on the human body.
- Lemon properties.
- Practical part
- Experience No. 1 "Tea with lemon."
- Experience No. 2 "Lemon - stain remover."
- Experience No. 3 "The Secret Message".
- Experience No. 4 "Lemon inflates a balloon."
- Experience number 5 "Lemon battery".
- Experience No. 6 "Citric acid".
- Application.
- The results of the survey of children in grade 1 MOU Orzhitskaya OOSh.
- Interview with school nurse Shapovalova Natalya Viktorovna.
- The use of lemon in various areas.
- Useful tips.
- This is interesting.
- conclusions
- List of sources
"The Magical Power of Lemon!"
Relevance:
In winter, many of us experience the effects of winter and spring beriberi - conditions caused by the absence and lack of vitamins. In such weather, tea with lemon helps us out. Why do we like this drink the most? But because it gives good health and excellent mood not only in winter, but also quenches thirst in summer. Yes, everyone knows that lemon contains quite a lot of vitamin C.
Therefore, I really wanted to know what other substances are part of the lemon, and what effect it has on the human body.
Purpose and objectives of the project:
Project theme: "The Magical Power of Lemon!"
Hypothesis: Suppose that lemons not only have healing properties, but also have magical powers when interacting with other substances.
Objective of the project: To get acquainted with the role of lemon in human life and highlight its virtues and magical features.
Project objectives:
- To study the literature on the beneficial properties of lemon, on the composition of the substances contained in its fruits;
- Learn the history of the lemon;
- Prove the importance of using lemons in life;
- Conduct a series of experiments to study its properties and interaction with individual substances;
- Conduct a sociological survey among students to find out the benefits of lemon;
- Describe the results of the study.
Object of study: lemon
Subject of study:lemon properties
The research methods were:
- collection and analysis of information on this topic;
- sociological survey;
- interviews with doctors;
- experiment;
- observation.
Drawing up a research plan:
- Determining the topic, goals and objectives;
- Putting forward a hypothesis;
- Choice of research methods.
Problem questions:
- What are the positive effects of vitamin C on the human body?
- What is in a lemon?
- How do people use lemons?
- How popular is lemon among children?
- What magical power is hidden in the precious gift of nature?
Project time- 1 month
Working hours - after hours
Project type - information and research
Materials about the equipment:
- Sources of information on the topic;
- Computer;
- Camera;
- lemons;
- Materials for experiments (Teapot with brewed tea, two mugs, iodine, cotton pads, l piece of paper, cotton swab, table lamp, baking soda, plastic bottle with a narrow neck, balloon, screws or nails, copper coins, copper wires, LED light, limescale kettle, citric acid).
- Theoretical part
Lemon - what is it?
Lemon is an evergreen subtropical tree with a height of 3 to 7 m of the rue family, with prickly branches and bright white flowers with a purple corolla. They are grown everywhere in the countries of the subtropical natural belt.
Numerous varieties of lemon in culture are divided into two groups - tree-like (tall - up to 6 m tall - trees; fruits are formed in the depths of the crown) and bushy (small (up to 3-4 m tall) bushes with a less dense crown; fruits are formed at the ends of branches ). Bush varieties are less productive than tree varieties.
The leaves are leathery, green, 10-15 cm long, 5-8 cm wide. The flowers are axillary, solitary or paired.
Fetus 6-9 cm long, 4-6 cm in diameter, ovoid or oval, narrowed at both ends, with a nipple at the apex, light yellow, with tuberous or pittedcrust containing many glands with essential oil.
The inner part of the fruit with several nests. Seeds ovoid, yellow-green or white, greenish in section.
The pulp makes up about 60% of the weight of the fruit, the peel - about 40%.
About the birthplace of the lemon
Lemons are native to the tropics and subtropics of China, India and Burma. Currently cultivated in the Mediterranean countries, the USA, in the Caucasus.
Lemon is an ancient preventive and vitamin remedy. At the end of the 18th century, the English Navy introduced a mandatory intake of 30 grams of lemon juice daily, which reliably protected sailors from scurvy on long voyages. In the Middle Ages, lemons were believed to ward off plague and to be an antidote for snake bites.
The name "lemon" comes from the Malay word "lemo". In India, this fruit is called "nimu", and in China "limung", which means good for mothers.
Interesting Lemon Facts
The ancient Greek philosopher Theophrastus, around 300 BC, first mentioned the lemon. He wrote that the fragrant fruit was not eaten at all, but was used only to fight moths. Fragrant slices of lemon were hidden in the folds of clothes. But later they started talking about the lemon in a different way. And it all started with a legend...
Lemon legends
Once, a beloved servant of one of the Caucasian kings fell out of favor for some kind of offense. The enraged overlord ordered his servant to be immediately imprisoned and ordered the guards to feed the prisoner with only one kind of food. When asked how exactly, Vladyka, having mercy, answered: "Let him choose for himself." The prisoner had no choice but to fulfill the king's will. And he fulfilled it, asking to give him only ... lemons . And he explained to the perplexed guards:"The aroma of a lemon will amuse my thoughts, the peel of fruits and grains will be good for my heart, in the pulp of a lemon I will find food for myself, and I will quench my thirst with juice."
Lemons are native to India and the Pacific tropical islands.
It is known that it was the troops of Alexander the Great who brought lemons from India to Greece and Palestine. Then the lemon was called "Indian apple" or "citron".
In the 13th century, the crusaders brought lemons to Italy, and from there the fruit came to France, where it immediately gained popularity among fashionistas - the ladies believed that the sour lemon juice makes lips brighter.
Lemons are low-calorie fruits, but legends, legends and even Greek myths are devoted to their nutritional power. Their researchers believe that it was the lemons that were the golden apples of the Hesperides that Hercules needed to get in order to draw energy and strength from them to accomplish his exploits.
“The ancient Scandinavians in their myths called lemons “apples of immortality” for their ability to heal and prevent decrepitude, and in Russian fairy tales lemons were called “golden rejuvenating apples.”
Scandinavian legends mention "golden apples of immortality". Whoever was lucky enough to eat them, he did not know diseases in his life - long, debilitating, with pain and anguish in old age. These poetic names hide not apples at all, but lemons, the special properties of which have been known for many hundreds of years.
Lemon came to Russia during the time of Peter I.
The positive effect of vitamin C on the human body
- First of all, because it contains vitamin C, which is very important for strengthening the immune system. Lemons save from seasonal colds and infections.
- Removes waste and toxins from the body.
- Improves performance.
- Improves attention and memory.
- Reduces stomach acidity.
- Controls pressure.
- It has a mild diuretic effect.
- Kills microbes, prevents the development of bacteria.
- Strengthens the walls of blood vessels.
- Thins the blood.
- It has a wound healing effect for external skin problems.
- Lemon is good for hair.
- Lemons improve complexion, keep skin youthful.
- Strengthens nails.
- Fights fungus.
- Relieves itching and redness of the skin.
Composition of lemon
- organic acids;
- vitamins;
- Coloring matter;
- mineral salts;
- Sugar;
- Essential oil in the peel.
The properties of lemon are multifaceted
- bactericidal;
- Tonic;
- Antiseptic;
- Flavoring;
- General strengthening;
- restorative;
- Whitening.
- Practical part
Experience number 1. "Tea with lemon"
Purpose: To find out how lemon behaves with natural tea dye, which changes the color of our teeth.
Hypothesis: Let's assume that the lemon, due to its acidity, discolors the color of the tea.
I took 2 mugs and poured strong tea into them. After that, I put a piece of lemon in one of the mugs.
Conclusion - our hypothesis was confirmed.
Lemon discolored the tea color, thereby protecting our teeth from the appearance of a yellowish tint on them.
Experience number 2. "Lemon - stain remover"
Purpose: To find out how a lemon behaves with stains on fabrics, clothes.
Hypothesis: Based on previous experience, we have seen that lemon can whiten colors. So, it can help remove some stains.
I took iodine and put it on a cotton pad. Then I squeezed a few drops of lemon juice onto the iodine stain. The stain is gone.
Conclusion - our hypothesis was confirmed.
Lemon can help remove some stains from clothes without the use of chemicals.
Experience number 3. "The Secret Message"
Objective: To learn how a lemon behaves when heated
I squeezed a few drops of lemon, took a cotton swab and drew a sun on the sheet. But my drawing was not visible and, therefore, I began to heat my drawing in front of the lamp. At first nothing was visible, and then my drawing warmed up and showed up.
Conclusion: Lemon juice turns yellow on paper when heated. Our "message" was declassified. Experience can be applied in the game.
Experience number 4. "Lemon inflates a balloon"
Purpose: To learn how lemon interacts with baking soda.
Hypothesis: When quenching soda, acetic acid is used in cooking, which means that lemon juice can also be a soda quencher and emit volatile gas.
I poured soda into a plastic bottle, then poured squeezed lemon juice into the same place and quickly put a balloon on the bottle. As the bottle began to release gas, my balloon began to inflate.
Conclusion: When soda and lemon acid interact, a gas is formed that can inflate the balloon. |
Experience number 5. "Lemon Battery"
Purpose: To study the lemon as a conductor of electricity.
I prepared 4 lemons, 4 copper wires (about 10 cm each), 4 copper coins, 4 screws and 1 LED. Dad cleaned the opposite ends of the wires at a distance of 2-3 cm. They made cuts in the lemons and inserted coins and wires into them. To the other ends of the wires, one screw was screwed to each. They stuck it in lemons at a distance of 1-1.5 cm from the coins. And in one place, I brought an LED to different ends of the wires. What happened? Yes! The light bulb is on!
Conclusion: Lemon circuit, without a current source - lights the LED!
Experience number 6. "Lemon acid"
Objective: To learn how lemon interacts with limescale in a teapot.
Hypothesis: Suppose that citric acid removes limescale from the kettle.
When you use the kettle for a long time, lime deposits appear on the bottom. It is very easy to remove this plaque with citric acid. To do this, you just need to pour water into the kettle, pour a bag of citric acid into it, boil it and let it stand for a bit. Then drain the water and rinse the kettle. And our kettle is like new again.
|

Conclusion: When boiling a kettle with the addition of citric acid, limescale is removed.
Conclusion from the results of the study:
During our research, we studied the role of lemon in human life, highlighted its virtues and magical features.
The hypothesis put forward by us that lemons not only have healing properties, but also have magical powers when interacting with other substances turned out to be correct.
The purpose and objectives of our work have been achieved. The conducted research and literature review allowed us not only to draw the right conclusions about the benefits of lemon, but also to learn the history of lemon, where lemon is used and draw appropriate conclusions. Lemon properties are multifaceted. Lemon serves as a tonic, whitening, flavoring, restorative, regenerating, bactericidal beneficial substance.
Lemon is widely used in cooking, pharmaceuticals, and in everyday situations. Truly a lemon is a useful fruit, a mysterious fruit, a magical and mysterious fruit. No plant can compete in its healing properties and magical power with lemon.
This is where we want to finish our research, and in our opinion, we have fulfilled the goal that we have set for ourselves in full. I didn’t even expect the lemon to be such a miracle fruit. After all, I only use it as a vitamin, but I drink tea so as not to get sick.
My research work turned out to be interesting, I learned a lot, and I will not stop there, I will continue to study things and phenomena that are around me.
I dare to advise everyone:
Try starting your day with a cup of warm water and lemon juice, as it invigorates and boosts the immune system. The smell of lemon can increase efficiency, reduce drowsiness. And if you put lemon slices in the classroom, it will have a beneficial effect on the students.
Make friends with a lemon, trust its magic power and you will be healthy. A reliable doctor will save you from old diseases and protect you from new ones. Be healthy!
/APPENDIX №1/
Survey results
When I became interested in this topic, it became interesting to me, how many of my classmates like lemon?
The next step in my research was to ask my classmates about the role of lemon in their lives. Questionnaire - questionnaire
Question #1
Question #2
Conclusion: Most of the children in our class like to eat lemon. But, unfortunately, few of them know that all parts of the lemon are useful, except for the seeds.
/APPENDIX №2/
Interview with the school nurse
Natalya Viktorovna, tell me, please,what is the benefit of lemon?
N.V.: First of all, of course, ascorbic acid, or vitamin "C", the medicinal value of which is known to many. Today it is known that vitamin "C" increases the body's resistance to infectious diseases, especially the so-called colds. That is why lemons can be recommended (along with other fruits and vegetables) as a means for non-specific prevention of influenza and influenza-like illnesses. Moreover, the saturation of the body with this vitamin increases resistance to the effects of cold. In addition, this vitamin has the ability to accelerate the healing of wounds, burns and bone fractures, promotes faster recovery from rheumatism, tuberculosis, and allergic lesions. According to some reports, patients with various infections also experience relief in the treatment of ascorbic acid.
Natalya Viktorovna, how often do they give lemon to children at our school, and what dishes do they add it to?
N.V.: Prevention of influenza, especially in winter and spring,held daily in our school. Including with the help of vitamin C. Either lemon is added to the diet of children (it is cut into tea), or citric acid is added to compotes, which also increases the immunity of children.
Thank you, Natalya Viktorovna, for an informative conversation.
/APPENDIX №3/
The use of lemon in various areas
I learned a lot of interesting things about the use of lemon:
- It is part of many ointments, emulsions, masks, lotions, toilet waters used for hygienic skin care and freckle removal.
- Currently, lemon fruits are widely used in the confectionery industry (for the preparation of candied fruits, sweets, essences, juices, drinks, etc.). Can be used in cooking in sauces, salad dressings, baked goods. In various cookbooks, there are instructions for preparing certain dishes, for example: "Add lemon or orange zest."
- Pharmacists use lemon. From the pressed fresh peel of the fruit, lemon oil is obtained, which is used to improve the taste and smell of medicines.
- In perfumery, valuable essential oils are extracted from flowers, leaves and fruits of lemon, which are used to make perfumes.
- You can make lemonade at home. Such lemonade comes out not only much cheaper than store-bought, but also healthier.
- It is recommended to apply when cleaning rooms. A handkerchief or cotton ball with a few drops of lemon juice in the closet helps to get rid of moths. And you can put lemon peels in the closet.
- Rust stains can be easily removed with lemon. Apply lemon juice to a dry cloth, leave for half an hour, then machine wash with regular powder.
/APPENDIX №4/
Helpful Hints:
How to choose a lemon?
- Often we can see very beautiful, glossy grated lemons in stores or on the market. They are usually larger than average. They can be waxed. You need to know that with age, the peel of a lemon becomes thicker and thicker, and there are less and less vitamins under it.
- Hence the conclusion: a large size for a lemon is not the main thing.It is better to buy small lemonsand for us the best thing is probably Abkhazian lemons. Lemon that is younger, always with a green tail. Its peel is thinner, with a greenish color. Black dots on the peel are a bad sign. These lemons were frozen. There are fewer useful substances in them, and more bitterness.
- Most Unhelpfulin a lemon, it's the pits. They can provoke a strong secretion of bile and an allergic reaction. A the most useful - white layer. It has the most vitamin C.
- Probably every housewife knows that it is very useful to wipe the wooden cutting boards that we use every day with lemon juice. All microbes are destroyed. Don't forget to do this periodically.
/APPENDIX №5/
This is interesting:
About the age of lemons
The fruits of some citrus fruits sometimes do not fall off for 1.5-2 years. As a rule, lemons and oranges do not fall on their own in the first year of ripening. If they are not cut yellow before winter, then they begin to turn green again in the spring. In the summer, their peel thickens very much, in the fall it turns yellow again, as if ripening a second time. But two-year-old fruits, despite their size, have less taste and medicinal qualities, that is, they contain fewer vitamins and acids. Therefore, do not chase for large thick-skinned fruits, they may be "old". It should also be taken into account that, as a rule, lemons are picked while still green; they cannot even be compared with ripe ones in terms of medicinal properties. To make unripe fruits healthier, they should be consumed with honey.
lemon festival
Residents of the town are immersed in a fairy-tale world for three whole weeks - everything is painted in bright yellow-orange colors, houses and streets are decorated with all kinds of compositions and sculptures made of lemons and oranges, fireworks are lit, and dozens of folklore musical groups are walking around the city, performing French folk melodies.
List of used literature:
- Encyclopedia "I know the world", M. A. Toropova
- Big encyclopedia of a preschooler., ROOSSA
- Children's encyclopedia. "Rosman", D. Eliot
- Encyclopedia of useful indoor plants. Lemon. A. Blaze.
- NYM - Big encyclopedia of baby food
- Lemon
http://relaxic.net/lemon-festival/


