Making a tea basket. Do-it-yourself bouquets, gifts and gift baskets from tea, coffee, sweets: ideas, making, photos
You can make a tea bouquet in a basket. To do this, you will need the basket itself, tea, decorations, such as artificial flowers, beads, bows, ribbons, and a little creative imagination. Such a bouquet practically does not need to be fixed, since everything is inside the basket.
There is an idea a bouquet of tea and sweets. You can arrange sweets as flowers, and use tea bags in individual packaging, or you can alternate tea bags and coffee bags. There is such an idea, a beautiful bouquet

To do this, we make crocuses from corrugated paper and sweets.


from corrugated paper, we make such a skirt, where we will glue tea bags on a drop of glue, or you can alternately with coffee bags


and now, our beauty and deliciousness are ready

A bouquet of tea, coffee and sweets is a very unusual gift that everyone will like. In order to create such a bouquet with your own hands, you will need: a basket, corrugated paper, tea, coffee, sweets, transparent film, electrical tape, bows and other decorations. You need to fantasize a little. Take a basket and insert all your components into it - these are lollipops, tea, coffee. Cover everything with a film on top and cling to bows or other decorations. From below, wrap the trunk with electrical tape. Wrap the bouquet with corrugated paper.
For example, you can do something like this:

I propose to make such a beautiful bouquet of sweets and tea:

To create it you will need:
300 grams of round sweets, tea bags, penoplex, corrugated paper, toothpicks, ribbons, sisal.
First of all, we cut out a circle from foam plastic and wrap it with sisal. It should turn out like this:


Then we stick the roses into the base. We twist the ends of the sticks with tape and wrap them with sisal. We tie a beautiful bow.

For decoration, you can also add artificial greenery.
You can make such a bouquet using a glue gun, wire cardboard. It will consist of tea bags and chocolates, instead of tea, you can use coffee bags.

You can also make a paper cake with a surprise, paint the pieces of the cake with small chocolates, and put tea or coffee in the piece itself.
A bouquet of sweets is already boring, you can make a bouquet of tea and coffee. First of all, we go to the grocery store and buy a gift version of tea or coffee, or better, both.
Then we will visit a stationery store where we need to buy corrugated paper to decorate our bouquet.
In the sewing and sewing store we buy a variety of beads, bows, decorations for our bouquet. And in the store - everything is for flowers, we need to purchase a frame for a bouquet of the shape we need.
When everything is purchased, we get to work. This is where our imagination and desire to express our attitude towards the person to whom this gift is intended should work.


Here I found such a version of a tea bouquet from Chinese tea a fiery flower. You can make such a bouquet as follows:

This is what the brewed tea will look like. Very beautiful.

A bouquet of tea is an unusual gift. Anyone can make such a bouquet with their own hands if desired. For its manufacture does not require special manual dexterity or specific materials. Here are the options: a bouquet of tea and chocolates Geisha:

Materials that will be required to make a bouquet of tea.
The bouquet is ready! Happy creativity.


To come to visit with a bouquet of flowers means to please the owners of the house and show your good manners. And if the gift bouquet is made by hand, then you “risk” of running into a compliment for the manifestation of creative imagination) Of course, not everyone can be surprised with traditional candy bouquets in modern times, because they are quite popular. But if you collect a bouquet of sweets and tea, and put a wicker basket in the basis of it, then you will definitely distinguish yourself with originality! Let's learn how to collect edible and inedible in one basket, and also decorate it beautifully!
Let's start with the materials. We will need:
- Corrugated (floristic) paper of three colors (pink and lemon yellow - for the petals, the color of baked milk - for the middle of the flowers)
- Sisal green
- Candy round shape (here "Martian")
- Satin ribbons
- Artificial flowers and greenery
- Small decor (bees, ladybugs, etc.)
- Hot glue gun
- Scissors, thread, lighter, awl
- wicker basket
- Spray paint in any suitable color (silver here)
- Mounting foam in a tube
Let's start with flowers. First, cut the corrugated paper into the middle of the flowers. Height - one and a half divisions (they are printed on a sheet of paper), length - the girth of the candy in the tightness. We made such centers for roses.
We take only floral paper, thin paper will not give such stretching of the workpiece.

Fold the strip in half and cut off one edge, rounding it.

We stretch the middle and wrap the candy in it (we turn the tails to the middle. Some craftsmen fix them there with tape, but this is not necessary). We tighten the lower edge with several turns of thread.

We get these details. If the paper is taken longer, more closed centers will be obtained. In our case, candy is visible.

We make blanks - quantity at will. 11 flowers with sweets went to my basket.

Now let's start making petals. For primroses, I came up with sharp pink petals - there are five in total. We cut strips of pink corrugated paper, also 1.5 divisions high and about 5 cm long. We fold them with an accordion and cut off one side into a sharp corner.

Stretch the center of each petal. We make 11 blanks.

Now we will strengthen the stem. I made them from toothpicks - on a drop of hot glue at the base.

The next step is to assemble a flower with petals. We take a strip with 5 petals (stretched in the middle. You can twist and sharpen the tips a little more), draw glue along ⅓ of the inside of the base and attach to the middle. The paper needs to be slightly folded. Then another third and the final third of the ribbon of pink corrugated paper. So we glued all the petals.

We remove the threads of glue from the paper after we wrap the stem of the flower with tape. And we will straighten the petals already in finished form (you can bend them a little from the center if you want a more magnificent primrose). No - leave it like that.

And now let's deal with the basis of our composition - a basket-hat. We take a ready-made wicker basket (sold in needlework stores), blow a little mounting foam into the middle and leave to harden. The foam expands over time and fills the entire volume, like yeast dough. And even with a slide it turns out. I decided to paint it with silver spray.

Now we will remove the excess from the base with a construction knife - we will cut the foam flush with the fields of the basket hat.

I used Tess tea bags as a trim for the side. The green color of the tea bag is very suitable for arranging with flowers. Each bag was glued with an overlap on hot glue in a circle.
Instead of Tess, any other tea in green individual packaging will do. If you wish, you can take a different color as a basis, depending on what theme you have for the basket.

Now let's make a hat. We turn over the basket-hat and select a satin ribbon. We cut off the required length with the tips obliquely and singe the edges of the tape with a lighter. We glue the tape on hot melt adhesive in several places.

We decorate the fields of the hat with artificial greenery and flowers, optionally add bees, ladybugs, etc. So we turned a wicker basket into a straw hat.

We turn it over to the other side and begin to make out the basket. We cover its inner part (mounting foam) with green sisal and strengthen the flowers. Be sure to add artificial flowers and leaves to the candy flowers. This will give the composition airiness.
I make a place for flowers, even in the softest base material, with an awl. And then I strengthen the stem of the flower with glue.

This is how we put together a delicious and beautiful souvenir - a basket of flowers and a hat at the same time.
I hope everything was clear. If you have any questions - ask, I will definitely answer!
Good luck with your sweet work!
Master - Irina Makhinova (Yalinka)
And one more bouquet of sweets and tea bags in the video master class by Ekaterina Ivanova:
Categories
A bouquet of tea and sweets is the perfect gift for tea lovers. This is a wonderful gift for a new acquaintance, work colleague or boss whose interests and hobbies are unfamiliar to you. All handmade bouquets of tea and sweets can be divided into two large groups. The first group includes compositions where a box of tea or coffee is placed on a stand, and sweet flowers are placed next to it.
A box of tea or coffee becomes the basis for a basket or chest, which are decorated with paper and candy flowers. The second group is compositions where tea or coffee bags are already included in the structure of the bouquet as a decorative element. If the person does not drink tea, buy coffee bags. You can choose not only products of different colors, but also shapes.

A master class on making such a bouquet with your own hands will teach you how to make flowers, how to include tea or coffee in the composition of the bouquet, and how to decorate your craft in the best possible way.
For work you will need the following materials:
- candies for flowers;
- tea, coffee in individual bags;
- corrugated and wrapping paper, foil;
- glue;
- wire, if any - special floristic wire, or thin wooden sticks for stems;
- teip tape;
- satin ribbons, artificial flowers or any other decorative material.

Master class: making flowers from candies
Prepare wire or wooden sticks. You can do it in two ways to combine them with sweets with your own hands without piercing sweets. The first way: wrap one tail of the candy wrapper around the stick. The second way: wrap the candy with corrugated paper or foil, at the same time attaching it to the stem stick. The resulting blank can be decorated with beads. Insert the wire into the bead, twist and attach.

From soft corrugated paper, make a blank for the petals. You can cut each petal separately. The master class will be more complete if we mention the need to add volume and create a resemblance to real flowers. To do this, gently stretch the paper with your fingers on one side of the petal. You can cut a strip of paper, shape aster petals from one edge, creating sharp ends (you will get a blank similar to grass for application). Form a head with your own hands, wrapping the candy with petals, fix with glue. If you are using a non-green blank for the stem, decorate it with either teip tape or a strip of corrugated paper.
MORE ABOUT: DIY beaded necklace

Make the required number of flowers. Most often, flowers with leaves are not inserted into bouquets of sweets, as they will not be visible. It is better to make the flower heads themselves more magnificent. If necessary, fill the empty space, you can already place individual leaves at the assembly stage.
Master class: making the basis for a bouquet
As a basis, you can use a special floral frame. It is a wire loop covered with decorative material. You can take the packaging of corrugated paper for bouquets. It is somewhat stiffer than similar paper used to make flowers. But the master class will teach you how to make the simplest basis for a bouquet with your own hands. Just take a thick piece of paper - drawing paper, cut a piece and make a cone, glue the edges. It is better to paint it in the desired color in advance if you do not plan to decorate it further.

Along the edge, you can glue artificial flowers, ruffled ribbons, and attach tea bags or coffee bags with adhesive tape on top, laying them beautifully in a circle. Thus, they will create a beautiful decorative edge of sharp teeth. It is better to choose the colors of the bags so that they match in color or are contrasting.
The basis of the bouquet can be unconventional. The tutorial on how to create it is very simple. Take a sheet of cardboard or thick paper, cut out a circle of large diameter. In the center of the circle, mark a strip at least 15 cm wide, draw lines. Bend along these lines.

You will get a platform that will allow you to put the composition on the table. Inside, place a piece of Styrofoam or a floral sponge, into which you will then stick the flowers. Cardboard also needs to be decorated - draw a pattern, stick paper, decorate with ribbons, braid, organza, and place tea bags along the edge. The corners of the bags will either complement the color scheme, or shade it favorably.
MORE ABOUT: Master class: felt crown
Master class: assembling compositions with your own hands
The most responsible stage. This is where your idea comes to life. First outline your future composition, and only then thoroughly fix and connect with glue. If this is a hand-made bouquet, then first collect the flowers, then place them in the frame, tie with a ribbon. If you made a composition of flowers, tea or coffee, then place the drink package in the intended place, decorate with flowers, add decorative elements.
It's always nice to surprise your family. But few people try when choosing a presentation. Most often they give a card or money. But to make the gift original and useful, show your imagination. You don’t need a lot of money to do this, make a gift with your own hands, and you will understand how much nicer it is than the usual boring congratulations! And if the one you congratulate loves tea, then a bouquet of tea will be a great gift. In this fascinating article, an excellent master class awaits all lovers of extraordinary ideas, in which we will try to make bouquets of tea. Such simple step-by-step elements will help you easily assemble a charming bouquet with your own hands without spending a lot of time on it.
Do-it-yourself tea bouquet master class
Tea bags are very popular. Such a gift, unlike sweets, will not melt in hot weather; it does not require a lot of expensive material. You can add various souvenir gifts to it and you get just a wonderful craft.
To create such a wonderful gift, you need to purchase corrugated paper, it is dense and can stretch.
If suddenly it was not on sale, then such paper can be replaced with a floristic net, organza, gift paper.
You also need to buy sisal or corrugated stationery paper, or a special filler to close the gaps between the tea bags. You will need a basis for a bouquet, satin ribbons, lace, film, tea, small accessories. The bouquet must be decorated in the same style.
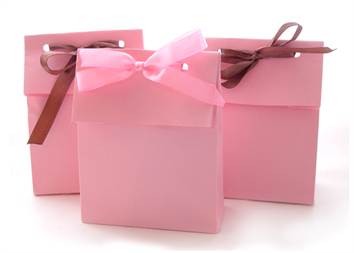
A tea bag may not match the color scheme of the entire bouquet, then we make a wrapper for it ourselves. We make a bag out of wrapping paper.
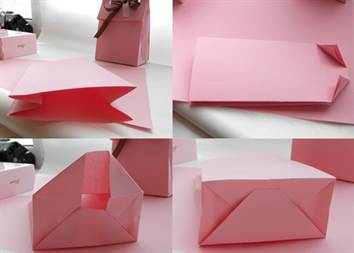
We punch holes for ribbons with a hole punch, which we will tie with a beautiful bow.
Place decorated bags on the basis for the bouquet. To keep them from falling out, carefully secure them with glue. Fill empty spaces with sisal or other colorful filler.
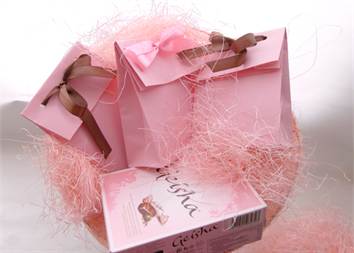
Wrap all this beauty together with the base with a film, securing it with an openwork ribbon.

Corrugated paper bend a little on one side, stretch a little. Next, decorate the paper itself.

You can add another layer of corrugated paper that is compatible in tone.
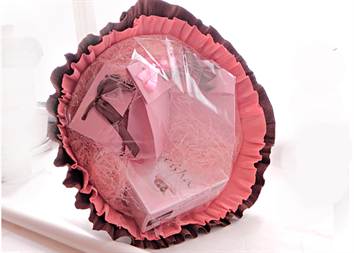
Decorate according to your imagination with any additional details. A beautiful tea bouquet is ready!

Gift tea season novelties
But you can not stop there, conquer new heights. Add a jar of coffee to a tea bouquet, and the gift will become doubly useful. Gift bouquets of fragrant tea are made in almost the same way as coffee. The composition of the bouquet will be the same, but delicious coffee will be added.
The basis of the bouquet must be covered with corrugated paper. Slightly bend and stretch the edges. All this should resemble a flower wrapper. We take bags of coffee and tea and lay them out neatly in the resulting basket. It should look like flower petals. From pieces of corrugated paper, try to fill in all the empty spaces between the bags, so the design will become denser.

You can decorate the resulting bouquet with leaves, flowers, beads, bows, ribbons. Let your imagination know no bounds!
The packaging also needs to be ennobled with tape. Its ends can be curled a little with scissors. Get cute curls. In the decoration of the packaging, all the raisins and nuances that can be seen in the photo of bouquets of other craftswomen should be used. If the result of sweets and tea turned out to be excellent, then please your loved one with such beauty, let him be proud of you.

Tea bouquet with job description for beginners
From the above, it became clear that it is very easy to please loved ones with an original gift. You need to have a lot of desire. Who has not yet fully understood all the nuances of how to make a bouquet, we will fix the main points. Prepare all the material in advance, do not forget about the glue gun, it will perfectly help in working from tea. The more interesting the decor, the more original the work looks. The style of the bouquet is selected to the person to whom it is intended. Think over the little things. Let everything be less, but to feel the style. Release your ideas to freedom and an unsurpassed gift will please the eye for a very long time.
They also say that different types of tea affect a person in different ways and give different effects. Bouquets of Chinese tea look very original. For example, green tea provides the body with unprecedented lightness, relieves boring pastime and fatigue. This variety is especially popular when a small surprise is hidden in the flower ball itself: one flower or many buds. Especially this option is suitable for tea drinking for the whole family. They will definitely appreciate such a bouquet, and children will watch the opening of the buds with great pleasure.
Each of us, probably, agree that it is very pleasant to surprise relatives. However, despite this, quite a few people show diligence at the time of buying a gift for a loved one. Therefore, in most cases, a postcard or some specific amount of money is presented as a gift. If you want to make a gift memorable and original, then fantasy will help you. In this case, it is not necessary to have a lot of money. And a gift that was created with your own hands will be more pleasant than a banal congratulation. And if a person loves tea, then do-it-yourself tea gifts can be valuable here. We will offer you an interesting master class with a photo that will allow you to create happiness with your own hands.
tea bouquet
Any bouquets are popular in our world today. Bouquets made from tea are also very popular. This gift has many benefits. For example, in hot weather, it will not melt, and even here expensive material will not participate in the creation. And if you add various kinds of souvenir gifts to the bouquet, then you should get a wonderful souvenir craft.
Corrugated paper is involved in the creation of this gift, which can be dense and at the same time stretch. In general, this material is purchased in advance. If this material is not available, then it is successfully replaced: with a floristic mesh, gift paper or organza.
You will also need corrugated stationery or sisal. Also, purchase a special filler so that it can close the gaps between the tea bags. Prepare more: the basis for the bouquet, satin ribbons, tea itself, lace, film and small accessories.

On a note! Decorate your bouquet in a monochromatic style.
If the tea bag does not fit the color scheme of the bouquet, then you should make a wrapper for it with your own hands. The bag is made from wrapping paper.
Now holes for the ribbons are punched through the hole punch. In the future, the ribbons will be tied into bows. 
The bags that have been decorated are placed on the base of the bouquet. And so that they do not fall out, they are fixed with glue. Empty spaces are filled with sisal or other beautiful material.

This beauty, together with the base, is wrapped in a film, and then everything is fixed with a ribbon.

In the next step, the corrugated tape is folded on one side. It's worth doing it a little. Stretch the material a little. After that, corrugated paper is simply decorated.

For additional beauty, another layer of corrugated paper is used, which will be compatible in tone with the color scheme of the bouquet itself.
Now, given your imagination, apply any details. And now your beautiful bouquet of tea will be ready.

Bouquet of coffee and tea
So, above you could see how a bouquet of tea is made with your own hands. However, our article does not end there. We are ready to offer you a lot of other interesting crafts, which are also made from tea. So, if you add a jar of coffee to a bouquet of tea, then the present will be even more useful. Bouquets of coffee and tea are also very simple. The contents of the bouquet will remain the same. But there will still be coffee.
In this case, the base of the bouquet is covered with corrugated paper. At the same time, slightly bend the edges and stretch. The material should resemble a wrapper for flowers. At the next stage, coffee and tea bags are laid out in the basket that you have turned out. As a result, you get a semblance of flower petals. Pieces of corrugated paper close up the empty spaces that are observed between the packages. As a result of this action, the structure will be dense.
The finished bouquet is decorated with whatever materials you like. It can be: beads, flowers and even beautiful leaves.
The packaging of the bouquet is also decorated with a ribbon. In this case, the ends of the tape are slightly curled with scissors. Packaging can also be decorated beautifully and in an original way.

New Year presents
And now we will offer you New Year's gifts from tea. These ideas are suitable for those people who decide to present something beautiful to their loved ones.


Finally
If you tried and you got excellent products, then you can easily please your loved ones with them.


