How to make popsicles at home. How to make a fruit bouquet with your own hands? How to make delicious homemade popsicles
Everything is just the most interesting! How to make eclairs, lemons from bottles, sew vegetables and berries, make them from papier-mâché.
Food is a pleasant topic for many. Products run out pretty quickly, and already from delicious cakes, fruits, only memories remain. But you can make it so that they will always be in front of your eyes, and even decorate the interior. Don't believe? Then find out how to achieve it.
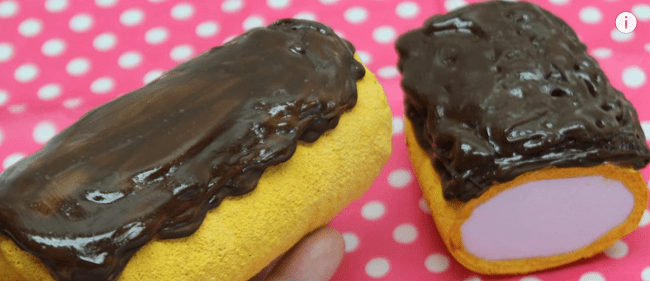
How to make eclairs from plastic bottles?
Look how delicious the cakes look. But do not forget to warn home and visiting guests that these eclairs cannot be eaten, they can only be admired.
To make such a sweet that will always be in the house, take:
- 3 plastic bottles of 0.5 l;
- foil;
- salt;
- PVA glue;
- acrylic paints;
- scotch;
- thin white foam;
- Styrofoam;
- white fom;
- glue gun;
- brushes.

Expand the foil, put this blank on it, and next to it is another, but a whole bottle without a cap. Wrap them in foil, put them in the oven for two minutes. Homemade eclair also needs to be baked, but these blanks are placed in a hot place to make them more pliable. When you take them out of the oven, press down on the foil to make the bottles oval.
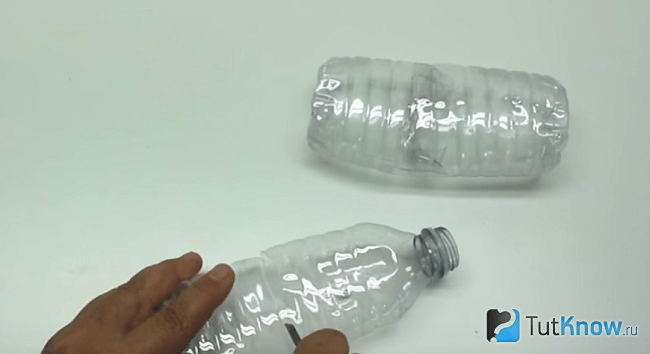
Cut the whole container in half, you only need a part of it, which is with a bottom. She will play the role of half a cake. A blank of two bottles at the junction must be glued with adhesive tape.
Pour PVA glue into a convenient container. Sprinkle salt on the board. Lubricate the plastic bottle blank with glue with a brush, then roll it over salt, which will adhere well to this base.
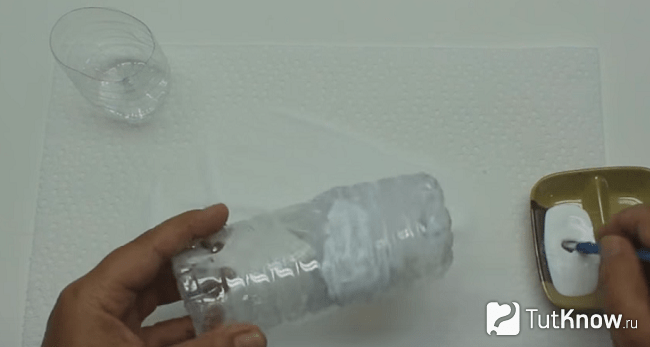
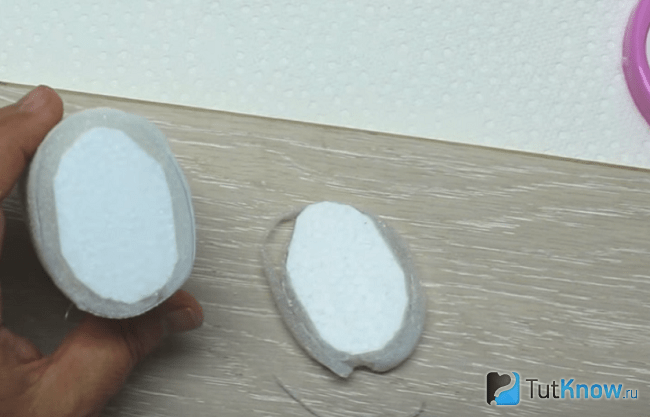
Set these future eclairs aside to dry. After that, you need to brush off excess salt with your hands or a brush. Cut out a small cone shape from the styrofoam. Lubricating it with silicone from a glue gun, glue a sheet of thin white foam rubber here. You will need to wrap the foam blank a couple of times.
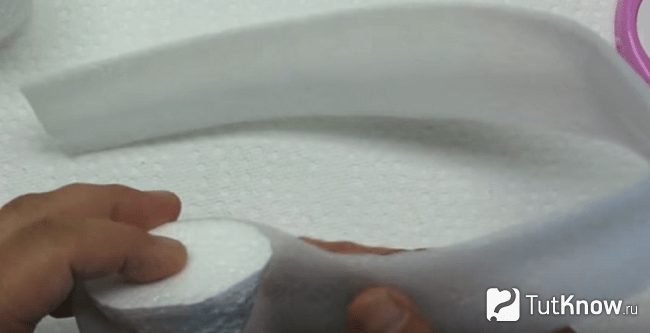
At the same time, the foam rubber strip will imitate the dough, and the foam plastic will be the inner white cream.
Now shove this blank with the cone-shaped part inside into the bottle. This part should fit firmly and well into it. Lay the bottle on the board on its side, cut off the excess with a sharp knife to get a nice even cut.
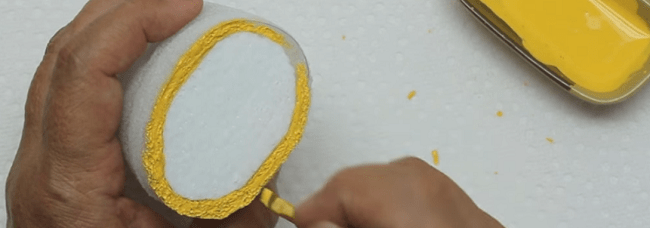
Now with yellow acrylic paint cover the surface of the cakes. To highlight the dough of the eclair halves with this color, apply it with a thin brush along the contour of the cut, painting over the white foam rubber here.
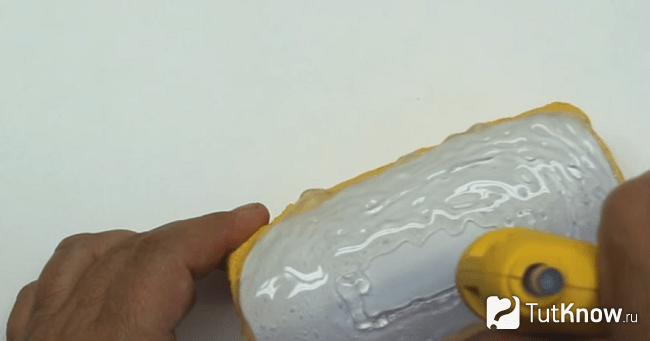
From a white foamirant, cut a rectangular blank, round the edges. Its shape almost repeats the view of the cake from above.

Glue this part with a glue gun, cut off the excess.
Now generously pour silicone from the glue gun here. To do this, prepare the silicone rods in advance so that they do not run out in the midst of the process.
Wait for this glue to dry, after which it needs to be painted over with brown acrylic paint to make a delicious glaze. The photo clearly shows how to make such an eclair.
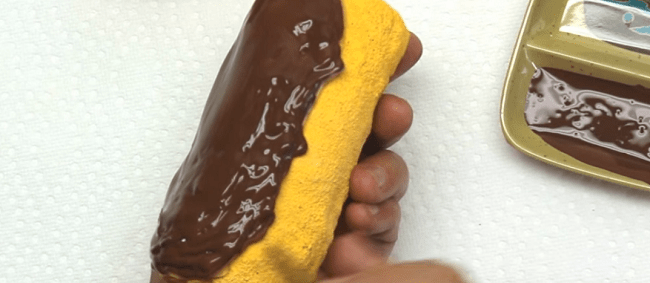
In the same way, make the icing for the second cake, after which you can put them on decorative dishes, but it’s better to put them not on the table, but behind the glass in the cabinet. After all, these cakes are so similar to real ones, they look very appetizing, you need to make sure that someone does not want to try them “by the tooth”.
If you need to bring crafts to a kindergarten competition, this will be an excellent way out. But also the teacher should not lose vigilance so that the children cannot take such an artificial sweetness.
The next craft also looks like a real one. Therefore, it is also necessary to warn everyone who will look at her that she is not edible.
How to make lemon at home?
For this craft, take:
- small bottles;
- sharp knife;
- PVA glue;
- salt;
- acrylic paints;
- scotch;
- thin brush.

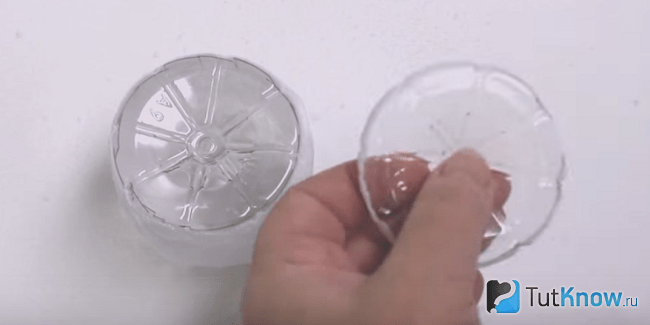
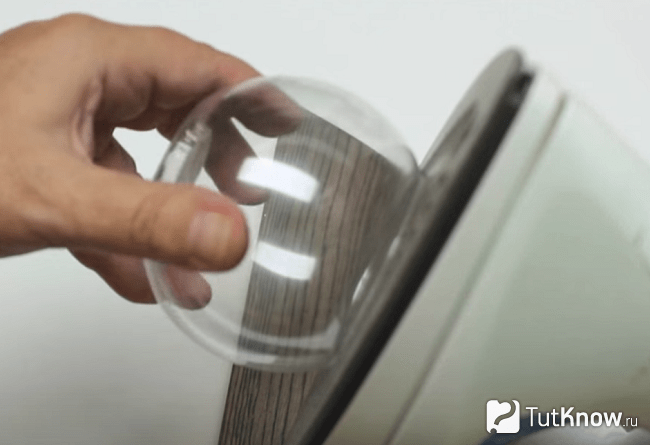
From the bottom of the bottle, cut off a piece about 7 cm high, you can vary this value at your discretion to make a lemon of the desired size. From above, cut its strips, the distance between which is 1 cm, their length is the same.

As in the first case, such a fringe will help to better put the second part of the bottle on this one. But downloaded from the second bottle, you need to cut off the bottom, the height of which is quite small, about 1.2 cm.

Match these two blanks, seal the junction with tape. Lubricate the surface of one and the second bottle with glue, sprinkle with salt.

In this case, the bottom, which is inserted into this container, does not need to be lubricated. To make lemon wedges, cut the bottoms of plastic bottles so they are about 1cm or less high. With PVA glue, you need to lubricate only their sidewalls, also sprinkle them with salt. While the glue dries, you can go about your business.
Then you need to remove excess salt with your hands. If this is not done, then along with these grains the paint will fly around when you cover the surface of the fruit with it.
To make the color of the final work the most vivid, it is better to first cover the surface with white acrylic paint, when it dries, use the one you need.
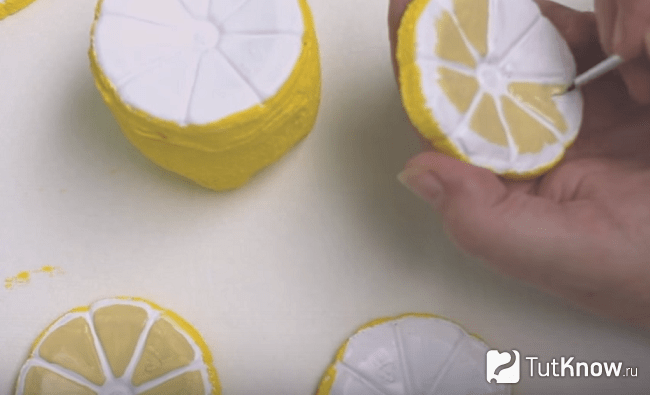
This is how elegant blanks painted with white acrylic look.

Now the skin of lemons and its slices need to be painted with bright juicy yellow paint. To make the flesh have a realistic color, mix white, beige paint, add a little yellow. This composition should be applied with a thin brush on slices of lemons, but leave white streaks and light edging.
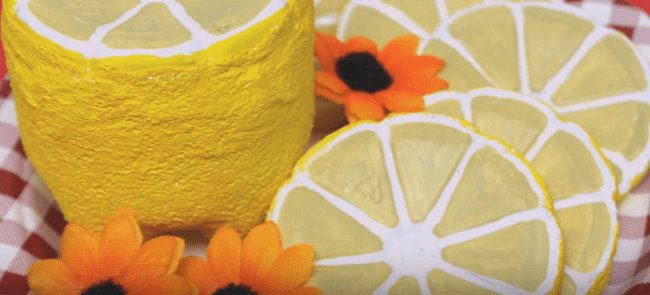
When the paint dries, lay the juicy lemon and its slices on a dish. Let everyone who sees such beauty praise your golden hands and be surprised that such a bright realistic lemon can be made from a plastic bottle.
How to make a candle in the form of a watermelon with your own hands?

The main component will also be a plastic bottle, but small and round. Here is what you need to transform it:
- a piece of foam;
- sharp knife;
- small round candle;
- expanded clay;
- acrylic paints.

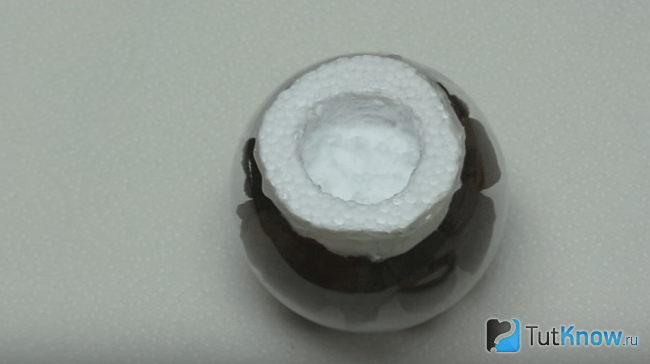
To round the edges of this container, to make them less sharp, attach this cut to a heated iron for a few seconds.
Put the foam in front of you. Turn the blank from the bottle over, place it with a cut on this material, draw a circle along these contours with a pencil. Cut it out, inside draw another circle, its diameter is equal to the diameter of the candle. Make this inner notch.

Pour expanded clay or other decorative stones into a plastic bottle, put a foam blank for a candle on top.
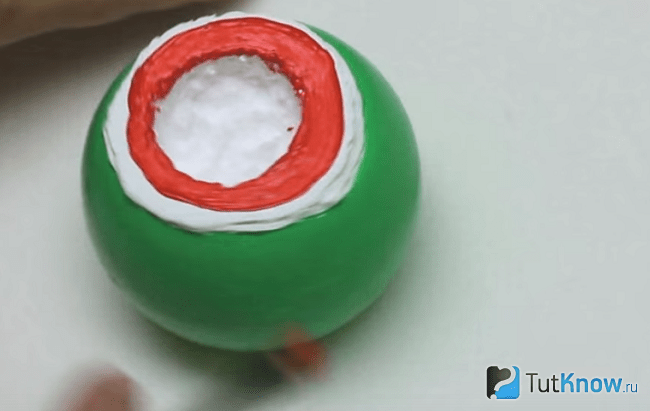
Outside, paint the blank from the plastic bottle, as well as from the foam, with white acrylic paint. On top of it, apply green, of course, when the previous layer is dry.

From above, cover the whiteness with red paint to make the pulp of the fruit.
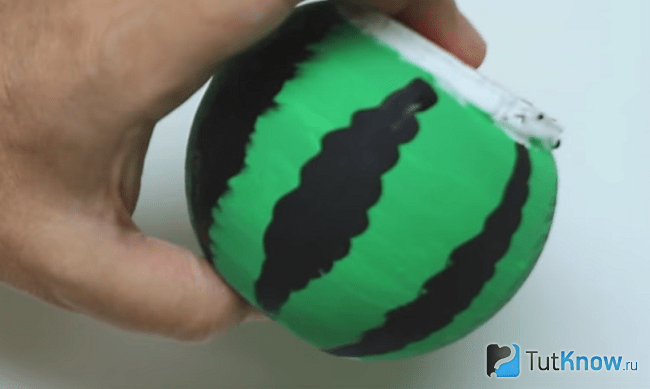
Now, on top of the dried green paint, you need to draw black stripes of a watermelon, they may not necessarily be straight, make them openwork.
It remains to put a candle inside, light the wick and you can indulge in romantic dreams by the fire.
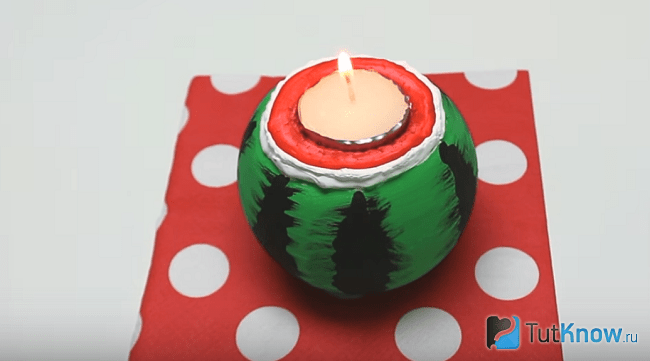
Here's how to make a candle at home out of almost nothing.
How to make vegetables and fruits: a master class
We will make them from papier-mâché. To do this, take:
- newspapers;
- paste or PVA glue;
- foil;
- scotch;
- colored paper or corrugated, or tissue paper.
The next batch of newspaper sheets must also be kneaded well, then lowered into PVA or into glue prepared by oneself. To do this, you can mix flour or starch with water, put on fire, with frequent stirring, bring to a boil.
When such glue has cooled, you need to lower the newspapers into it, distribute them over the surface of the foil fruit. Lay the blanks on a tray, put them in a warm place, for example, under the battery, so that they dry completely. Only then proceed to the design.
To do this, you need to generously lubricate colored, corrugated or tissue paper with a paste or PVA, glue future fruits and vegetables with these blanks.
See what wonderful crafts you get. Put them in a bowl. Place on a table or nightstand to decorate.

There is another way that will tell you how to make fruits and vegetables with your own hands from papier-mâché.
- This will require real products. If you want to use them later for food, then take only a natural flour or starch paste for work.
- Pour it into a bowl, dip a paper napkin torn into pieces there, take out the mass with a spoon with holes, which is called a slotted spoon. Then the excess glue will drain.
- The paper composition must be applied to the selected object, for example, a banana, orange or apple. The layer must be sufficient. Then also put the crafts in a warm place.
- When they have reached the condition, having dried, then carefully cut the paper layer of each fruit in the middle to remove the two halves of the frozen papier-mâché mass. To give them integrity, connect again by gluing the cut.
- Further, such blanks are drawn up at your discretion. You can glue them with colored paper or cover them with paints.

If you want to make halves of an apple, then you do not need to glue its 2 paper parts, on the contrary, you need to fill them with a mass of newspaper or napkins mixed with glue. When the blanks are dry, prime them with putty. After drying this mass, it must be sanded, then covered with acrylic paints.
For this job you need:
- paper napkins;
- fruits and vegetables;
- paste;
- Bowl;
- sandpaper;
- acrylic paints;
- tassel.
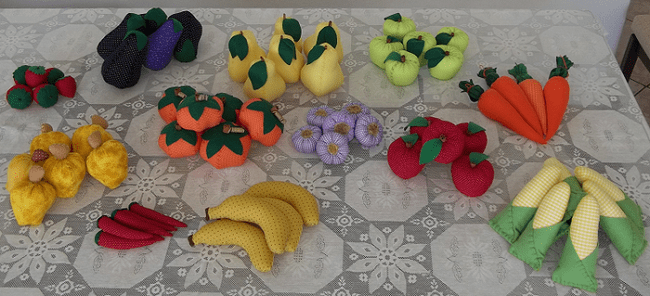
How to make artificial fruits and vegetables from fabric?
They can be voluminous and flat. Let's take a look at the first option. If you were asked to bring toy fruits and vegetables to kindergarten, then you can sew them from the remnants of the fabric.
Take:
- patches of fabric;
- synthetic winterizer;
- presented patterns;
- scissors;
- chalk or dry remnant.

It consists of several slices, the following photo will tell you their pattern.
Based on this diagram, cut out 6 blanks, they need to be sewn into a single canvas. Sew the second side of the last piece and the first side of the first. Fill the resulting bag with padding polyester, sew it on top, tighten the thread. Sew this hole, glue or attach tow with a thread and a needle on top.
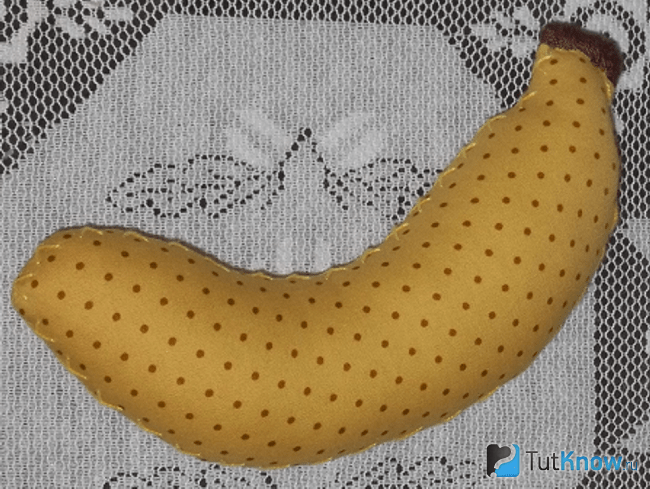
You can also sew a banana out of fabric.
For this you need to take:
- fabric of a suitable color;
- bulk filler;
- thread with a needle.

- Redraw the outlines of this fruit, attach this template to the yellow fabric, cut out two blanks.
- If you have a sewing machine and work skills, then sew both halves on it, leaving a small edge free on top.
- Through it, you will fill the banana with padding polyester. Cut a small rectangle out of brown fabric, fold it in half in the form of a ribbon, sew it here, at the same time closing this hole.
- If a sewing machine is not available, then you need to sweep both halves using a seam over the edge. Even without this tool at hand, you can still make a banana.

Looking at such bright-colored carrots, summer is immediately remembered and the mood rises. Find fabric in the right color. As you can see, you can use not only plain orange, but also small white polka dots.
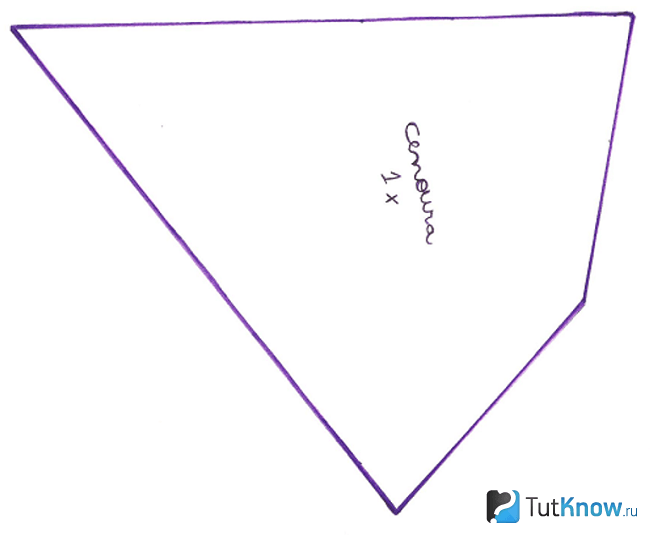
- Translate this template onto the canvas of your choice. Connect the sides of this figure to make a cone. They can also be swept away on a typewriter or by hand.
- Stuff this cone with padding polyester, sew greens on top. To make it, cut a circle from a dense fabric of this color. Cut with scissors its edges almost to the middle. Raise them up, sew this part to the carrot.
- In order for the greenery to acquire the shape we need, tie it with a thread.

A pattern will also help you make this vegetable.
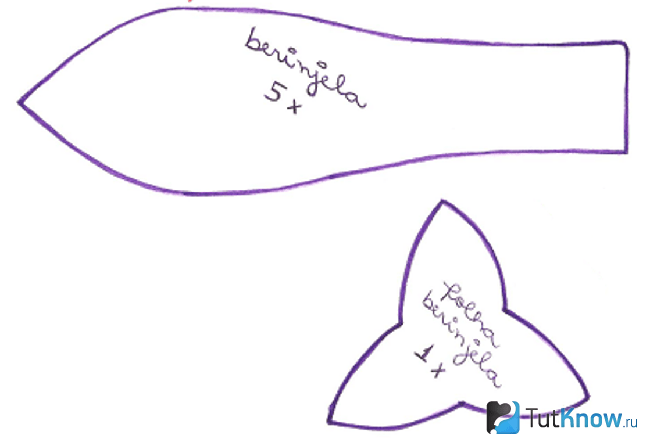
As you can see, the big part is the eggplant itself, you will need to cut 5 identical ones. A small petal-shaped form is the greens of a vegetable. Cut it out of fabric of this color. 5 identical wedges need to be sewn together to make a blank similar to a cone. Through the upper hole, you will fill it with padding polyester, sew greens here.
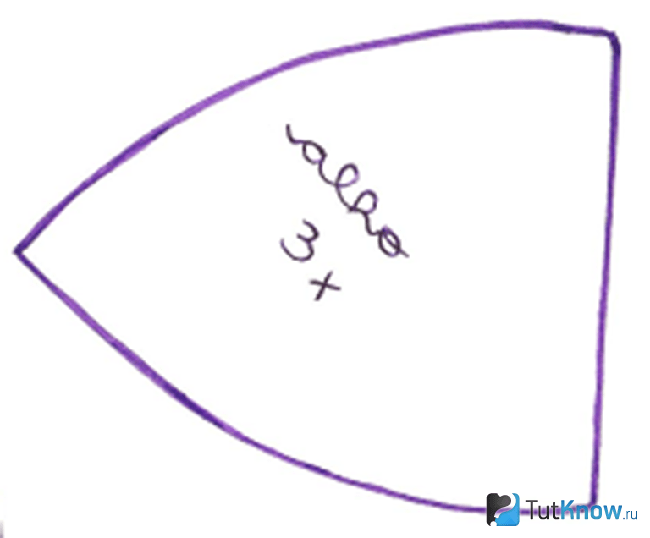
A pattern will also help you make a quince.

The main part of this fruit is a large blank, they will need 3 pieces that need to be swept away on the sides. You will make a quince tail from brown fabric by sewing 2 parts for this. Stuff the body of the fruit with synthetic winterizer, sew a tail on top, covering the junction of these two elements with it.
Here's how to make an apple out of cloth. To do this, cut out three identical parts, stitch them on the sides. Collect the resulting workpiece on top of the thread, tighten.
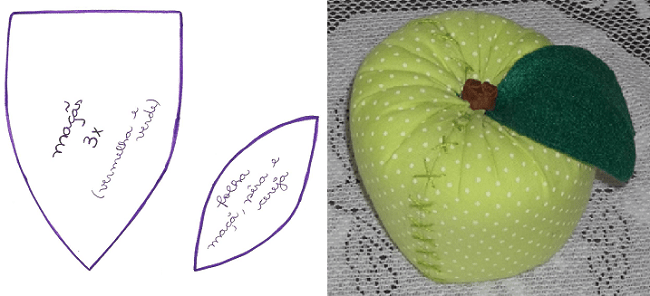
Cut a leaf from a green drape or felt, a fruit tail from a brown one, attach these details in place using a thread with a needle.
A pear consists of 4 blanks that need to be swept away. If you are doing this on your hands, use a cross stitch. To do this, first make parallel seams at an angle of 45 °, then with an inclination to the other side - seams perpendicular to them.

If you do not know how to make strawberries to add this berry to fruits and vegetables from fabric, then pay attention to the pattern.
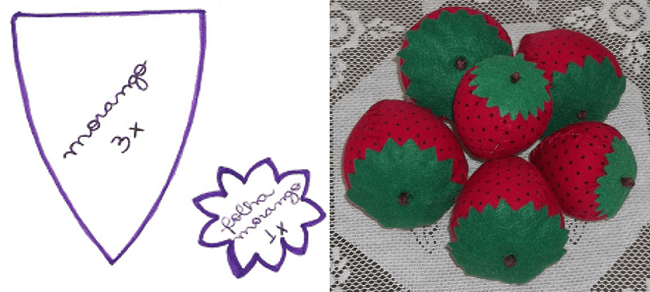
Three parts of an almost triangular shape, sewn into a single canvas, will become a berry, if you then stuff this semi-finished product with a padding polyester, gather it upstairs, sew the greens of the berry here.
- Grapes are created in a very interesting way. From fabric of a suitable color, cut out a triangle similar to the one you made for the carrot, but larger.
- Sew this blank on the side to make a wide cone. Stuff it with synthetic winterizer. Starting from the bottom, separate small pieces of fabric together with a padding polyester, tie them with a thread to make balls.
- Make such grapes all over the surface of the cone. Sew a green drape hat and ponytail on top.

In the finale, you can add spice if you make another vegetable. A pattern is also provided for it.
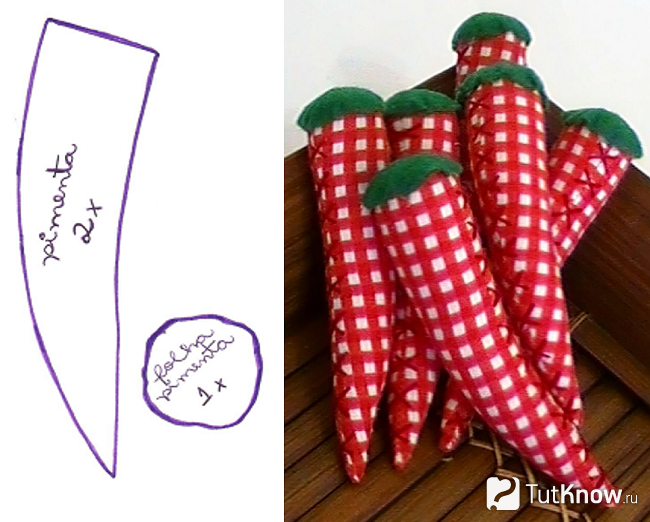
You can make hot peppers using a plain red cloth or with fasteners. Cut out two identical acute-angled parts, connect them on the sides with a seam. Fill with filler, close the place with a green cap of fabric.
Here's how to make your own vegetables using leftover fabrics, empty plastic bottles, old newspapers, or paper towels.
We hope that you will be interested to see the process of making vegetables in the presented story.
How to make a sweet, beloved by many - lollipops, is described in the second video. You will create them from plastic bottles using interesting needlework methods.
Many people are interested in how to make juice ice cream. What could be better than ice cream made from the juice of your favorite fruits! Fragrant fruit ice will appeal to both adults and children. After all, homemade ice cream made from natural products does not contain chemicals, which makes it safe and very tasty. Children are always happy to join the cooking process, because popsicles are one of their favorite treats.
How is ice cream made from juice?
To make ice cream from fruit juice, you can use a natural drink, fresh fruits or berries. The recipe is very simple - all you need is desire and a little imagination. Below is a detailed description of how you can make your own juice ice cream at home.
Consider the recipe for ice cream Fruit ice. To make fruit juice ice cream, you will need:
- fruit juice, preferably with pulp;
- sugar syrup;
- lemon juice;
- plastic or silicone molds.
This recipe is based on strawberries and kiwis, but oranges, cherries, pineapple, and any other fruit can also be used.
How Ice Cream is Made:
- When choosing strawberries, you need to look not at the beauty and size of the berries, but at the ripeness and aroma. They are beaten with a blender until smooth. The softer and more aromatic the berry is, the better the ice will turn out. The same goes for kiwi. Preference should be given to soft and ripe fruits. And you should not save in terms of fruit on homemade ice cream.
- The next step is to prepare the sugar syrup. The amount of sugar is added to your taste. In order for the syrup not to crystallize, add a little lemon juice. Water with sugar is heated and stirred until the sugar is completely dissolved.
- In separate bowls, whisk strawberries and kiwi. To each of them add the cooled sugar syrup.
- Prepare molds. On sale there are special molds for ice cream, which are very convenient to use. But if you don’t have them, then any plastic cups with wooden ice cream sticks will do.
- The prepared fruit puree is poured into cups exactly halfway and frozen in the freezer. When the first part of the puree is ready, you need to put the sticks in the cups and pour the remaining mass. You can pour kiwi syrup on the strawberry part, and on the kiwi, on the contrary, red strawberry puree. All this is again sent to the freezer for several hours. As a result, you will get a striped platter called Fruit Ice.
If it is difficult to remove the ice cream, then you can lower it for a few seconds in a container of hot water and then it will easily come out of the plastic cup.
People, experimenting, add yogurt, various spices to the recipe. The cooking technique does not change from this. Some recipes for homemade fruit juice ice cream include stabilizers such as starch or gelatin. If you are a supporter of a softer ice cream, then you will need to add them to the juice.
The cooking process will look like this:
- Pre-soaked gelatin or starch diluted in water is added to the finished sugar syrup. Gelatin is soaked for half an hour in cold water at the rate of 6 g per 3 tbsp. water. Starch is diluted in cold water until completely dissolved. The syrup, with diluted stabilizer, is heated to a boil with continuous stirring.
- After combining the fruit drink with syrup, the mass must be filtered through a sieve or cheesecloth, then poured into molds and put in the freezer.
To make ice cream white, you can use milk instead of water.
How to make popsicles?
Consider the original recipe for making ice from juice. Juice ice cream can be prepared in the form of ice cubes for various drinks. To make such ice from juice, you need figured molds, preferably made of silicone. Such fruit ice is prepared from undiluted fresh juice, as these ice floes will be added to various drinks: lemonade, cocktail, etc.
For the preparation of ice cubes, both freshly squeezed fruit juice and ready-made natural drinks bought at the store are suitable. For adults, frozen popsicles with the addition of wine are suitable. This is a good addition to dessert.
It is prepared as follows:
- A little granulated sugar is added to the finished fruit juice and stirred until completely dissolved.
- Next, a little dry white wine is poured in. Wine needs very little so that it does not interrupt the taste of fruits.
- If you are a fan of various spices, then you can add a little cinnamon or cloves, the taste will only improve.
- The molds filled with the finished mass are sent to the freezer until completely hardened.
If you have never made ice cream at home, then this tip will come in handy: in order for the ice cream to turn out lush and without ice crystals, you need to take the molds out of the freezer several times during the freezing process and beat the mixture well.
Ice cream or popsicles made from juice at home
What could be better than ice cream made from the juice of your favorite fruits! Fragrant fruit ice will appeal to both adults and children.
Source: prosoki.ru
How to make popsicles at home.
A delicious treat for children is easy to make at home, and it doesn’t have to be ice cream at all - after all, in the summer there are a lot of different fruits and berries that can be used to make not only tasty, but also healthy ice!
Children really like homemade popsicles, so if for some reason you don’t want or can’t please a little gourmet with regular ice cream on a hot day, prepare this ice treat for him, it will wonderfully replace the desired glass of ice cream, and there will be much more benefits from an ice stick!
Ingredients:
A glass of warm boiled water
cups of strawberry juice - I used natural juice,
let the strawberries stand in the bowl overnight
granulated sugar - you can use less sugar if you like not very sweet desserts 6 g gelatin - I use sheet gelatin, 6 g is 2.5 plates
Additionally, you will need an ice cream maker or disposable plastic cups.
Recipe for making popsicles at home
Soak gelatin in cold boiled water for 10 minutes. For 2.5 plates you need 6 tablespoons of water. Pour a glass of warm water into a small saucepan, add granulated sugar and mix thoroughly. Bring sugar syrup to a boil over medium heat, reduce heat. Squeeze out the gelatin and carefully transfer it to a saucepan with syrup, stirring constantly, simmer over low heat for 2-3 minutes.
Stirring constantly, pour strawberry juice into the syrup, boil for another 2-3 minutes. Remove the saucepan from the heat, pour the contents into a bowl and set aside. To cool quickly, you can put the pot of syrup in a bowl of cold water. Pour the cooled syrup into the molds of the ice cream maker, they should be filled to the very edge.
Put the ice cream maker in the freezer for 7-8 hours, ideally overnight. If you do not have a special ice cream maker, you can use ordinary disposable cups: pour syrup over them and insert a teaspoon. To remove popsicles after freezing, it is necessary to cut the cup and pull the edges of the cut to the sides. The glass will break - and the ice can be easily removed. As you can see, making popsicles at home is not that difficult.
How to make popsicles at home
A delicious treat for children is easy to make at home, and it doesn’t have to be ice cream at all - after all, in the summer there are a lot of different fruits and berries that can be used to prepare not only delicious
When it's hot outside, all we can think about is relieving the body's debilitating thirst. There are many ways to do this, but one of the most successful among them is the use of fruit ice - ice cream prepared on the basis of fruit and berry juices.
Fruit ice is one of the varieties of ice cream, the most refreshing and light. If, watching your figure, you deny yourself creamy ice cream, creme brulee, ice cream, popsicle, etc. then there is no reason to refuse popsicles. The fact is that it will save you from the heat without loading the body with extra calories, because it contains neither proteins nor fats, only useful minerals and vitamins that are found in fruits and berries. But all this, of course, provided that such ice was prepared at home without the addition of various preservatives, from natural berries and fruits.
Store-bought fruit ice contains additives that are unnecessary for the body (especially for children!) As stabilizers, acidity regulators, dyes and other preservatives, etc.
How and from what you can make homemade popsicles
Homemade popsicles can be prepared according to different recipes of various levels of complexity. However, even the most difficult option can be mastered by cooks with little experience: it is enough to follow the recommendations and do everything according to the recipe.
Having prepared such ice cream, you can fully experience all the benefits of homemade fruit ice: it not only refreshes without harm to your figure and health, but also gives you great health and energy thanks to the beneficial substances contained in this wonderful delicacy.
Let's start with the simplest recipe for making popsicles at home.
Fruit ice: the easiest recipe
You will need: freshly squeezed fruit or berry juice.
How to make homemade popsicles. To prepare such ice, you will need a mold in which it can be frozen: there are special molds, but you can also use regular yogurt packaging, etc. Fruit or berry juice should be poured into a mold and put into the freezer, when the liquid freezes, insert a wooden or plastic stick into it, for which you can then hold the ice cream and freeze the ice cream to the end.
To easily remove the ice cream from the mold, dip the mold in warm water for a couple of seconds.
Of course, such a simple fruit ice will be the most delicious if you make it from freshly squeezed juice prepared by yourself, and not from a store. It is believed that fruit ice made from juice with pulp is the most delicious - try it!
The second recipe for making fruit ice - a little more difficult, is that if ice is made from berries, you need to add sugar to them, wait until liquid is released from them, mix everything and pour into molds, freeze. You will need more sugar the more acidic the berries you use.
Slightly more difficult to prepare popsicles on syrup.
Sugar Syrup Popsicle Recipe
You will need: 500 g of berries, 100 g of sugar (to taste), 2 tsp. lemon juice, water.
How to make popsicles with syrup. Pour sugar into a saucepan and dilute with a small amount of boiling water, prepare syrup by bringing sugar and water to a boil and completely dissolve the first. Puree prepared berries with a blender or mash with a spoon, add lemon juice, mix. While stirring, pour the cooled sugar syrup into the berry mixture, pour the resulting mass into molds and put in the freezer.
Very tasty and quite a bit more high-calorie ice cream is obtained from fruit and yoghurt ice.
fruit and yogurt ice cream recipe
You will need: 500 ml of apple juice, 140 ml of natural yogurt without additives, fruit or berry juices.
How to make yoghurt fruit ice. Beat yogurt, then add apple juice and beat again, pour into molds, filling them completely, a third or half - depending on how many layers you want to make. If there are several layers, then each previous one must be completely frozen before adding the next one. You can combine yogurt layers with juice-only layers, or make all layers with yogurt.
You can make popsicles from any fruit or berries, such as strawberries.
strawberry popsicle recipe
You will need: 500 g of strawberries, 120 g of powdered sugar and the same amount of water, ½ lemon.
How to make strawberry popsicles. Puree the prepared strawberries with a blender, rub the puree through a sieve, add lemon juice. Pour water into a saucepan, add powdered sugar, mix, bring to a boil, boil for 2 minutes over low heat, remove the saucepan from the stove, let cool slightly, add strawberry puree to the syrup, mix, pour the mixture into molds, let it cool completely and remove into the freezer. When the ice cream has hardened a little, insert a stick into each mold.
When preparing popsicles, you can use several types of juices or purees at once, which are combined with each other, for example, strawberries can be combined with an orange.
Another type of popsicle can be made using gelatin, a popular culinary product.
gelatin popsicle recipe
You will need: 400 ml of water, 300 g of sugar, 250 g of fruit puree, 6 g of gelatin, lemon juice to taste.
How to make popsicles with gelatin. Pour gelatin 3 tbsp. boiled chilled water, leave for 30 minutes. Add sugar to the rest of the water, bring to a boil, pour gelatin with water, vigorously stirring the syrup, boil for 2-3 minutes with constant stirring, then add fruit puree, mix again and strain the resulting mass through a sieve or gauze. Add lemon juice to the cooled mixture, mix everything again, pour into molds, put in the freezer until solidified.
The subtleties of making delicious fruit ice
- To make ice cream, use only fresh, high quality ingredients;
- Do not dilute the juice with too much water, the more concentrated the juice is, the tastier the ice from it will be;
- Do not store popsicles in the freezer for too long - they will harden too much;
- Puree or juice fruit or berries just before making ice.
Making such homemade ice cream as popsicles, as you can see, is not too tricky and time-consuming, and the delicacy in the end turns out to be much tastier than store-bought and does not harm your health. Want to cheer up even more? Replace juice or puree from fruits and berries with tea or coffee! In general, there are a lot of options for this refreshing delicacy, the main thing is to start trying them and choose the most delicious one just for you!
Alexander Gushchin
I can't vouch for the taste, but it will be hot :)
Content
What is the perfect snack for yourself if you want something light and sweet? Try a fruit dessert: tasty and appropriate at any time of the day. If you choose a light dressing combined with healthy ingredients, you can get not only a snack, but also a real dessert for a festive feast. Find out what fruit snacks you can make.
How to make fruit salad
Proper preparation of fruit salad begins with the preparation of ingredients. Fresh fruits must be washed, remove excess seeds, stalks, peel. Dried fruits, so that they soften, you need to pour boiling water in advance and let them stand for a while. It can be difficult to wash the berries, so if they are very dirty, you need to soak them for 5-10 minutes in cold water, and only then rinse well. Blot the fruits with a napkin: if you use berries and fruits without drying them, the taste of the salad may deteriorate, become watery.
Fruits that darken quickly (apples, bananas, pears, avocados) are pre-sprinkled with lemon juice. Thanks to such manipulations, they will look beautiful in the dessert, as in the photo. In the same way, you can prepare exotic mangoes or papaya to make their taste more interesting. Fruit snacks are seasoned with syrup, sweet sauce, yogurt, sour cream, juice or liquor. You can use ice cream, but add it just before serving. Fruit desserts are recommended to be eaten chilled.
For decoration, you can use a mint leaf, berries, figurines carved from fruits or nuts. For those with a sweet tooth who cannot imagine a dessert without chocolate, you can add sweet seasoning by rubbing the bar or breaking it into pieces. As powders, you can use any confectionery: dragee, coconut, almond flakes, chopped pistachios or any other nuts, cookie crumbs, raisins.
fruit salad recipes
Healthy desserts are always appropriate and very easy to prepare. The fruit salad recipe does not require special skills: you just need to cut the ingredients beautifully and season with a delicious sauce. This is a great option for a man who wants to pamper his lady with a delicious and colorful dessert. If you decorate the serving of the dish in an original way, then this will only add spectacularity.
Serve a fresh salad in pineapple, mango, apple or orange halves, after scraping the fruit pulp (you can use it as an ingredient or cut out shapes for decoration). It is necessary to decorate the salad, whether it is in half a pineapple or a bowl. If you chose the second option, make sure that the dishes are elegant and comfortable.

With yogurt
Sweet fruit with soft yogurt is a great option for an evening snack, breakfast or a great diet snack for a children's party. Fruits are a good source of carbohydrates, so this dessert will fill you up and give you energy for the whole day. The recipe for fruit salad with yogurt, thanks to its sour-milk component, is easily varied: you can use fresh fruits or dried fruits, your favorite types of nuts, dragees, marshmallows or powders.
Ingredients:
- apricot - 2 pcs.;
- banana - 1 pc.;
- apple - 1 pc.;
- lemon juice - 0.5 tsp;
- prunes - 4-5 pcs.;
- low fat yogurt - 3 tbsp. l.;
- milk chocolate - 50 g;
- walnut - 1 pc.
Cooking method:
- Pour boiling water over prunes and leave for 15-20 minutes. This will soften it up and make it easy to cut.
- Wash apricots and apples, peel: remove pits and seeds.
- Remove the peel from the banana, then cut all fresh fruits into large cubes. Sprinkle the apple with additional lemon juice.
- Dry the prunes with a paper towel, then chop with a knife into small pieces.
- Crush the walnut with a mallet to beat the meat.
- Break milk chocolate into small pieces.
- Mix all the fruits, season with yogurt and decorate with chocolate and nut crumbs on top.

with apples
What is the most accessible fruit in all seasons? That's right, an apple. You can buy it everywhere: in the market, in the supermarket. This versatile fruit pairs well with many ingredients and dressings. Fruits with a high iron content darken quickly after being cut, so the apple should be sprinkled with lemon juice to maintain its attractive appearance (as in a photo from a food magazine). How to make fruit salad from apples?
Ingredients:
- peach - 2 pcs.;
- apple - 1 pc.;
- blueberries - 1 tbsp.;
- raspberries - 5 pcs.;
- lemon juice - 1 teaspoon;
- fruit syrup - 3 tbsp. spoons.;
- mint - for decoration.
Cooking method:
- Peel peaches, remove seeds and stems from apples.
- Cut fruits into slices. Sprinkle apple with lemon juice.
- Add washed blueberries, mix.
- Drizzle fruit syrup on top, garnish with raspberries and mint leaves.

with banana
Nutritious and tasty banana salad will appeal not only to adults, but also to children. This fragrant fruit is rich in nutrients, perfectly complemented by other fruits and berries, besides it is very satisfying: it can replace dinner or breakfast. Therefore, be sure to try to please your loved ones with a fragrant and delicate dish.
Ingredients:
- banana - 1 pc.;
- apple - 1 pc.;
- grapes - a small brush;
- yogurt - 50 ml;
- honey - 1 teaspoon;
- lemon juice - 1 tbsp.
Cooking method:
- Wash fruits, peel apples. Separate the grapes from the branch.
- Cut the banana into slices, leave the grapes whole.
- Cut the apple into large cubes. Sprinkle with lemon juice.
- Prepare dressing: Combine low-fat yogurt with honey.
- Place all the ingredients in a bowl and pour over the dressing. Decorate the dessert at your own discretion (the version with the addition of a celery stalk is considered the original).

With kiwi
Vitamin C helps the body strengthen its protective functions and is an excellent prophylactic agent against colds and viral diseases. An excellent source of this vitamin will be not only vegetables, but also kiwi salads. Children sometimes refuse this fruit because of the unpleasant appearance of small black seeds, so if you are thinking how to prepare a delicious dessert for a child's birthday, try carefully scraping out the seeds with a teaspoon.
Ingredients:
- kiwi - 2 pcs.;
- banana - 2 pcs.;
- tangerine - 2 pcs.;
- pomegranate - 1 pc.;
- orange syrup - 4 tablespoons.
Cooking method:
- Wash fruits well, peel. Disassemble the pomegranate into grains.
- Kiwi, banana, mandarin cut into small pieces.
- Lay out all the fruits in layers, interspersed with pomegranate seeds.
- Drizzle with orange syrup and garnish with fresh mint leaves or whipped cream.

For children
The child will like the beautiful design of the dessert, so instead of a salad bowl or bowl, it is recommended to use a scraped half of a pineapple. An exotic option is to serve the dessert in a coconut shell if you have one. Remember that a salad recipe for children requires a balanced sugar content so that fruits do not cause harm (do not provoke allergies, diathesis or gastritis). Choose the ingredients that your child loves the most.
Ingredients:
- pineapple - 1 pc.;
- apple - 1 pc.;
- banana - 1 pc.;
- tangerine - 4 pcs.;
- grapes - 150 g;
- unflavored yogurt - 100 g
Cooking method:
- Cut the pineapple in half, cut out the flesh with a knife.
- Chop it into small cubes.
- Wash the apple and grapes. Peel all fruits from peel, seeds, branches, cut into cubes.
- Mix all the ingredients, put in pineapple halves, pour yogurt on top. You can decorate the dessert with bright paper umbrellas.

Fruit and ice cream dessert
Beautiful fruit dishes should be served cold so that the juice does not have time to drain to the bottom of the vase and mix with the sauce. Fruit salad with ice cream is seasoned just before serving, so that the dessert does not turn into a liquid sweet porridge, but retains the most appetizing look (as in the photo). The original version will turn out if you use not just an ice cream, but a fruit or berry sorbet based on natural juice.
Ingredients:
- ice cream - 100 g;
- kiwi - 1 pc.;
- orange - 1 pc.;
- strawberries - 7-8 pcs.;
- pistachios - 50 g;
- grated chocolate - 50 g.
Cooking method:
- Peel kiwi and orange, cut into large pieces.
- Cut the strawberries into quarters and mix with the rest of the ingredients.
- Chop pistachios.
- Lay out in layers: fruit, ice cream, then crushed pistachios.
- Decorate the dessert with grated chocolate.

With sour cream
A variety of dressings allows you to adapt a classic dessert to the individual preferences of any person. For example, a fruit salad with sour cream, especially if you use a low-fat product, is suitable for those who are on a diet. Try to combine sweet and sour fruits so that they harmonize better with the sour milk sauce.
Ingredients:
- pear - 2 pcs.;
- grapes - 1 bunch;
- persimmon - 1 pc.;
- orange - 1 pc.;
- sour cream - 100 grams;
- granulated sugar (to taste).
Cooking method:
- Wash all fruits thoroughly, then peel.
- Cut the pear into cubes, sprinkle with lemon juice so that it does not darken, or immediately mix with an orange.
- Remove the grapes from the branch and leave whole.
- Put in layers in a bowl: orange, grapes, persimmon, pear. Lubricate each layer with sour cream, adding sugar to taste.
- If you want to make the dessert sweeter, season with chocolate on top.

From berries
Summer dishes from fruits and berries are versatile and healthy, they can be served on the festive table or as a snack on a weekday. The easiest way to decide how to make a light dessert will be in June or July, when fresh berries grow in your country house or appear on any market stall. At this time, you just need to choose the right dressing so as not to drown out the bright expressive taste of fresh strawberries.
Ingredients:
- strawberries - 300 grams;
- blueberries - 100 grams;
- kiwi - 2 pcs.;
- banana - 1 pc.;
- cream - 5 tbsp. l.;/li>
- mint - for decoration.
Cooking method:
- Wash all fruits thoroughly, peel kiwi and banana. Remove stems and leaves from strawberries.
- Banana, kiwi, strawberries cut into thin slices, then put in a vase in layers, sprinkled with blueberries and poured with cream. If you have heavy cream at your disposal, you can beat it with sugar to make a cream.
- Decorate with mint leaves on top.

With cheese
If you are tired of vegetable dishes, but want something light and fresh, try the fruit and cheese platter - this is a combination of sweetness and tartness: if you season the appetizer with an original sauce, then homemade recipes for salads with fruits and cheese will not yield to restaurant ones. Start your acquaintance with classic combinations.
Ingredients:
- goat cheese - 50 g;
- pear - 1 pc.;
- romano or iceberg leaves - 2-3 pieces;
- olive oil - 1 tbsp. l.;
- honey - 1 tsp;
- walnut - 2 tbsp. l.
Cooking method:
- Wash the pear, remove the seeds. Cut into slices, fry for a couple of minutes in oil.
- Pour chopped walnut crumbs and honey to the pear, cook for another 2-3 minutes.
- Put the romaine leaves torn by hand on plates, and the fried pear on them. Season with sauce from the skillet.
- Coarsely grate goat cheese and sprinkle on top.
- According to a similar recipe, you can prepare an appetizer with brie (or camembert) cheese and grapes or figs.

With cottage cheese
For baby food, a curd-fruit dessert is perfect, which combines useful properties (due to the high calcium content) and a bright, delicate taste. There is no need to add sugar to this dish, so it is suitable even for those who are on a diet. Instead of cottage cheese, soft cheeses can be used to avoid excessive graininess in the dish (as in the photo). Cottage cheese goes well with low-fat yogurt or sour cream sauce.
Ingredients:
- mascarpone - 200 g;
- raspberry syrup - 5 tbsp. l.;
- banana - 1 pc.;
- orange - 1 pc.;
- dark chocolate;
- canned pineapple (pieces) - 150 g.
Cooking method:
- Cut the pulp of pineapple into cubes, banana into circles, and orange into small pieces.
- Place the mascarpone on the bottom of the bowl.
- Then mix the rest of the ingredients, season with syrup and lay out the second layer.
- Top with chocolate pieces.

How to make fruit salad
If any sauces and oils are suitable for vegetables, then what should be the dressing for fruit salad? It should not interrupt the taste of the fruits and berries themselves, but only give them new shades. If you are trying to lose weight, choose low-fat fermented milk products (0% if possible). What is suitable as a fruit salad dressing:
- Syrup (berry, fruit, chocolate).
- Caramel.
- Cream (liquid consistency or whipped).
- Yogurt (with or without flavorings).
- Sour cream.
- Berry, fruit juices.
- Condensed milk.
- Lemon juice.
Video
Did you find an error in the text? Select it, press Ctrl + Enter and we'll fix it!Fruit ice is a great cooling treat during the hot season. It can be an excellent substitute for ice cream, while quenching thirst for a long time.
It can be prepared easily at home, for this you need fruit juice and special forms for freezing. It turns out to be very useful, because the preparation does not use preservatives and fats, which can adversely affect the figure.
The composition will contain only useful vitamins, minerals, which are usually part of fruit or berry juice. But before you start making homemade sweet ice, be sure to learn the basic principles of its preparation.
Before you start making ice, it is worth considering the features of the technology for preparing this cold dessert. In fact, its preparation does not require much effort, everything is done quite simply and easily.
The main thing in the presence must be juice from natural berries, fruits. Various spices, granulated sugar are also added to it.
But still, before proceeding with its preparation, it is worth carefully studying some important features:

The easiest recipe
To make ice according to a simple recipe, you will need:
- freshly squeezed juice from any fruit or berry;
- a few currants;
- freeze molds.
Cooking time - 3-4 hours.
Calorie content - 110 kcal.
For cooking, you can use any molds. Yogurt molds are perfect. Juice is recommended to use only fresh. You can squeeze berries or fruits or pass through a juicer. Of course, you can freeze store-bought juice, but the taste will not be the same.

You can add a little pulp to fruit or berry juice, this will make the ice much tastier, and in its structure it will resemble ice cream. Pour the liquid into molds and put it in the freezer for a while.

As soon as the mixture begins to freeze and is covered with a crust of ice on top, sticks should be inserted into the molds. Put in the refrigerator until completely frozen.
How to make apple pear ice from fruits
- half a fresh lemon;
- fresh pear - 300 grams;
- two apples;
- 200 grams of granulated sugar;
- a glass of clean drinking water;
- vanilla sachet.
Calorie content - 120 kcal.

How to make popsicles at home:
- Pears and apples are thoroughly washed from dust, dirt;
- Next, cut the pears with apples into 4 parts, cut out rosettes with seeds;
- Cut the fruit pulp into small pieces;
- We spread the fruit slices in the blender container;
- Grind pears with apples to a state of puree;
- Pour water into an enameled saucepan or stewpan, add granulated sugar, add vanillin;
- Put it on the fire and let it boil until it boils. As soon as the first bubbles appear on the surface, the container should be removed from the heat;
- Pour fruit puree into hot syrup, mix until smooth;
- As soon as the mixture becomes warm, check for readiness, if the fruit is hard, then the container can be put on fire and boiled to a boil;
- Add lemon juice, cool and pour into molds;
- We remove the molds in the freezer and leave to freeze;
- As soon as a crust of ice forms on the surface, insert the sticks;
- Freeze until ice forms.

How to make popsicles with strawberry syrup cubes
- 500 grams of fresh strawberries;
- 250 grams of powdered sugar;
- 170 ml of boiled water.
The cooking time is 4-5 hours.
Calorie content - 115 kcal.
Cooking process:
- Ripe strawberries must be well washed from dust, dirt, be sure to clean the stalks;
- Next, cut each berry into 3-4 parts;
- After that, strawberries should be mashed. To do this, the berry can be mashed with a crush or grind it with a blender;
- The result should be a thick mass, but in order for the mixture to be homogeneous, it must be rubbed through a sieve;
- When rubbing through a sieve, it is better to use a tablespoon;
- Pour water into a small saucepan, add powdered sugar and put on fire;
- The mixture must be stirred until the powdered sugar is completely dissolved. Bring to a boil and remove from heat;
- Put the strawberry puree into the syrup and stir well;
- In special molds that are designed for freezing cubes, pour the strawberry mixture;
- Put in the freezer and leave until completely frozen;
- The ice will be ready in about 4-5 hours.

How to make pineapple ice pops at home
For cooking you will need the following ingredients:
- juice from canned pineapples - 1 cup;
- canned pineapples - 500 grams;
- drinking water - 1 glass;
- granulated sugar - 180 grams;
- lemon juice - 80 ml.
Cooking time - 3.5-4 hours.
Calorie content - 125 kcal.

Let's start cooking:
- Pour a glass of pineapple syrup and a glass of drinking water into a small container;
- Pour granulated sugar into the liquid and put on fire;
- We heat the mixture, while it is required to constantly mix it so that all the sugar grains are completely dissolved;
- As soon as the syrup boils, it must be removed from the heat and left to cool;
- While the syrup is cooling, put the canned pineapples in a blender container and grind to a state of porridge;
- Pour the lemon juice into the cooled syrup and spread the pineapple puree. Mix well;
- Pour the mixture into molds, put them in the freezer and leave to freeze;
- As soon as an ice crust forms on top, insert the sticks;
- Place back in the freezer and leave until ice forms.

Watermelon frozen dessert
What ingredients will be needed:
- bright-colored watermelon pulp - 400 grams;
- granulated sugar - 170 grams;
- one medium sized lemon;
- kiwi - 2 pieces;
- blueberries - 100 grams;
- chilled water - 150 ml.
It will take 4-5 hours to prepare.
Calorie content - 118 kcal.

How to make watermelon popsicles:
- Sugar should be divided into three parts, because this ice is made from three layers;
- Put the pulp of the pitted watermelon into a blender, pour in a third of the granulated sugar;
- Cut the lemon into two parts, squeeze the juice from half and pour into a blender to the watermelon with sugar;
- Grind everything until a puree is formed;
- Pour the watermelon mixture into molds;
- We dip blueberries into the watermelon mixture, they will be watermelon bones;
- We remove the forms in the freezer and leave for a while;
- As soon as the mixture freezes a little, insert a stick into each form;
- We put it back in the freezer;
- In the container we make the second layer. Pour water, juice from half a lemon and a third of sugar;
- Stir thoroughly until the sugar is completely dissolved;
- We take out the molds and pour the second layer;
- After that, we make the third layer of kiwi. We clean the fruits, cut into medium pieces and put them in a blender container;
- We fall asleep sugar, add a little water and grind in a blender until a puree is formed;
- We spread the last layer of kiwi in the molds;
- We send it to the freezer for several hours until completely frozen.

How to make raspberry popsicles
For ice you will need the following ingredients:
- 3 cups fresh raspberries;
- granulated sugar - 100 grams;
- 100 ml of water or lemonade.
It will take 3-4 hours to prepare.
Calorie content - 118 kcal.

Cooking process:
- To begin with, raspberries need to be cleaned of stalks, leaf;
- Gently rinse the berries with cool water;
- We spread the raspberries in a container, pour granulated sugar;
- We wipe the berry with sugar until a homogeneous mixture;
- Since there are seeds from the berry mixture that can spoil the taste of ice, it is better to pass the mass through a sieve;
- Then add water or lemonade. Mix everything well;
- Additionally, a few drops of lemon juice can be added to the mixture;
- Pour the mixture into molds, yogurt molds are perfect;
- We put it in the freezer for a while;
- As soon as the mixture sets a little and a crust of ice appears on its surface, we insert sticks or skewers into each form;
- Put in the freezer until completely frozen.

How to make popsicles at home from kiwi fruit with yogurt
What components will be needed:
- 200 ml of regular creamy yogurt;
- kiwi - 2 pieces;
- apple juice - a glass;
- granulated sugar - 100 grams.
It will take 3-4 hours to prepare.
Calorie content - 135 kcal.

Let's start cooking:
- We clean the kiwi from the skin, cut it into pieces;
- Place in a blender and blend until puree is formed.
- Pour the sugar to the kiwi and mix well until the sugar is completely dissolved;
- In molds for freezing, you can use from under yogurt, spread the kiwi mixture, it should fill each mold by 1/3 part;
- We spread a layer of yogurt on top of the kiwi, insert a stick into each form;
- We put it in the freezer for a while so that the mixture freezes;
- As soon as the layers freeze, we take out the molds, pour the juice from the apples;
- We put it in the freezer for 4 hours, during this period ice is formed from three layers.
How to make ice cream from baby fruit puree
For cooking, you will need the following components:
- 310 grams of fruit baby puree of any taste;
- 300 grams of granulated sugar;
- a bag of gelatin for 10-15 grams;
- juice from lemon or grapefruit - 30 grams;
- two glasses of clean water.
Cooking will take 3-4 hours.

Calorie content - 129 kcal.
How to do:
- Gelatin should be poured with a small amount of hot water and left for a while. After about half an hour, it will swell;
- Pour water into a saucepan or saucepan, pour granulated sugar into it;
- We place the container on the fire, warm it up, while constantly stirring;
- Pour the swollen gelatin into the warmed syrup and mix thoroughly;
- Then remove the splits and leave to cool;
- As soon as the mixture becomes warm, put the fruit puree into it and stir well;
- Next, add 30 ml of lemon or grapefruit juice;
- Close the lid and leave to stand for about 15 minutes;
- Pour the mass into molds and put it in the freezer;
- Let it freeze until ice forms.
How to make homemade cherry ice cream with gelatin
For cooking, you will need the following components:
- water - 420 ml;
- cherry puree - 1 cup;
- cane sugar - one and a half glasses;
- gelatin - 7 grams;
- a little lime or lemon juice.
Cooking time - 3-4 hours.

Calorie content - 124 kcal.
Cooking process:

- for cooking, you can use not only juice from fruits or berries, but also pulp. The pulp will make the ice look like ice cream;
- if ice is made with layers of yogurt, then it will also look like homemade ice cream;
- Additionally, vanillin or cinnamon can be added to the syrup, these components will give a pleasant taste and aroma.
Fruit or berry ice will be an excellent way to cool or quench your thirst during the hot season.
Homemade delicacy turns out to be very tasty, children will especially like it.
For this reason, every mother should definitely have several recipes for this summer treat in her stock, because the children will ask him to cook again and again, and homemade ice is much tastier and healthier than store-bought ice cream.
Another recipe for making fruit ice is in the next video.


