How to make gelled fruit for cake decoration. Things to Consider When Making a Fruit Decoration: Tricks and Tips
More than one century has passed since the time when decorating dishes with vegetables and fruits carried a sacred and religious meaning. Today, this practice has become the art of giving the finished dish an aesthetic and elegant look. With the help of various techniques, chefs and confectioners create unique masterpieces that amaze the imagination. However, anyone can try their hand at creating a culinary creation at home, you just need to be patient. In this article, you will learn how to decorate dishes yourself using various techniques and surprise guests with your skill.
Decoration of fruit dishes: a bit of history
The history of culinary development goes back several thousand years. Since the time of the Roman Empire, the approach to decorating dishes has been seriously transformed under the influence of cultural and spiritual changes in the minds of people. At that time, the cake was more like bread flavored with honey, molasses or dried fruits, and not a culinary product that we are used to seeing on the shelves of pastry shops.
The first real cake decorations were created in Great Britain in the 14th century during the reign of Elizabeth I. It was then that such desserts began to be prepared for royal receptions, paying special attention to their appearance. As the first attempts to decorate the cake, an almond flour-based paste, known today as marzipan, was used. At the same time, table decoration with fruits and vegetables was actively developing.
Dessert designs became especially popular in the 17th century, when wedding cakes came into fashion. So, it was customary to decorate the groom's cake in dark colors using dark chocolate. And for the bride, it was traditionally made airy, decorated in bright colors using cream.
DIY fruit decoration
Today, almost every housewife can give the cake a festive look at home. And for this it is absolutely not necessary to own special techniques and techniques.
An ordinary biscuit cake with butter or sour cream can be decorated with kiwi or banana slices. A combination of orange and strawberry slices will look unusual. In terms of decorating dishes, everything is limited only by the imagination of the cook. You can fix your masterpiece with a special sugar solution or
The combination of fruits and chocolate looks very piquant. To do this, just put sliced oranges, strawberries or other fruits of your choice on the cake and pour over them with melted chocolate and cream. Such a decoration of cakes with fruits, photos of which, perhaps, everyone has seen today, will become the main highlight of any feast.
Recently, various design techniques for decorating dishes have gained great popularity. For example, such a fruit decoration method as carving. Thanks to this technique, anyone can learn how to create unique compositions that will impress even the most demanding gourmet.
This art came to modern cooking from China. The word "carving" itself comes from the English "curving", which means "hand carving". This word refers to the curly cutting of fruits and vegetables to decorate various dishes and desserts.
There are carving schools in every metropolis. In just a few lessons, you will be taught how to create your own spectacular culinary masterpieces using special tools. However, you can learn the art of carving fruits and vegetables on your own. The main thing is to show imagination by creating fruit decorations. Simple floral and plant motifs will be a great addition to the festive table.

Carving tools
To master this technique, you will need special tools. An ordinary kitchen knife will not be able to give fruits such an elegant shape as specially sharpened blades. So, here is a list of the main tools for carving:
- Thai knife with a pointed shape. With this tool, the basic elements of carving are performed.
- Noisette knife for making round cuts. Also used to create fruit balls.
- Carb knives are used to shape fruits and vegetables into petal and leaf shapes.
- A fluting knife that is used to create grooves and various patterns.
- Serpentine cutter for chip removal.
- Spirals for carving, giving a spiral shape to future products.

In addition to the listed tools, culinary and manicure scissors, tweezers, an awl and even scalpels made of medical alloy are often used. As materials, any fruits and vegetables that can be shaped are used. If you decide to try your hand at carving, be sure to purchase the necessary
Basic tricks
The techniques that are used in home carving are quite simple, but still require some skill. From fruits, you can create elegant flower arrangements for decorating cakes and desserts.
One technique taught to beginners is the creation of a chrysanthemum. To do this, you can use an ordinary apple, which must first be peeled. Previously, the fetus is fixed on a horizontal surface. Then, moving in a spiral, you need to carefully pinch off the leaves of the future chrysanthemum with manicure or culinary scissors. In this case, you can control the length and thickness of each petal.

You can create graceful roses from a pear by cutting it into thin slices and folding it like flower petals. At the same time, it is not necessary to peel the fruit, which will give a special look to the finished product. You can fix the rose at the base with a toothpick or caramel.
You can decorate the cake in an unusual way thanks to the noisette knife, with which fruit balls are made. For this, watermelon or melon is usually used. The fruit should be firm enough for the balls to hold their shape.
Strawberries can be used to create leaves for flowers. The shape of this berry in cutting resembles a leaf. It remains only to give the desired shape and make grooves with a cannelling knife.
Each carving master has his own techniques, which are developed as a result of many years of experience. Therefore, do not despair if the first time you fail to create your plan. Be patient and practice making fruit decorations. Photos of carving masters' products will help you create beautiful compositions at home.

How to save fruit decor?
Any culinary creation quickly loses its appearance. Therefore, the only disadvantage of fruit decoration is its fragility. Dessert with fruit flowers should be served immediately, otherwise it will lose its shape and freshness. However, there are some tricks that will help keep such jewelry alive.
If the fruit composition is made in a horizontal plane, then you can fill it with jelly, which is sold in any supermarket. Thus, the effect of glass will be obtained, and the cake will be able to stand in the refrigerator for several days.
A voluminous fruit composition can also be saved with a simple recipe. To do this, you need to prepare sugar caramel by heating 10 tablespoons of sugar with 1-2 tablespoons of water over low heat. The resulting mixture, while still warm, should be applied to the fruit with a brush. When the sugar coating cools, it will create a protective layer on the fruit in the form of a hardened candy.

In addition to the above methods, you can use a special carving glaze, which is sold in culinary stores. It allows you to preserve compositions without caramelization, leaving the natural look and taste of fruits.
Decor of marzipan cakes
In addition to decorating with fruits, you can give the cake a festive look with marzipan products. Traditionally, this product is made from powdered sugar mixed with water. The resulting mass is kneaded to the state of elastic plasticine, from which it is convenient to sculpt various figures. Such almond dough can be colored with food coloring, which will allow you to create any bright compositions. Marzipan keeps well in the refrigerator. At the same time, its taste properties do not change at all.
Chocolate cake decoration

In order to decorate a cake with chocolate, it is not necessary to be a professional confectioner. It is enough to buy a bar of your favorite dark or milk chocolate and melt it in a water bath or in a microwave. The resulting mass can be given any shape by pouring it in a thin stream onto parchment paper. When the chocolate figures harden, they can decorate a ready-made cake.
They are very beautifully combined with giving desserts a piquant and very appetizing look.
Cream cake decoration
With the help of a pastry syringe, any cake or pastry can be turned into a work of art. Traditionally, an oil-based cream is used for this. To prepare it, you will need 200 grams of butter, 0.5 cups of powdered sugar and 5 tablespoons of condensed milk. All ingredients must be mixed with a mixer until a thick cream is formed that is able to hold its shape. Before use, it is recommended to keep it in the refrigerator for at least 1 hour. Thanks to the various nozzles that are attached to the confectionery syringe, you can give the cream any shape. As a rule, confectioners apply it on the side of the dessert, and decorate cakes with fruit on top. Photos of culinary masterpieces from all over the world will help the beginner to create their own unique dessert.
- If you decide to learn the art of decorating cakes, then stock up on the necessary equipment - a set of carving tools and a pastry syringe.
- Try experimenting with colors and flavor combinations. Over time, you will find the perfect fruit combinations.

- Be sure to fix fruit compositions with jelly or caramel. So your creation will last longer.
- Try to create various fruit decorations. The photos of the culinary products given in our article will help you find inspiration for creating your own masterpiece.
If you love baking cakes, then this article is for you! In this article, we will look at a variety of ways to decorate cakes with your own hands at home. You can transform an ordinary cake with the help of mastic, marzipan, icing, waffles, chocolate, icing, cream, cream, meringue, fruit, jelly, sweets, marmalade and sprinkles. We will consider each ingredient of the jewelry separately, get acquainted with the manufacturing recipe, and, of course, be inspired by a huge number of ideas.
For some cake decorating options, you will need special materials such as: a pastry syringe with nozzles, parchment paper, a sharp thin knife, spatulas of different thicknesses.

Mastic- This is a special dough for decorating a cake. You can roll it out and cover the top of the cake, you can also create various animal figures, letters, numbers, flowers, leaves, openwork patterns and whatever your imagination desires.
The basic rule of working with mastic is that you have to work with it very quickly, as it instantly hardens. But there is a way out! When you form the decoration, pinch off the desired piece, and wrap the rest of the mastic in a film. Large figurines may crack when dry.
Mastic recipe number 1
Ingredients: condensed milk, milk powder or cream, powdered sugar, food coloring (optional). The number of ingredients directly depends on the size of the cake.
Cooking process: take a deep bowl and mix milk powder or cream with powdered sugar. Gradually add condensed milk and mix well. You should get an elastic dough that does not stick to your hands. Add food coloring drop by drop and mix in. After cooking, immediately wrap the mastic in a film.
Mastic recipe number 2
Ingredients: water, lemon juice or citric acid, butter, powdered sugar, starch, marshmallow (white chewing marshmallow), food coloring (optional).
Cooking process: melt marshmallows for a couple, add drops of food coloring if desired. Then add water and just a little bit of lemon juice or citric acid. Mix well the mixture, and then add 50 grams of butter. Separately, mix powdered sugar and starch in a ratio of 1: 3. Gradually add the corn starch mixture to the marshmallow mixture and knead well for about 10 minutes. After cooking, immediately wrap the mastic in a film.


Marzipan- This is a nut mass, which consists of almond flour and sugar paste. Its advantages are that it keeps its shape perfectly, is quite elastic and has an amazing delicate taste. It is convenient to create all the elements of decoration from it - small figures, cake coating and voluminous decorations.
marzipan recipe
Ingredients: 200 grams of sugar, a quarter cup of water, 1 cup of lightly roasted almonds, butter.
Cooking process: peel the almonds from the husk and finely chop it in a blender or on a grater. Make syrup from sugar and water. The consistency of the syrup should be thick. Pour the ground almonds into the syrup, stir and cook for 3 minutes. Take a bowl and grease it well with butter. Pour the marzipan into a bowl. Cool marzipan and pass through a meat grinder. Marzipan is ready! If it turns out liquid, add powdered sugar. If the marzipan is very thick, add a little boiled water.
I recommend the photo gallery of marzipan cakes!

Icing- This is an ice pattern that looks like a winter pattern on the window and tastes like crisp ice. The advantages of icing are that it is strong enough, does not spread, and perfectly adheres to the surface of the confectionery. It can be applied over hard chocolate icing, mastic, fudge. It is worth noting that the surface on which icing can be applied should not spread and be non-sticky. The icing is applied with a confectionery syringe, then the finished product is placed in the refrigerator for further solidification. Laces, inscriptions and patterns are very beautiful.
icing recipe
Ingredients: 3 eggs, 500-600 grams of powdered sugar, 15 grams of lemon juice, 1 teaspoon of glycerin.
Manufacturing process: cool all the ingredients, degrease the dishes and wipe them dry. Take the eggs, separate the whites from the yolks. Beat egg whites, add glycerin, lemon juice and powdered sugar. Beat the mass well with a whisk until it turns white. Cover the mass with cling film and place in the refrigerator for 1 hour to burst the air bubbles. The icing is ready, you can safely decorate the cake!

waffles- these are materials for decorating flowers, various figures, numbers. They are made from crispy waffle dough. Ready-made edible pictures based on waffle cake are also popular. You can buy this decoration in confectionery stores, supermarkets or on the Internet. It’s not possible to make waffles with an image on your own, as food ink and special equipment will be required. The advantages of waffles are that they do not crack, keep their shape perfectly and do not melt. However, they can only be used on the light surface of the cake, since when soaked, the picture can be saturated with dark cream.
Waffle design rules

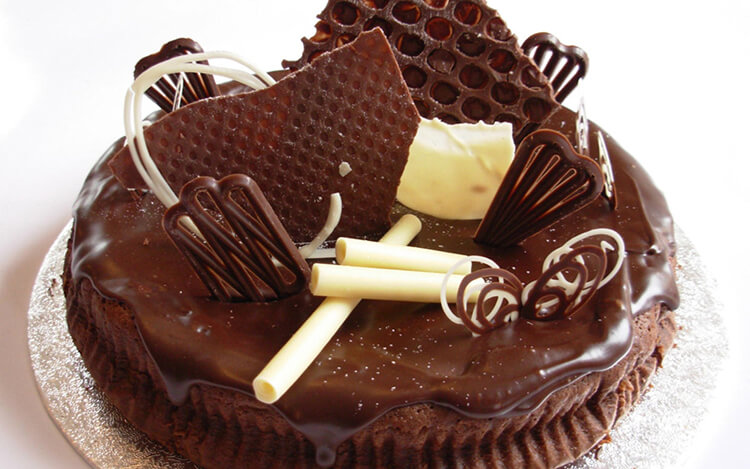
Decorating with chocolate is considered a classic decoration for cakes. This ingredient goes well with biscuits, soufflé, mousse, puff pastry and various creams. The advantage of chocolate lies in the fact that when it is melted, it can be given any kind of shape, and when the chocolate hardens, it will not crack or spread. To decorate cakes, you can use any chocolate - black, white, milk, porous.
Methods for decorating cakes with chocolate
- To decorate a cake with chocolate chips, simply grate a bar of chocolate on a grater and sprinkle it on the cake.
- To decorate the cake with curls, warm the chocolate bar slightly, then take a thin knife, or better, a vegetable cutter and cut off thin strips, they will immediately begin to twist. From them you can create chic patterns.
- Here is another way to decorate the cake with openwork patterns, inscriptions and drawings. Melt a bar of chocolate in a steam bath. Place the chocolate in a confectionery syringe. Take parchment paper and draw patterns. Use a pastry syringe to draw patterns on parchment paper. Place the parchment in the refrigerator to harden the chocolate. Carefully remove the chocolate from the parchment and decorate the cake. If you are not good at drawing, find a beautiful pattern on the Internet, print it out, attach transparent parchment paper to the pattern and simply copy it.
- To decorate the cake with chocolate leaves, you will need real leaves of trees or a houseplant. Wash and dry the leaves. Melt the chocolate in a steam bath and spread it on the inside of the sheet with a silicone brush. Put in the refrigerator, and when it hardens, carefully remove the chocolate from the leaf and decorate the cake.
- Another creative way to decorate the cake is with cherries and chocolate. Get rid of the pits, place each cherry in melted chocolate and decorate the cake.

At the moment, there are chocolate, mirror, marmalade, caramel, multi-colored, soft, milk and cream glazes.
chocolate frosting recipe
Ingredients: 1.5 tablespoons of milk, 2 teaspoons of cocoa powder, 1.5 tablespoons of sugar, 40 grams of butter.
Cooking process: take a bowl, put cocoa, sugar, pieces of butter, and pour milk. Put on fire, melt and boil for 5-7 minutes. Cover the cake with chocolate icing using a wide knife and refrigerate to harden further.
caramel frosting recipe
Ingredients: 150 grams of warm water, 180 grams of fine-grained sugar, 2 teaspoons of cornstarch, 150 grams of heavy cream, 5 grams of gelatin sheet.
Cooking process: soak gelatin in water, mix cream with starch, melt sugar in a pan until light brown. Add cream with starch and sugar to warm water. Boil to dissolve the caramel. Remember to constantly stir the mixture. Then pour it into the cream, mix, cool and add the swollen gelatin. Cover the cake with caramel icing using a wide knife and refrigerate to further set.
Marmalade Glaze Recipe
Ingredients: 200 grams of marmalade of the same color, 50 grams of butter, 2 tablespoons of fat sour cream, 120 grams of sugar.
Cooking process: melt the marmalade in a steam bath or in the microwave, add sour cream, butter and sugar. Mix well and put on fire. Cook the glaze for 10 minutes, stirring constantly. Let the icing cool down a bit. Cover the cake with marmalade icing using a wide knife and refrigerate for 3-4 hours to further set.


Cream- universal decoration for cakes. It is very convenient for them to write congratulations, make openwork frames, lush roses. Food coloring is often added to the cream.
buttercream recipe
Ingredients: 100 grams of butter, 5 tablespoons of condensed milk, food coloring.
Cooking process: melt the butter in a steam bath or in the microwave. Whisk it until it becomes white and fluffy. Add condensed milk, mix well and divide the cream into portions. Add the dye of the desired color to each portion of the cream. Place the cream in a pastry syringe and create beauty, then send the cake in the cold so that the cream freezes.

Whipped cream- this is an original airy, voluminous and delicate decoration. Their preparation does not require special products. To beautifully decorate the cake with whipped cream, you will need a pastry syringe. You need to work with cream quickly enough. Make sure all ingredients and tools are ready. The surface of the cake should be even and not too sticky.
whipped cream recipe
Ingredients: half a liter of high-fat cream from 33%, a bag of vanilla, 100-200 grams of granulated sugar, 1 bag of instant gelatin, food coloring (optional).
Cooking process: put the cream in the refrigerator for 12 hours. Pour chilled cream into a deep bowl. Take another deep container, pour ice water into it. Place the bowl of cream into a bowl of ice water. Dissolve the gelatin in the manner indicated on the package. Whip the cream with a mixer (do not use a blender, as the foam will not work). Beat them until the foam is strong enough. Add powdered sugar and vanilla, then stir with a whisk. Add the dissolved gelatin in a thin stream. Put the cream in the syringe and decorate the cake.
I recommend a photo gallery of cakes decorated with whipped cream!

Meringue- This is a snow-white, crispy and very tasty decoration. It is laid out on a layer of chocolate, jam, or cream.
meringue recipe
Ingredients: a glass of powdered sugar, 5 chilled eggs, a bag of vanilla (optional).
Cooking process: separate the proteins from the yolks, pour the proteins into a dry, fat-free deep container. Beat egg whites until fluffy (10-15 minutes). Gradually pour out the powder (1-2 teaspoons) and immediately dissolve it. Add vanilla and dissolve well as well. Preheat the oven to 100 degrees, line a baking sheet with parchment paper and transfer the protein foam to a pastry syringe. Squeeze the protein mixture onto a baking sheet, creating beautiful balls or other figures. The meringue is dried, not baked, the time the future meringue stays in the oven depends on the size of the blanks. Approximate drying time 1.5-2 hours.

Fruits are very tasty, healthy and contain a huge amount of vitamins. They brightly decorate the cake with flavor combinations and rich colors. The easiest way to decorate with fruit is to fan out chopped slices of strawberries, kiwis, oranges, mangoes, and all sorts of other fruits. You can create a whole fruit canvas that blends perfectly in natural jelly.
Recipe
Ingredients: fresh fruits and berries, for fruit jelly - light juice, such as apple juice 600 ml, a glass of powdered sugar, 1 package of powdered gelatin.
Cooking process: pour gelatin with a glass of juice and set aside to swell. Prepare the fruits, peel them and cut into small beautiful slices. Kiwis and bananas are cut in circles, apples and oranges - in half rings, strawberries - in half, raspberries, blackberries, cherries - left whole. Melt the gelatin in a water bath, add the remaining juice and powdered sugar to it. Strain the mixture, arrange the fruit nicely in the jelly and refrigerate. When the jelly hardens slightly, transfer it to the cake, turning the container upside down. If desired, mask the edges with buttercream or whipped cream. Put the cake in the refrigerator.

Jelly looks very beautiful and has a beneficial effect on people's joints. Jelly filling goes well with various fruits. However, you can decorate the cake with it in its pure form, or you can decorate the top with jelly filling with sprinkles of coconut or nuts, be original and think over the concept of decoration!
jelly filling recipe
Ingredients: 600 ml of juice (you can take juice of different colors), 1 pack of fast-dissolving gelatin, a glass of powdered sugar.
Cooking process: soak the gelatin in 1/3 of the juice and leave to swell. Then melt the gelatin with the juice for a couple. Mix powdered sugar and remaining juice, pour into molds and refrigerate. Pour off 100 ml of jelly, and put it in the refrigerator for a while so that it has time to set. Put the cake in a mold that is 3 cm higher than it. Put the jelly filling on the cake, and decorate with jelly molds on top. Steam will help to easily get the jelly blanks out of the molds. It is enough to bring the mold with jelly over the steam, and then turn it over for dessert. Put the cake in the refrigerator for 10-12 hours and do not forget to remove the mold before serving. If you want to make a jelly filling with fruit, then prepare the jelly as described above. Put it in the refrigerator for a while so that it has time to set. Spread the jelly over the nicely arranged fruit, smooth with a spatula and refrigerate overnight. To prevent the jelly from breaking during serving, cut it with a heated knife.

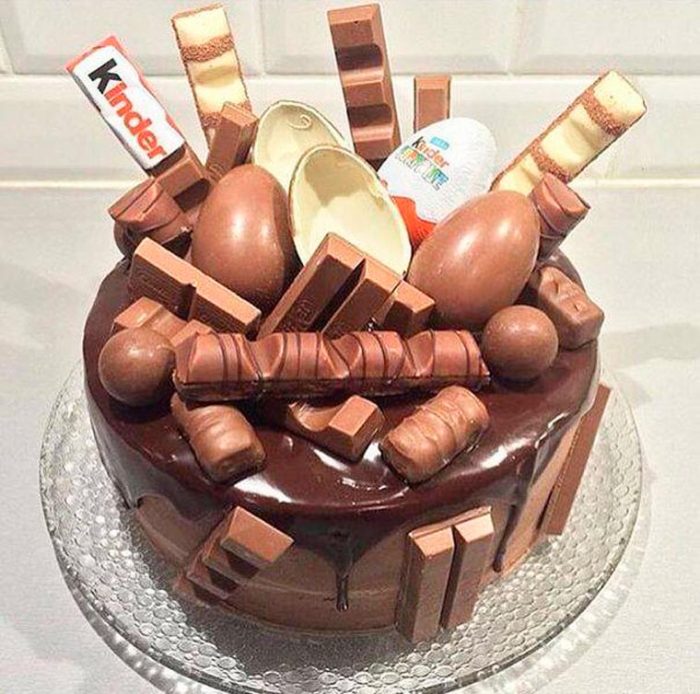
Candies This is a favorite treat for children. Toddlers pay attention to the design of the cake itself, and not to the products from which the cake was made. Try to decorate the cake for the children's holiday as brightly and creatively as possible. You can use all kinds of sweets except lollipops. The surface of the cake should be thick and viscous, for example - whipped cream, butter cream, icing.
Ways to decorate cakes with sweets
- The sides of the cake can be decorated with chocolate bars or waffles, and the top can be filled with dragees.
- Small toffees are great for creating a pattern or lettering on a creamy surface or white icing.
- Cut the gummies into squares and randomly decorate the top of the cake with white fondant or whipped cream.
- It is good to decorate the sides with round candies, and put 3 sweets in the central part of the cake.


Decorating cakes is an interesting but time-consuming section of cooking. An easy way to make a treat colorful and tasty is to decorate it with fruits and berries. A successful decor will turn out even from the most familiar fruits - apples, bananas, oranges. Exotic fruits will make the dessert even more appetizing, and the berries will complement the taste of the cream, set off its sweetness. Do not forget about the benefits of fresh fruits.

Berry decorations
Dark berries look spectacular on a lush mass of white cream. Whipped cream, protein cream, custard, condensed milk are used.

To decorate with protein cream with berries, you will need:
- 4 eggs (whites);
- 1 glass of powdered sugar;
- 1 pack of butter;
- 2 tbsp. l. lemon juice.

Recipe:
- Separate the whites from the yolks, cool and pour into a dry bowl.
- Now beat them with a mixer at medium speed, gradually adding powdered sugar.
- When the mixture reaches the consistency of light foam, place it in a water bath and heat for about 4 minutes until the powder is completely dissolved.
- Combine the warmed proteins with soft butter and lemon juice, beat again until fluffy.
- Cover with cream cake layers, top and side parts. With the help of a pastry bag with curly nozzles, beautiful sides in the form of waves are quite simply formed.
- It remains only to decorate the cake with berries. More often than others, raspberries, blueberries, blackberries, lingonberries, strawberries are used. Cherries are also suitable, including cocktail ones - soaked in sugar syrup, but they must first be pitted.
- Place the berries randomly or assemble them into a thoughtful composition.
- If the cake is layered, it's a good idea to mix the berries with the cream and use as a filling.

A cake decorated with grapes, both green and black, looks elegant. A pattern is formed from the berries or a scattering is laid out. Large grapes are placed both on top and in the layer. If you “drown” them in cream, then when cutting dessert, guests will experience a pleasant surprise. Grapes are combined with strawberries, kiwi, lemon.
Advice
Freshly frozen berries are also suitable for decorating the cake, for example, blackberries, cranberries, raspberries, black currants.
Strawberries with cream
This tandem is a win-win option thanks to an unsurpassed combination of taste and color.

To decorate the cake with strawberries and cream, it is better to whip them yourself.
You will need:
- 400 ml of heavy cream;
- 6 art. l. powdered sugar.
Recipe:
- Cool cream and whip. Lush peaks will be obtained only from a fatty product, so you need to collect fat from the walls of the pack with a spoon and add it to the total mass.
- Place the bowl and whisk in the freezer for 5 minutes before whipping.
- Start whipping at medium speed, gradually increasing the speed.
- After 2-3 minutes, introduce the powder.
- When steep peaks appear, stop, as the cream is easy to beat into butter. On average, it takes 10 minutes to prepare the cream.

Strawberries with chocolate
Another way to create a memorable cake decoration. The delicate pink color of the berry looks great on a dark background. To make the decor perfect, the largest strawberries are taken. In this case, it is not necessary to remove the stalk.

You will need:
- chocolate bar;
- some milk;
- nuts - optional;
- 8-10 large strawberries.
Recipe:
- Melt the chocolate in a water bath. If it turns out too thick, then add a little milk and mix until smooth.
- Brush the top and sides of the cake with chocolate.
- Dip strawberries into hot chocolate.
- Place the berries in a circle closer to the edge of the cake.
- Grind nuts on a grater. With the resulting nut dust, draw wavy paths on the chocolate.
- Finish the decoration with beautiful chocolate curls, which are obtained by grinding on a coarse grater.

Advice
Strawberries go well with both bitter and milk or white chocolate.
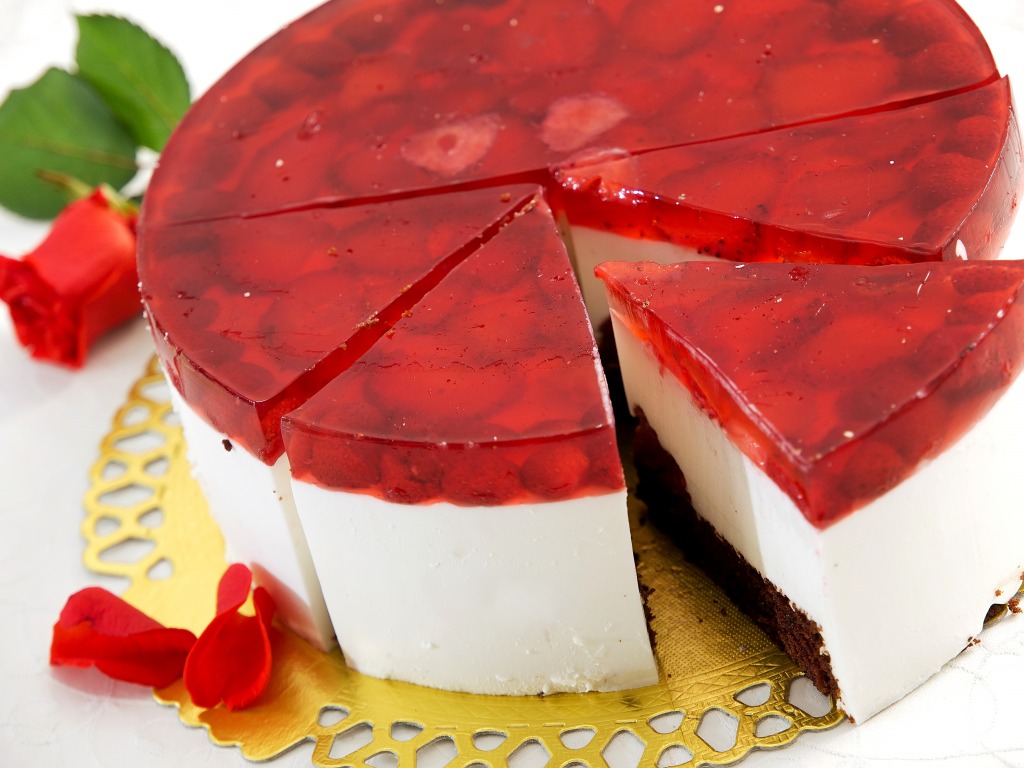
Fruits in jelly
With the help of fruit jelly, high layered cakes are created. For the base, a regular biscuit is suitable. Between the cake and gelled fruit, you can put a layer of thick cream, soufflé or fruit jam.

You will need:
- sliding form;
- gelatin - 1 pack;
- 1 st. l. Sahara;
- 1 tsp lemon juice;
- 0.5 st. water.
How to cook:
- Pour gelatin with warm water and leave to swell.
- After 15 minutes, put the mixture in a water bath and wait for the gelatin to dissolve completely.
- After boiling, immediately remove the mixture from heat and add sugar and lemon juice.
- Place the cake in a sliding form with high sides. Cut fruit in advance and arrange beautifully.
- Pour warm jelly onto fruits in a thin stream from the center to the edge of the composition, or gently smear the fruits using a brush with a brush.
- Place the cake in the refrigerator until the gelatin has completely set.
- To get a colored jelly, dyes must be added during the boiling of gelatin, but in a small amount: fruits will be lost in too dark jelly. Instead of water, it is allowed to take colored berry fruit drinks, this will give the finished jelly a delicate shade. Gelatin supplement option - cream or yogurt. They should be added in small portions after the gelatin has cooled and mixed thoroughly.

Advice
Do not gel citrus fruits, pineapple and kiwi: they may not harden. The acids that these fruits secrete prevent the gelatin from seizing.
Jelly can be bought at a candy store. It is specially designed for pouring fruit. You need to act quickly, such as the mass freezes instantly.
Fruit roses: the secret of creation
To decorate the cake with fruit in the form of flowers, you need to prepare sugar syrup. Thin plastics of apple and peach are best suited for creating buds. The method is ideal if you want to decorate the cake with oranges. Citrus gives a lot of juice when fresh, and after boiling in syrup it becomes soft and docile.

Ingredients:
- 1 apple;
- 1 peach;
- 1 orange;
- 1 cup of sugar;
- 1 glass of water.

Recipe step by step:
- Cut apple, orange and peach into thin slices.
- Mix sugar with water and bring to a boil.
- Dip fruit pieces in syrup.
- Twist one plastic into a tube, place a second one on top of it and continue twisting. Thus, roses of the desired size are formed. The optimal number of fruit plates is 4-6.
- Transfer to the cake, secure with a toothpick for stability.
- Lay out the leaves from small strips of green apple, placed skin side up.
A combination of fruits, berries, creams, interesting ideas and supplements
Tips for combining and placing fruits and berries:
- Even randomly laid out fruits and berries look beautiful on a lush layer of cream.
- Small fruit fragments are laid out at the edges, and large ones in the center.
- Kiwi circles are used to frame the composition. They are placed side by side.
- An interesting option: do not mix the fruits, but arrange them in sections in the form of triangles, the vertices of which are in the center of the cake.
- A composition of fruits and berries can be placed in the center of the cake, or a wreath can be formed along the edge of the confectionery.
- To decorate with bananas, the fruits are peeled and cut into circles. They are placed in a dense layer and covered with thin strips of chocolate. As an addition - grated nuts, small sweet berries (for example, blueberries).
- Raspberries are combined with blackberries; from fruits, kiwi is suitable for berries.
- The best fruit cream - custard, protein, oil.
- Slices of red grapefruit and lime look spectacular next to oranges.
- If the cream turned out to be too sweet, the cake is decorated with berries and fruits with sourness. This will balance the taste of the dessert.
- Fruit is quite realistic to place on the sides of the cake. To do this, you need a sticky cream. Banana circles and apple slices hold best.
- Various shapes are cut out of thick plastics of an apple: hearts, stars, etc. You will need special food molds or devices for cutting dough for cookies.
- The edges of the cake are masked with dense cream: protein, custard, oil. From a long cookie (suitable for "Children's"), bumpers are formed. Wafer tubes are used for the same purpose.
- Whole large berries are combined with soft chocolates.
- Delicate ensemble - raspberries, blueberries and macarons. The delicacy is selected by color.
- Before placing large pieces, they are dipped in melted chocolate or syrup, and then in confectionery sprinkles or coconut flakes.
- Fresh mint leaves are a good addition to fruits.
- Tangerines for decoration are used in the form of slices, oranges - circles or their halves. Citruses are peeled not only from the peel and seeds, but also from the white fibers between the pulp. If the drawing is not made up of whole slices, then the pulp should be freed from the film.

Things to Consider When Making a Fruit Decoration: Tricks and Tips
Not all housewives have a lot of experience with voluminous fruit decorations. You need to choose a good cream, carefully cut and arrange the pieces.

So that the work does not go down the drain because of some little thing, check out this collection of useful tips:
- Not all fruits and berries are suitable for decoration due to the abundance of juice. Due to excess fluid, the whole picture will deteriorate. Such fruits and berries include lemon, lime, persimmon, watermelon, melon, gooseberry. But if these fruits are quite elastic, then why not find them a use in the confectionery business? Juicy fruits and berries are suitable for a layer of cakes, their juice nourishes a dryish biscuit. Citrus fruits often use the zest. By the way, canned fruits are rarely used to decorate cakes, as they also have a lot of juice.
- Before buying fruits, you need to make sure that guests are not allergic to any of them. Most often, a negative reaction is caused by oranges, kiwi.
- Do not forget to remove the seeds from cherries, citrus fruits, grapes.
- Everyone noticed that an apple, after peeling the peel, begins to darken quickly. On a birthday cake, such pieces can spoil the overall impression of a confectionery masterpiece. To keep the apple pulp clean, it is sprinkled with lemon juice.
- There should be no dots or cracks on the fruit. Overripe fruits should not be used.
- So that cakes decorated with fruits do not fall apart, 2-3 cm are left from the decor to the edge of the cake.
- In order for each guest to treat themselves to the decor of the cake, portions are calculated in advance and the dessert is divided into segments. Then the decoration elements are symmetrically arranged.
- So that frozen berries do not lose their shape, it is necessary that they thaw gradually. First, the fruits are moved from the freezer to the top shelf of the refrigerator, and after a few hours they are taken out and brought to room temperature.
- Using a pastry bag with a thin nozzle, drawings are created directly on berries and fruits. Strawberries and raspberries are covered with strips of chocolate.
- Idea: place toothpicks with berries on the pear halves, draw eyes with dark chocolate. Get a funny hedgehog.

No matter how difficult it is to compete with venerable confectioners in the design of a cake, homemade cakes have been, are and will be a favorite at family holidays. A handmade fruit decoration will be aesthetic in any case, even if you just place the slices on the cream, and the taste of the cake will be saturated with good mood and love for loved ones, and this is the main component of success.


What is a holiday without guests, gifts and cake? Boring! A holiday for that and a holiday that have fun, chat, dance and indulge yourself with all sorts of sweets! If you know how to bake cakes and make delicious creams, this is already half the battle. Today we will look at options on how to decorate a cake at home.
How to decorate a cake at home?
How to decorate a cake at home with cream
First of all, you need to deal with the question of what kind of cream is ideal for decorating confectionery. There are not many of them:
- oil;
- protein;
- creamy.
The basis of the butter cream is butter, with a fat content of at least 82%. You can also use condensed milk or powdered sugar to make the cream. As for the proportions, when preparing butter cream with condensed milk, it is necessary to take into account the consistency of the milk itself. Very often, experienced confectioners use boiled condensed milk, it is denser and ensures the stability of the cream. To give the decor the desired shade, it is more advisable to use liquid food coloring.
In butter cream you can also add cocoa powder or chocolate melted in a water bath. This technology is ideal for decorating chocolate biscuits and cupcakes.

Protein cream - one of the capricious. Its preparation will require patience and endurance from you. For decorating cakes, custard protein cream is used, the preparation of which takes place in three stages:
- Pour ¼ cup of clean water into a saucepan and add 6 tablespoons of sugar. Put on the fire and cook the syrup for 3-5 minutes after boiling (checking readiness is easy enough - dip a spoon into the syrup and raise it so that the finished syrup flows down - if the thread is thick and continuous, your syrup is ready);
- put 3 cold egg whites in a clean and dry bowl and beat with a mixer until a thick white foam (to get stable peaks, you can add 3-4 drops of lemon juice or a pinch of citric acid);
- Continuing to beat, pour the prepared sugar syrup into the whites in a thin stream and beat the resulting mass for another 1-2 minutes. At this stage, the necessary flavors and dyes can be added to the cream.

The finished cream is also applied to the cake using a pastry syringe and nozzles. The capriciousness of the cream lies in the fact that overcooked or undercooked sugar syrup will cause the flowers and patterns from the cream to lose their shape very quickly. And the overcooked syrup will add bitterness to the cream. To thicken the protein cream, you can use agar-agar (this is a natural product that is safe for children and adults).
To prepare butter cream, you will need fatty confectionery cream (at least 32% fat) and powdered sugar. Cream is also a rather capricious ingredient. Before whipping, it is necessary to cool not only them, but also the container in which you will whip the cream, as well as the whisks of the mixer. The observance of time when whipping the cream also plays an important role, a common mistake of novice cooks is over-whipped cream. Cold cream is whipped with powdered sugar until stiff peaks are obtained. If you doubt that the cream will not lose its shape within 12-24 hours, you can add a special thickener to it, which is sold in almost any supermarket. Butter cream can also be given any shade, but the classic option for decorating cakes with cream is the white color of the cream.

How to decorate a cake at home with mastic
Today, confectionery products decorated with mastic figures are very popular. It is also worth clarifying here that there are two options making mastic:
- sugar;
- marshmallow.
The first option is more time consuming, but guarantees the stability and strength of your figures and flowers. By the way, almost every one of us has come across such figures and flowers - they are sold as decor for Easter cakes. Sugar and marshmallow mastic are sold ready-made, but you can also make them yourself.

To make sugar paste you will need:
- 80 ml of water;
- 7 g of instant gelatin;
- 15-20 g of soft butter;
- 2 tablespoons of glucose (fructose);
- 1 kg of powdered sugar.
Gelatin must be prepared in advance. To do this, fill it with cold water and set aside for 30-40 minutes, then heat the mass until the gelatin is completely dissolved (but do not boil!). Add butter and glucose to hot gelatin, mix until smooth and refrigerate. If you want to give the mastic any shade, then the dye must be added to the hot gelatin. Powdered sugar is added to the mass only after complete cooling. It is necessary to knead the mastic like dough for dumplings (sprinkle the table with powdered sugar and knead the mass until the mastic stops absorbing the powder).
For the preparation of marshmallow mastic you will need chewing marshmallows (marshmallows), powdered sugar, a little butter. Marshmallows must be heated in a microwave or in a water bath until they increase by 1.5-2 times (a piece of butter must be added to a container with marshmallows before heating). Stir the enlarged sweets, add dyes and, adding powdered sugar, knead the mass similar in consistency to plasticine. This mastic is used to cover cakes and create various figures.

You can decorate the cake with fresh or canned fruit, grated chocolate, coconut flakes.


Decorating a cake with fruits and berries is always a winning decision. Such confectionery products look bright, festive, and most importantly, they are useful, since there are no dyes and harmful additives in the berry-fruit decor. Fruit cakes do not require special skills: cakes can be baked using any technology or bought in a store. We offer advice from experienced confectioners on how to decorate a cake with fruits or berries in various ways.
Rules for decorating cakes with fruits
A cake beautifully decorated with fruits will become a real gem of any celebration and a source of pride for the hostess. In order for the finished product to retain its shape, you must follow certain rules for decorating a cake with fruits:

- Preparation of cakes. They are well soaked in cream, to which, if desired, canned fruits are added. An important condition is that the last cake must be covered with a thin layer of cream layer. This will keep the fruit pieces from sliding off the dessert.
- Fruits. Decorate confectionery with fresh, frozen or canned fruits. Cakes decorated with fresh berries look more colorful and bright. Fruits harvested for future use must first be thawed, and the resulting juice must be drained from them before use. Throw the preservation on a sieve to drain the syrup. Fruits are laid out in the form of figures (heart, animals, flower, numbers, fairy-tale characters) or randomly. Do not forget about a reasonable combination of shades.
- Jelly. They are poured over a fruit-decorated cake so that they are better fixed on the surface of a sweet product. It is better to use ready-made jelly powder. It is enough to dilute it with water according to the instructions on the package, and pour the cake with liquid jelly.
- Additional decoration. Decorated with fruits, the cake is decorated with chocolate, powdered sugar, confectionery sprinkles and other elements. Pieces or whole fruits immersed in melted chocolate look elegant.
- Surface. Fruit decoration will ideally stick to the top cake, covered with whipped cream, cream, uncured icing. Mastic, marzipan and hardening glaze cannot be used.
Fruits are a great solution for decorating a cake and decorating other sweet products or pastries: muffins, muffins, pies, desserts.
Choosing fruits

Not all fruits can be used to decorate confectionery. To beautifully decorate the cake with fruits, choose each one carefully. Only strong fruits without dents, dark spots, cracks and other damage will do. Overripe and very juicy are not suitable, because the juice they secrete will spoil the presentation of the cake.
Most often used to decorate a cake:
- pineapples, mangoes, kiwis, peaches, apricots (fresh or canned);
- citrus fruits (tangerine, orange, grapefruit);
- apples, pears, bananas, plums;
- strawberries, blueberries, currants (black and red), grapes.
Some fruits, after defrosting, lose their taste and attractiveness. It is undesirable to decorate products with such fruits. In this list:
- watermelon melon;
- persimmon;
- cherry, pomegranate;
- gooseberries, cranberries, raspberries, blackberries;
- lime.
If you are planning to decorate a jelly-filled cake with kiwi or pineapple, then first pour boiling water over them. Otherwise, they will not allow the jelly mass to harden.
Preparation for registration

To start decorating a cake with fresh fruits and berries is to prepare the fruits.
For this you need:
- choose beautiful, ripe, but strong fruits or berries;
- wash them thoroughly under running water and dry on a towel;
- remove leaves, seeds, stalk, from citrus fruits - peel, film;
- remove seeds and cut.
For a beautiful design of a confectionery, fruits are cut in a certain way:
- cut apples, pears, mangoes, kiwi and others into thin slices, circles;
- apricots, peaches - in halves, as well as slices or quarters;
- bananas - elongated circles;
- fresh berries are usually put whole, it is allowed to cut only large grapes into halves.
If decorating with chopped apples, then sprinkle with lemon juice so that the used fruit does not darken.
From large fruits at home, you can cut roses, plates or various other shapes. Beautiful cutting will be obtained by using a knife with a thin blade or a special slicer.
The use of canned fruits involves leaning back on a sieve / colander to drain excess liquid.

When making a product, select fruits according to shape, size, color. Usually large fruits / berries are placed in the center, smaller ones - at the edges. The choice of color combinations depends solely on your imagination and artistic abilities.
How to decorate a fruit cake with your own hands
Decorating cakes with fruits is a simple (if you do not take into account complex options), fast and beautiful technique for decorating confectionery. There are many ways to decorate a cake with fruits and berries at home. We offer some options suitable for a novice confectioner:
- Minimalism. Requires a small amount of fruits and berries. They can be laid out on a cake smeared with cream, at a small distance from each other along the edges, in the center, on one side of the cake, based on what shape it is and how well your imagination works. Decorate the center of the product with a large fruit. Combine according to the color scheme: fruits of a contrasting color look optimal on a light cream.
- Rainbow. You will need fruits of several types and different colors (preferably from a rainbow palette). Cut the fruit and arrange in a circle, starting from the center and alternating in color. The sides can be decorated with fruit slices or cookies. You can conditionally (or gently with a knife) divide the surface of the cake, smeared with cream or whipped cream, into several zones, including the sides (triangles, stripes), then fill them with one layer of berries / fruits of different colors.
- Mono. A very elegant way to decorate sweets, when one type of fruit and berry is taken as the basis, a color contrasting with the creamy mass. For example, white and red, white and black, white and green, etc. Let your imagination run wild: there are a lot of options.
- Randomness. Cut fruits, take whole berries. Mix the prepared fruits in a cup and spread evenly over the top cake, the surface of which should be sticky. Usually they use kiwi, pineapple, currants, cherries, blueberries, citrus fruits.
- Flowers and ornament. From thinly sliced apples, oranges and other fruits with a slicer, form beautiful voluminous flowers. Collect the slices into a rosette and place on the surface of the cake. Decorate the edges with grapes or other fruits. From berries of large sizes, you can lay out an ornament.
- Cubes. A delicacy in the shape of a hemisphere, decorated with fruit cubes, looks unusual and interesting. Cover with sticky cream. Lay out a circle of strawberries in the center, divide the remaining space into 6 equal parts and decorate them with cubes of orange, pineapple, banana, kiwi, currant berries.
- Volume. Prick prepared fruits and berries for decoration on a toothpick, and place on the surface of the cake. Any form can be chosen. This method will add volume to the confectionery product. Medium-sized fruits are optimal: strawberries, apricots, raspberries, cherries.
- A combination of large berries and fruit slices. Prepare tangerines, large grapes and mangoes (fresh or canned). In the center, lay out a flower from the mango slices, slightly overlapping each other. Lay grape halves and tangerine slices alternately around the perimeter.
As you can see, it is very easy to make an original fruit decoration of a confectionery product with your own hands. Do not be afraid to experiment: you can’t spoil the cake with fruit.
Fruit picking and decorating video
How to decorate a cake with frozen fruit
Frozen fruits are often used to decorate the cake with berries. The main thing is that fruits / berries do not lose their appearance after defrosting. Optimal for confectioners are pineapples, cherries and any berries. In this case, it is important to defrost them correctly. To do this, send the fruits taken out of the freezer to the top shelf of the refrigerator, and only then, after a few hours, continue defrosting at room temperature. This approach will keep the berries in shape and attractiveness.
For the base of the cake, take a cream with a dense consistency (cottage cheese or butter), which does not let the fruit juice that stands out after freezing. A confectionery product will have a more spectacular and delicate look if you pour its jelly on top.
Decoration with fruit and chocolate is considered popular. Experienced confectioners practice freezing fruits in chocolate. Immerse them in melted chocolate, spread them on parchment paper and send them to the freezer for a quarter of an hour. Then lay them on the chocolate cake, combining with citrus slices.
Cakes decorated with fruits and chocolate
Chocolate is recognized as universal for decorating confectionery products, which goes well with most products suitable for decoration.

Commonly used:
- Chocolate chip. Cover the sides and top surface of the cake, smeared with cream mass. Preparing it is very simple: grate a chilled chocolate bar or cut it with a knife.
- Chocolate glaze. Melt the chocolate in a water bath or in the microwave, mix with a little cream / milk. Treat the surface of the product with the prepared glaze or make chocolate smudges. Refrigerate for at least 4 hours before frosting the cake.
- "Lace" made of chocolate. Melted chocolate is a great opportunity to draw any pattern, figure, picture. Draw them on parchment, let them dry, and decorate the cake.
- Glazed fruits and berries are the best decoration for a chocolate cake. Dip the fruit in powdered sugar and then in hot chocolate icing. Place on oiled foil to set and decorate the cake with them.
Chocolate icing can decorate fruits and berries. Fill a confectionery syringe or parchment bag with melted chocolate, and paint the fruits as much as your imagination allows.
Decorating the cake with sweets, other sweets and mini chocolates will be a great addition to the chocolate and fruit decor.
How to decorate a cake with fruit in jelly

The best solution for decorating a biscuit is fruit in jelly. This allows you to create high multilayer products. Jelly-covered fruits and berries can decorate not only the surface, but also apply as a layer. In the latter case, a layer of thick cream, fruit jam, jam or soufflé is placed between the cake and the jelly-fruit mass. It is important to follow the recommendations of experienced confectioners when preparing jelly for decorating cakes with fruits.
You will need:
- gelatin - 1 pack (20 g);
- drinking water or juice - 1 glass;
- granulated sugar - 3 tbsp. l.
First you need to prepare the jelly mass:
- dissolve gelatin with water, mix thoroughly and let it brew for half an hour;
- pour juice into an iron container, pour sugar and put on fire;
- bring the mixture to a boil and pour in the gelatin with a stream, remembering to stir constantly until completely dissolved;
- wait until the mass cools down and slightly thickens.
Then, to decorate the cake with berries and fruits in jelly, the following work order:

- Apply a thin layer of confiture, jam on the surface of the cake. This will prevent the jelly from soaking into the cake.
- Place the sweet product in a detachable form, put on a confectionery ring of a suitable diameter and send it to the refrigerator for 2 hours. Fruit for decoration should also be chilled.
- You need to start pouring the jelly cake in a spiral, moving from the center to the edges and evenly distributing the gelatinous mass. The jet must be very thin.
- It is important to choose the color of the jelly. Universal option - colorless. Red color is suitable for decorating strawberries, raspberries, currants, yellow - for bananas, pineapples, apricots, citrus fruits, etc. In this case, a small amount of dye must be added when cooking the gelatinous mass.
Be careful when gelling kiwi, pineapple, and citrus fruits. They can prevent freezing. To avoid this, pour boiling water over them.
Berries and fruits are cut into thin slices and laid out arbitrarily, based on the individual preferences of a novice confectioner or members of his family.
Decorating cakes with carving
A complex way to decorate cakes with fruits is carving - figured cutting. However, this technique is within the power of even novice masters. The main thing is to cut the fruits in a certain sequence with a thin knife.

You must have special tools - a slicer, a thin carving knife, a vegetable peeler.
It is better to start experiments with familiar fruits.
We offer some ideas for carving with an apple and pears:
- Apple basket. Cut the fruit in half, scoop out some of the pulp from one half with a spoon to simulate a basket. From the second, cut a flower, string it on a toothpick and insert it into the lower half (basket). Fill it with other fruits and berries. Such baskets can also be made from other oval-shaped fruits - mango, peach, etc.
- Flower. Cut the apple into halves, remove the stones and cut into very thin slices. Form a flower out of them. Apple slices can be blanched in syrup or covered with a thin layer of jelly.
- Leaves. In the center of the apple quarter, make a longitudinal notch, the edges are jagged, resembling leaves.
- Pear hedgehog. On the narrow side, peel the fruit by two-thirds. Simulate needles by inserting toothpicks with strung grapes into the pear. In the peeled part, make a nose and eyes with currants or blueberries.
- Strawberry flowers. You can cut the berries into thin slices, and put flowers out of them in the center of the cake. The best solution for a voluminous composition is to place it in a deepening of the cake or a chocolate vase. You can cut the berries to the base and slightly open the resulting petals. Then thread onto a skewer / toothpick and attach to the cake.
- Asterisks. Cut parallel notches along the peeled banana with a knife, and then cut into circles. Decorate the cake with the resulting stars in accordance with your idea.

With the help of berries and fruits, you can make original decorations without special tools. For example, small berries of different colors are suitable for laying out congratulations, pictures or other patterns on the cake that can be covered with jelly.
Decorating cakes with fruits and berries does not have strict standards and does not require special skills. The end result depends on the imagination, taste and invention of the confectioner. In any case, fruit and berry decoration always looks bright, festive and will be appropriate for any event.
The choice of decoration depends on the theme of the celebration.
- for berry-fruit decor, cakes of any shape are suitable: round, oval, square, figured, etc .;
- for children, figures of animals and fairy-tale characters carved from fruit are ideal;
- flowers, geometric and other shapes (heart, sun, etc.) are considered universal decor;
- fruits and small berries of different colors cut in various ways - the best solution for laying out ornaments and plot pictures;
- cakes that are decorated with fruits doused in chocolate or sprinkled with powdered sugar, cinnamon, ground nuts, coconut flakes, poppy seeds, almond flakes, etc. look advantageous and original;
- large fruits are placed in the center, small ones are laid out at the edges;
- the best cream for a fruit cake is considered custard, protein or oil;
- fruits or berries with sourness will help to balance the taste of dessert with too sweet cream;
- pieces of fruits and berries can be put between the cakes: they are most often stuffed with canned peaches, pineapples, cherries;
- Mint is recognized as the best addition to fruits, however, vegetables can also be chosen for decoration.
When using powdered sugar as a sprinkle, remember that the fruit must be dry.
Even if you randomly arrange fruits and berries on the cake, they will look original and beautiful on a lush cream layer.
A cake made and decorated with your own hands is always a favorite of any celebration. And if not everything conceived can be translated into reality the first time, do not despair. Spice up your confectionery masterpiece with a good mood, saturate it with love for loved ones. Do not be afraid to go too far with creativity, and then success and admiration of your relatives are guaranteed.


