How to dye eggs with cloth. We decorate eggs for Easter with confectionery beads
Method number 1
This is one of the easiest ways I have come across. But, in the end, Easter eggs turn out to be extraordinarily beautiful, unique: although they may be slightly similar.
Ingredients:
- eggs;
- napkins;
- food coloring in various colors.
We paint eggs with napkins. Step by step recipe
- Dilute food coloring according to package directions. I mostly use 5-6 colors, but you can use your own. Containers for paint - cups are great, but I mostly use plastic cups so that I don’t wash home dishes from bright colors later.
- Boil the eggs for 7-10 minutes, pour cold water for a couple of minutes and you can start coloring. We use them while still warm so that the colors are better fixed on the shell.
- We wrap them in 2-3 layers of a napkin so that it does not break during staining.
- With a spoon (a teaspoon or a tablespoon), we scoop up the dyes in an arbitrary sequence and pour it onto the egg in such a way that each time a new color is applied to an unpainted fragment of a napkin.
- When all the places of the napkin are painted, we press it with our hands directly to the shell. Put on a dish and leave for 15-20 minutes.
- After we remove the napkin, and we get delicious, varied and very beautiful eggs.
- Leave them to dry completely: at least 2 hours.
This method is used to decorate gift options for eggs, they are not eaten - this is a beautiful DIY craft. With such eggs you can decorate the room, congratulate relatives and friends - and so on. I can't miss this coloring method because the egg itself turns out just gorgeous. You know, you can look at it for a long time, making associations - it's like looking into the starry sky.
Ingredients:
- container with water;
- toothpick or skewers;
- nail polish of different colors;
Marble egg coloring with nail polish at home. Step by step recipe
- Since these eggs are not for eating, therefore, only the shell is needed for work. With the tip of a knife or a needle, we make small holes on both sides in the shell (2-3 mm in diameter). Using a tube for juice, blow out the protein and yolk from the middle.
- Wash the shell well and dry it.
- Pour water into a small container (sudok) (I use a sudok about 10x7 centimeters in size), pour a few drops of different bright varnishes on top of it (I use mostly 4-5 colors, and you focus on yourself). You have a thin film. Stir lightly with a toothpick or skewer.
Another tip: when pouring varnishes, make circular movements with your hand so that one bloom does not pour into one point.
- Immerse the shell in water so that it is completely covered with a varnish film. We take out and dry. To make the application set faster, I use a hair dryer.
Marble Easter eggs are ready! They turned out to be simply amazing, exclusive: such that it takes your breath away! Before dyeing a new egg, carefully soak up the last of the previous varnish in water and fill in a new batch of flowers.
Method number 3
This method can be used both for eggs that will be served on the table, and for handicrafts. The difference is that if you do not plan to eat them, then you can take ordinary PVA glue to fix the pictures and decorate the shell. And for edible eggs, we use protein-based glue.
Ingredients:
- eggs;
- napkins with drawings;
- crude protein;
- food coloring - optional;
- scissors, brush, toothpicks.
Decoupage Easter eggs at home. Step by step recipe
- Hard boil eggs.
- For food glue: pass the protein through a sieve or shake it up slightly, but only so that foam bubbles do not form on its surface: because when it dries, the work will not look neat.
- In napkins, we separate the top layer (if you use multilayer ones) and carefully cut out the pictures. Please note: the larger the cut out picture, the more difficult it is to glue it beautifully.
- Lubricate the surface of the shell with protein, attach the cut out picture and smooth it with your hands or with a brush. Then dip the brush into the protein and go over the top of the sticker. Apply "glue" from the center of the picture to its edges, trying to expel all the air from under the napkin.
- After that, start gluing a new fragment, trying not to hurt the previous one. When everything is applied, coat the entire surface of the shell with protein and lay it to dry on a toothpick grill.
- After 30 minutes, I re-coat with protein "glue" and dry again on toothpicks.
The original decoupage Easter eggs are ready! They turned out irresistible! Optionally, you can additionally color with food coloring diluted in water - according to the instructions.
I advise you: wear gloves when you paint and decorate. Firstly, you will avoid dirty hands, and, secondly, circles from fingerprints may remain on the shell - it does not look neat.
Let's give ourselves a little pre-holiday positivity together with Super Chef and make beautiful eggs for Easter with our own hands in cozy home conditions. I'm sure you will succeed!
One of the largest church holidays is Easter. People start preparing for it in advance. Right before the holiday, the housewives prepare Easter cakes and paint eggs. It is here that women can show all their creative imagination. Particularly diverse
This article talks about how to beautifully paint eggs for Easter with your own hands at home. The above methods are so simple that even a novice hostess can handle it. In addition, they do not require any artistic skills from the hostess. Before you start painting the eggs, you should prepare them.
HOW TO PREPARE EGGS FOR PAINTING?
- The first step is to take the eggs out of the fridge. They must be at room temperature. This is necessary so that the eggs do not burst during the cooking process.
- If you want the paint to lay on the surface of the eggs evenly, then you should wash them with soapy water under running water before processing.
- To give the eggs a smooth and shiny surface, after applying paint to them, wipe them thoroughly and treat them with vegetable oil.
Now let's take a closer look at the technique of painting eggs for Easter.
HOW TO BEAUTIFULLY COLOR EGGS FOR EASTER WITH YOUR HANDS WITH ONION SHELL
Onion peel is one of the old methods used by our grandmothers. The result of using the husks are eggs of red, yellow and brown colors. This effect can be achieved by adding onion peel and increasing the time the eggs are in the water: if the egg is in the water for several minutes, then the color will turn yellowish. Provided that the eggs spend several hours in the onion water, it guarantees the coloring of the eggs in bright red and scarlet tones.
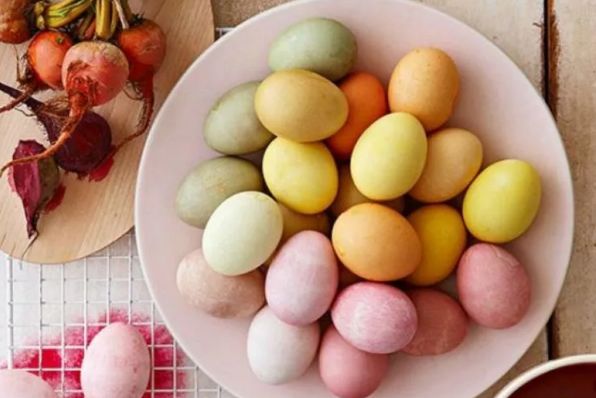
HOW TO COLOR EGGS FOR EASTER AT HOME WITH NATURAL DYES
A large number of foods that we eat have a coloring effect. These products include: beets, carrots, cabbage, coffee, lemon, orange, various greens and wild berries. The result is eggs of such shades as: orange, blue, purple, green, yellow. It should be noted that the color in such cases is not very saturated. To enhance the effect, it is necessary to increase the time the eggs are in the broth.
DECOUPAGE OF EGGS FOR EASTER WITH NAPKINS
Currently, many tools have been created that help to significantly facilitate the process of coloring eggs for the hostess. These include various stickers. In addition, you can apply the decoupage technique. Initially, you should boil the eggs and prepare the gelatin glue. You need to prepare it according to the instructions on the package. Next, you should choose napkins with a beautiful pattern. You need to remove the white layer of paper. Cut out the desired fragment and put on the egg. Next, the picture is processed using the prepared glue, waiting for it to dry completely and slowly and carefully get rid of the stencil.
HOW TO COLOR EGGS FOR EASTER WITH YOUR HANDS WITH FOOD COLORING
Now the culinary industry does not stand still and many confectionery additives have been developed. Various food dyes can be used not only in the manufacture of sweet dishes, but also for coloring eggs. To use them correctly, you must carefully read the instructions on the package. It should be remembered that the tinted water should completely cover the egg.
DYE THE EGGS WITH THE THREADS
In order to get beautiful patterns on eggs, you can use ordinary floss threads. Eggs should be wrapped in multi-colored paints and dipped in boiling water. As a result of high temperatures, interesting patterns of bizarre shapes will appear on the eggs. After heat treatment, all threads should be cut.
HOW TO MAKE BEAUTIFUL MARBLE EGGS FOR EASTER
They look very solemn and impressive. To properly paint eggs, you need to take vegetable oil and paints of different colors. This method is very complex and requires the hostess to have artistic skills. Coloring is carried out in the following way: first, the eggs should be painted with paints of light shades. Then they need to dry. Next, dark colors must be diluted in a cup with a small amount of water and oil. It should be remembered that cups with liquid should never be shaken. It must be placed so that small drops of paint appear. Then each egg must be lowered into this solution. It should be lowered once, maximum twice. The duration of the egg in the paint determines the intensity of staining. You should carefully select the shades to each other and correctly combine the colors.
DYE EGGS WITH COLORED CLOTH
For this method, you need a fabric of bright colors with a beautiful pattern. For this, silk ties or Pavloposad shawls are most often used. A raw egg at room temperature should be wrapped in a cloth so that its bright side is on the outside. You can sew along the contour of the fabric to prevent slipping of the fabric. Next, the egg with the cloth should be wrapped in a plain white cloth and carefully fastened on both sides. Then add water and 3 tablespoons of vinegar to the pan. Eggs should be boiled until cooked right in the fabric. The same process is carried out if silk fabric is used. After the eggs have completely cooled, remove the fabric.
USE OF POINTS FOR COLORING EGGS
- Before staining, wet eggs should be rolled over any cereal.
- In addition, you can use fresh herbs for decoration. In order for it not to fall out during the cooking process, the egg with greens should be fixed with gauze, stocking or bandage.
- To decorate the egg in straight lines, adhesive tape pasted in the form of strips is used. You can also use a rubber band.
After processing is completed, all fixtures must be removed.
EGG DECORATION WITH THE WHOLE FAMILY - EGG CHICKS
Easter is considered a family holiday and you can make it a tradition at home to decorate eggs together with your children. It will be interesting for children to make chickens out of eggs. To do this, parents together with their children can paint them with yellow food paint, and use egg cells as coasters. We cut out the legs, eyes and beak of the chicken from paper and attach it to the egg with gelatin glue.
DECORATION WITH THE HELP OF Stencils
Most parents do not have creative skills, but everyone wants to decorate eggs exquisitely. You can remember the times of youth and cut out stencils from tracing paper. It can be one or more, also one stencil can be placed on both sides of the egg. On them already carry out the processing of paints. Stencils can be used in several types.
PERMANENT MAKEUP
If you don’t want to bother with various stencils and tie eggs with threads, then in this situation there is a way out. Permanent markers will come to the rescue, which can be bought at any stationery store. In the absence of creative impulses and imagination, you can use the patterns available on the Internet. When decorating, a child can help you. For it, you can use ordinary felt-tip pens or watercolor, water-based gouache. After dyeing is completed, the eggs should be dried.
FOIL EGG DECORATIONS
This method will not only help to creatively decorate the eggs, but also cheer you up while working. If you want to leave the surface of the egg untouched, you can simply wrap the eggs in colored foil and attach decor elements to them. It is not necessary to use gold or silver shades, you can choose colored foil.
DECORATION OF EGGS WITH POWDER SUGAR
This method is very simple, but at the same time makes the surface of the egg more heterogeneous and gives it an interesting look. First, boil the eggs using food coloring. Next, you need to mix powdered sugar with water until a thick slurry is obtained. When the eggs have cooled, you can use a pastry bag to apply a pattern of your choice. It all depends on the imagination of the author. In addition, you can use special stencils, of which you can find a huge number on the Internet and for every taste.
RAINBOW ON EGGS
This method of coloring will give the eggs uniqueness, originality and make them more extravagant. Initially, you should boil the eggs and cool a little. This will make the application process more efficient. Next, you should dilute several types of paints in various containers and add 2 tablespoons of vinegar there.
Initially, the egg should be dipped in the desired paint, repeat with everyone. Eggs should be laid until completely dry. Next, you need to lower the painted egg halfway into another paint. Also let dry. This procedure can be carried out several times.
You can afford the most daring color combinations. After staining, any decorative element can be applied to a colored egg. However, even without them, they will look very beautiful.
QUILING ON EGGS
One of the most unique egg decorating techniques is the use of a new technique. One of these is quilling. This is the art of making various patterns out of paper without the help of scissors. Currently, you can find whole paintings created in the quilling style. Of course, the egg does not have a large surface, but you can also make a real masterpiece out of paper on it. But many craftsmen manage to create whole pictures: various voluminous animals, people, decorative elements can be folded out of paper.
Thus, using these egg coloring methods will help make your Easter table more refined and unique. Just imagine how delighted your loved ones will be at the sight of painted eggs, also made with their own hands.
The traditional custom for Easter is painted eggs, denoting the birth of a new life. But in order to decorate them beautifully, you need to know some secrets of art.
The content of the article:
Coloring eggs for Easter is a fun and exciting activity that brings all family members together. According to church tradition, this is usually done on Maundy Thursday, when it is customary to clean, bathe and get a haircut in the house. Pysanky and krashanka at the festive table are consumed first. In addition, they denote a talisman, so on Easter there is a custom of giving them. They are presented to relatives, friends, neighbors, visiting guests, they are taken with them to visit, distributed to the poor and brought to church.
Today, on the eve of the Resurrection of Christ, all stores sell a lot of food coloring, films, sparkles, stickers and other decors for decorating eggs with Easter symbols. However, many housewives still color eggs using the old methods: onion skins, beetroot juice, red cabbage, etc. Today we will talk about a variety of ways to dye eggs for Easter.
Natural dyes for eggs
Natural dyes are completely harmless to health. For a more intense color, after boiling the eggs, continue to keep in the colored broth until they acquire the desired shade. Take them out of the broth with a slotted spoon, put them on a plate and cool or decorate further.
- Onion peel. Remove the husk from the onion, fill it with water, boil and cook for 30-40 minutes over medium heat. Cool the broth and strain. Then dip the eggs into it, boil and cook hard boiled for 7-10 minutes after boiling. Onion skins impart shades ranging from light yellow to bright red-brown.
- Spinach, nettle or greens solution. Dip the eggs into the pan along with the spinach and nettle leaves. Boil them for up to 10 minutes. The green of the grass will give a green color. You can also get green Easter eggs with a solution of brilliant green, in which already boiled eggs are placed and aged to the desired color.
- Turmeric and violet. To get the yellow color of the krashanok, the testicles are boiled in water with the addition of turmeric, purple - with violet flowers. If you add lemon juice to violets, then you get a lavender color.
- Walnut shell. The method of coloring is the same, eggs are boiled with walnut shells and brown or light beige are obtained.
- Cranberry, blackberry and beetroot juice. These products will be colored pink. To get beetroot juice, boil peeled beets with vinegar until tender. Boil the eggs in the resulting broth. First wash the cranberries or blackberries, squeeze the juice in any way convenient for you and then boil the eggs in it in the same way.
- Carrot juice. Boil the peeled carrots to get a yellow broth. Dip the prepared eggs into the juice and boil hard.
- Coffee, hibiscus tea, mint tea. Boil eggs in ground coffee, get them brown or beige, in hibiscus tea - pink, with mint leaves - pistachio.
The meaning of Easter egg colors
- Red is the joy of life.
- Yellow - the sun, the moon, a rich harvest.
- Blue - health, sky, air.
- Green - spring, renewal of nature.
- Black - sorrow.
- Black and red - life as it is.
- Black and white - memory, respect for the departed souls.
- Multicolor - love, family happiness.
Decorating krashanok
- Blue stains. Boiled, dyed and dried eggs, rub with red cabbage leaves.
- Specks. Wash the eggs, roll in rice, buckwheat, millet or other grains so that the cereal sticks to them. Wrap them tightly in gauze, tie tightly and boil in dye.
- Abstract drawing (divorces). Wrap the eggs with onion peel and wrap in cheesecloth. Hard boil them in any dye.
- Stripes. Put a few rubber bands on the egg or rewind it with threads and so cook in dyes.
- Drawings. Attach any pattern to the egg (cut out of paper, parsley leaves, dill, flowers, etc.). Put it in a stocking, which you tightly tie. Cook in any dye. When it is cooked, remove the stocking and remove the pattern. The pysanka will be painted, and a clean place will remain in place of the drawing.
- "Silk" coloring. Wrap a raw egg with a natural silk cloth, fix it with a thread and boil it with the addition of vinegar. They will get exactly the same pattern as on the fabric.
- Wax drawing. On the egg with a match or a toothpick, apply wax drawings from a burning candle. Dip it in a warm temperature dye (hot water will melt the wax) and leave for the right time. After, remove the wax, the egg will be colored, but where the wax is applied, no.
- Scratches. On dyed eggs that have almost cooled down, scratch any pattern with a needle.
- Lace. Wrap eggs in openwork lace and boil in dyes. When the lace is removed, a beautiful pattern will remain on the surface.
Other ways to dye eggs
- Water based markers. With children's harmless markers, apply any pattern to boiled eggs. To make the drawing neat, first outline the sketch with a pencil.
- Acrylic paints. Dilute the paints to a liquid consistency, dip the toothbrush into the paints and sprinkle it on the boiled painted Easter eggs.
- Children's paints, gouache, pencils. For paints you will need a thin brush, for a pencil - a soft lead.
- Sequins. Apply glue in a pattern on the shell and dip the egg into a plate with sprinkled with cosmetic or special confectionery sparkles.
- Use stainless steel cookware as it will not stain.
- Work with paints with gloves so as not to get your hands dirty.
- Wash eggs before dyeing, wipe with soda, vinegar or alcohol solution. This will help the paint lay down evenly.
- So that the eggs do not crack during cooking and the protein does not flow out of them, add ½ tbsp to the water. salt (per 1 liter of water).
- You can dye quail eggs. But the exposure time in the dye must be reduced so that the contrast with the dots remains. They cook no more than 5 minutes.
- To gently dry the eggs, lay them on needles inserted in a 2x2 cm square into the foam.
- After full staining and cooling of the dyes, they can be rubbed with a cotton swab dipped in vegetable oil. This will enhance the brightness of the color, add shine and saturation.
- It is not recommended to eat eggs that are not colored with natural dyes. In this case, it is better to paint them blown out. Then they can be stored for years.
Beautifully decorated boiled eggs are an essential attribute of such a great Orthodox Easter holiday. Each housewife wants to decorate eggs in a special, exclusive way. This article will help both experienced housewives and even completely inexperienced ones to make Easter eggs really beautiful and unique, while not spending a lot of money and time.
Materials needed to dye eggs with dyes
On the eve of the Easter holiday, markets and supermarkets have a large selection of food colors for making Easter eggs. Therefore, in order to dye eggs in the classic way with the help of dyes, it is enough to buy it.
To dye eggs with food coloring you will need:
- Eggs.
- A bag of dye of the desired color.
- Tablespoon.
- Vinegar - 2 tbsp.
- Sunflower oil - 1 tbsp.
The classic version of dyeing eggs with dyes
Having prepared the necessary materials for work, we gradually paint the eggs:
- Pour eggs at room temperature with cold water and cook hard-boiled for 10-15 minutes.
- Ready hot eggs pour cold water and wait until they are completely cooled.
- While the eggs are cooling, prepare the dye solution. Usually, the instructions for preparing the coloring solution are written on bags of purchased food coloring.
- If it is not available, then the following steps must be taken: pour the contents of the package into 0.2-0.5 liters of water, mix well. The concentration of color depends on the volume of water used.
- Pour the coloring solution into a shallow, flat container.
- Treat eggs with vinegar before painting. Dip a small linen cloth in the vinegar, and wipe the shell of each egg. This is done to degrease the painted surface.
- Place a dry egg ready for painting on a tablespoon and dip it into the prepared solution.
- We perform such actions with the number of eggs that you want to paint in the selected color.
- Eggs should stand in the coloring solution for 5 minutes.
- With the help of a tablespoon, we take them out of the solution and put them on a paper towel so that the excess water is glass.
- After complete drying, rub the painted shell with sunflower oil, this will give the egg a shine, the color will become more saturated and will play in the sun.
An unusual way to dye eggs with dyes
For an unusual way of painting eggs, we prepare them in the same way as described above. We dilute the bag with food coloring in 100 g of water and perform the following actions:
- Pour the coloring liquid into a tall glass so that it covers the bottom by 2 fingers.
- We drop the prepared egg there. It should be half immersed in the dye solution.
- We wait 3-5 minutes and add ordinary water to the glass so that it completely covers the egg.
- After 5 minutes, take out the egg.
The Easter egg will turn out to be darker on one side, and on the other hand, the color will not be so saturated.
Painting eggs with dyes using electrical tape
The method is quite interesting. In addition to the above materials, you will need electrical tape.
- Cut the tape into narrow strips.
- We wrap the prepared egg with electrical tape, a spiral.
- Dip in the dye of the same color, for example - in yellow, hold for 5 minutes.
- We take it out, let it dry, remove the tape.
- We wind the tape on the other side, overlapping the previous strips.
- Dip in a dye solution of a different color, blue or green, hold for another 5 minutes.
- Put on a napkin and wait for drying to remove the electrical tape.
The result is an original Easter egg with multi-colored spirals. A vowel condition, the first dye should be several tones lighter than the second.
You can also cut out various figures from electrical tape, stick them on and follow the steps described above. Such eggs will not yield to their originality.
Coloring Easter eggs with dyes using a rubber band
The easiest way to make an original egg. You will need a few rubber bands for money.
- We put on elastic bands for money on the prepared eggs, winding them randomly.
- We color the egg in the classical way for 5 minutes.
- Take out and let dry.
- We remove the gum and the original egg is ready.
Experiment with dyes and improvised means, and then the bright Easter holiday will become not only bright, but also original, as well as beautiful.
Spring is just around the corner, and with it one of the brightest holidays of the year - Easter. Both adults and children look forward to it. The tradition of exchanging colored eggs is familiar to every person since childhood. The multi-colored attributes of the holiday, in which we paint eggs for Easter, symbolize the resurrection of Christ and are awarded with the words: “Christ is risen!”. "Truly risen!" - and the one who congratulated gets an egg in return.
Easter egg types
Each hostess tries to make beautiful and unusual eggs on this bright holiday. The name of the resulting eggs depends on which method of staining to use. For example, eggs dyed the same color are called eggs. Eggs with multi-colored dots due to droplets of wax are called specks. Drapanka is a one-color egg with a scratched pattern. With a drawing or pattern made using a special tool - a pisanka - these are pysanky. They are the most beautiful, they can even be called works of art.
Preparing eggs for dyeing
There are many ways to paint eggs for Easter. However, regardless of the option chosen, it is necessary to properly prepare. Here are some tips:
- an hour before dyeing, you should take the eggs out of the refrigerator so that they take room temperature. In this case, they will not burst during cooking. The same result can be achieved by piercing the egg with a thin, sharp needle;
- In order for the paint to lie evenly, they must be thoroughly washed. Color uniformity can also be achieved by wiping the eggs with soapy water or alcohol;
- colored eggs will acquire a shiny appearance if, after painting, wipe them dry and rub with vegetable oil.
Now you can go directly to painting the eggs. Here are a few ways, among which everyone can find the most suitable for themselves.
The first way: a classic of the genre - in onion skins with patterns
This is the way of our grandmothers, which is still relevant today. As a result, you can get red eggs, as well as yellow, brown or their shades - it all depends on the intensity of the paint and the duration of the staining procedure.
When cooked in onion skins, the krashenkas turn out to be monophonic. To decorate them with prints of flowers or leaves, you will need the fragments of dried plants themselves and what you will use to fix them on the shell. As a retainer, it is best to use stocking capron. If it is not there, you can take ordinary white threads or gauze (bandage).
To prevent dry plants from crumbling during the attachment process, soak them for a few minutes in hot water. After softening, put on the shell and secure by covering the testicle with nylon, bandage or thread. Next, dip the eggs into the water with the onion skins and set to boil.
To get straight lines or geometric patterns in a natural color on a red-brown background, stick pieces of electrical tape or stationery tape on an alcohol-free shell of raw eggs. After cooking in onion skins, the stickers can be easily removed, exposing unpainted areas.
The second way: gifts of nature - natural dyes
Many natural components have a coloring effect. This allows you to get a variety of colors and shades. Pink color gives beet juice, pale yellow - lemon, orange, carrot, yellow - birch leaves, calendula flowers. Green can be achieved with spinach or nettles, blue with red cabbage. Coffee gives the beige color to the eggs, and violet flowers give the purple color. Some dyes are not very intense, for example, violet or spinach, so eggs can be left in such decoctions all night.
- Pour water into a saucepan, add vinegar (1 tablespoon) and natural dye. Bring to a boil. Let the broth brew (about 30 minutes).
- Boil prepared eggs in broth, depending on the desired shade - from 15 to 30 minutes. If necessary, you can leave the eggs in the broth and longer - for a day.
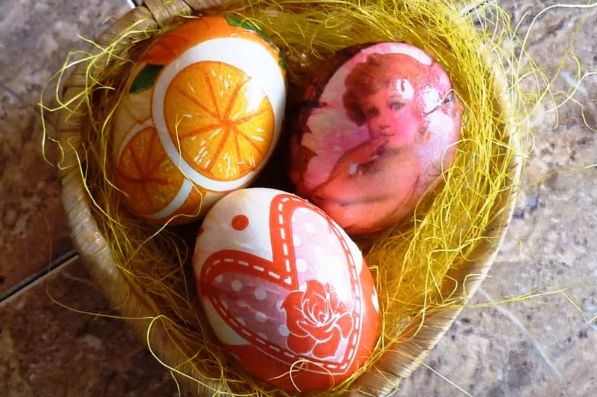
Third: decoupage technique
To decorate an Easter egg with a picture, it is not necessary to buy stickers. You can decorate it using decoupage technique.
Fourth: food industry presents - food coloring
One of the most trivial and easy ways is to color eggs with Easter dyes. There is always a recipe listed, but you can do it like this:
- Hard boil the eggs.
- Dilute the dyes with water - each color in a separate bowl. There should be enough water to cover the eggs. Add vinegar (1 tablespoon).
- Keep the eggs in bowls until they take on color.
It turns out bright multi-colored eggs, pleasing to the eye.
Fifth: colorful palette - colored threads
To get intricate stains, paint the eggs with multi-colored floss threads:
- Wrap the eggs with yarn.
- Weld hard.
Sixth: marble effect
Marble eggs look unusually festive. For their execution, you will need paint for eggs of different colors, vegetable oil and artistic flair.
- Color the eggs in bright bright colors, such as yellow, red, orange.
- Let the eggs dry.
- Dilute dark colors (blue, brown, purple) with water. Add vegetable oil (1 tsp) to each cup. Gently stir (do not shake) the oil so that there is a lot of oil "money", no larger than a pea.
- Dip each egg in the dark color and remove immediately. A beautiful marble pattern is obtained if you do this no more than once.
Seventh: eggs in silks
Exquisite eggs with drawings are obtained by dyeing them with fabrics. You can use a silk tie or a Pavloposad woolen scarf.
- A raw egg should be wrapped in a patterned cloth. The front side should fit snugly against the shell.
- To prevent the fabric from slipping, sew along the contour. Wrap it over the colored cotton fabric, securing it at the blunt end.
- Pour water into the pan, add vinegar (3 tablespoons). Place the cloth-wrapped eggs in the pan and cook for 10-12 minutes after boiling.
- Pour the cooked eggs with cold water. When they are completely cool, carefully remove the fabric. A thin pattern will remain on the egg, such as on fabric.
Eighth: fantasies in patterns using improvised materials
- chaotic specks can be achieved if wet eggs are rolled in rice or millet before coloring;
- a drawing in the form of a leaf can be obtained by attaching a parsley leaf to the egg before coloring and fixing it with gauze or stocking;
- in order for the egg to cross straight lines, you can stick masking tape on its shell or pull an elastic band over it for money;
- symbols or letters XB can be glued on before painting, using plaster or masking tape. After painting, they should be carefully removed;
- checkered eggs are obtained by boiling them wrapped in mesh stockings or in a fruit or vegetable net.
- a lace pattern will decorate an egg if, before painting, an interesting lace motif cut out of a napkin is fixed on it;
- paint the egg with wax crayons. The pattern will appear at the end of the staining procedure.
The ninth way: to the delight of children - an egg-craft
Easter is a family holiday, so you can decorate eggs with your children. You can make funny chickens from testicles.
- We cook hard-boiled eggs.
- Painted bright yellow.
- Preparing gelatin glue.
- We decorate the eggs with details cut out of colored paper. These are wings, beak, scallop, paws, tail and others (bows, cilia, curls) - it all depends on the imagination. Eyes can be glued or just drawn.
Tenth: saving time - thermal stickers
A way that is indispensable for busy people is to decorate eggs for Easter with thermal stickers. They are sold on the eve of the holiday in supermarkets, newsstands and other stores.
- Hard boil the eggs.
- Put a sticker on the egg. To avoid problems with size (the sticker may be small), it is better to choose medium-sized eggs.
- Dip the egg in boiling water so that the sticker hugs it and takes the desired shape.
Eleventh: stencils - back to the future
Using stencils to dye eggshells is relatively traditional. But as they say, "The new is the well-forgotten old." Let's remember the times when it was very entertaining to draw images using stencil bases. You feel like an artist. We invite you to remember this technique and try it on Easter eggs. The result will surprise.
- We cut out any stencil image from ultra-thin paper (tracing paper). It can be anything (Easter theme, images of saints and even your favorite brand). You can find an image for a stencil on the Internet or on the pages of books and magazines. The better the image and stencil, the more effective the result.
- We moisten the made stencil base with water until a plastic paper is formed that can take the form of a shell.
- Tightly attach the wetted stencil to the surface. If the drawing is small in size, it can be duplicated around the entire perimeter, and not limited to one side.
- We fix it with a stencil, wrapping it with nylon or gauze. We boil eggs, using any kind of dyes (natural, food) for coloring.
- Weld them, take them out and let them cool down.
- We remove the material that fixes the stencil and stencil base only after they have completely cooled down.
- On the eggshell, you can see the pattern you have chosen.
Twelfth: stylish permanent makeup for eggs
If you are tired of traditionalism, refuse to use dyes, and the Soul requires something exclusive, there is a way out. Decorate the eggshell with a permanent marker. As they say "cheap and cheerful".
- Boil them.
- If the fantasy "fails", use the existing images and fragments of patterns.
- Put the egg on the supply, so it will be more convenient to apply patterns. As a result, the drawing will be uniform and clear.
- Draw lines using a permanent marker.
- After completing the creative process, let the paint dry. An hour will be enough.
Combine your creativity and your child's imagination, giving him the opportunity to do the same, but only with colored felt-tip pens or honey-based watercolor paints. Both will be satisfied: joint work disposes.
Thirteenth: foil and colored confetti - simple but tasteful
Fashion trends are so diverse that it is no longer necessary to paint Easter eggs, you can take the path of least resistance - wrap them in colored foil.
- Buy colored foil (do not limit yourself to the standard gold and silver foil) and colored paper at the stationery store.
- Boil the eggs.
- Let them cool down.
- Cut the foil into equal parts according to the number of eggs.
- Pre-make the elements for the application. Instead of an application, you can use ready-made confetti.
- Wrap the cooled boiled eggs in foil, fix the applique elements or confetti on the foil using glue.
Fourteenth: snow-white patterns with powdered sugar
Sugar will help to diversify and make traditional krashenka more stylish. Unusual patterns, printed texture makes the eggshell irresistible.
- We paint in a standard way, using various dyes.
- Mix a glass of powdered sugar with a small amount of water so that a fairly thick consistency is formed. The resulting mass should be homogeneous, that is, not contain lumps. If there is no powdered sugar, you can easily make it yourself, for this sugar (it should be more than a glass) is enough to place in a coffee grinder. The quality of the powder is not inferior to the store.
- We collect sugar solution into a confectionery syringe.
- We apply the pattern and allow the solution to harden.
Fifteenth: rainbow eggs and flower power
Brightness and juiciness, individuality and uniqueness - that is inherent in dyes dyed using this technology. Be sure that each egg is original, so the probability of having exclusive dyes on the table is 100%.
- Boil the eggs, be sure to hard boil.
- Cool (it is desirable that the eggs are warm, then the process of applying the paint will be more effective).
- In separate containers, dilute the paint of your choice according to the instructions. It is desirable that the paints were of contrasting colors.
- Be sure to add 2 tablespoons of vinegar to each of the containers.
- Stir.
- Dip each egg into the paint container, holding it gently with a spoon.
- Leave them in the solution for a while. This will allow you to achieve an even distribution of paint.
- Take out the already painted objects and let them dry by leaving them to dry on a paper towel.
- Take the painted egg with your fingers (you can use tweezers) and dip it into another paint, but just don’t dip it completely, but only up to half.
- Soak it in the paint solution for a minute. It is important that the paint has time to take to the shell.
- Remove and dry thoroughly on a paper towel.
This sequence can be carried out several times, changing only the colorful solutions.
Sixteenth: wax pencils (crayons)
With the help of ordinary wax crayons for children's creativity, you can paint Easter eggs with all the colors of the rainbow. And also apply a white (lace) pattern on them.
How to get a color drawing on a natural background:
- Boil eggs in clean water with salt. The color of the shell can be any, as it will be hidden under a layer of opaque wax.
- After readiness, drain the shell and place the eggs on special stands. You can use plastic bottle caps instead of coasters.
- While the testicles have not cooled down, paint them with colored crayons. When in contact with a hot surface, the wax melts and forms bizarre, bright patterns with color transitions on the shell.
You can also grate the pencils on a fine grater and sprinkle freshly boiled eggs with them. Wax grains will create an unusual maroon or space pattern on them. By the way, some housewives melt wax crumbs in a water bath and dip the testicles in liquid dye. Or paint with a brush.
How to get a white pattern on a colored background:
- Rinse raw eggs under running water and rinse with soapy water (so the paint will lie more evenly).
- Dry the shell with a towel. Draw on it with wax pencils (the color of the pencils does not matter).
- Dip the eggs in a solution of any dye and set to boil. During cooking, the wax will melt and turn into water, and the places that were under it will remain unpainted.
- After removing from heat, immediately remove the dyes from the solution.
Seventeenth: candle, cereal, confectionery topping
Easter eggs can be decorated with the most common cereals - rice, millet, buckwheat, peas, lentils, ground corn. And also - confectionery topping made of colored glaze or chocolate, small noodles in the form of stars and even beads. To fix all this on the shell, you need a wax or paraffin candle.
- Boil the eggs. You can pre-color them in any way or leave them natural.
- After cooling, take the egg in your hands, light a candle and apply a pattern to the shell with melted paraffin or wax. This will be the adhesive base. Try not to touch the egg with flames so that no soot remains on it.
- Until the wax has hardened, roll the egg in the groats (sprinkling) or lay out the pattern with your hands.
- After hardening, grease the surface covered with cereals with vegetable oil so that it shines. From this, the testicle will look more elegant.
Eighteenth: cocoa and eyes
Together with children, you can decorate eggs with diluted cocoa powder and decorative stickers, it will turn out very original and unusual. You can draw anything: faces, faces of animals or insects.
- Boil chicken eggs until tender: 10-15 minutes. Cool slightly in cold water.
- Put a tablespoon of cocoa in a small container and dilute it with warm water to a state of sour cream.
- With a brush, apply the pattern on a warm egg, place on a dry surface with the painted side up, the chocolate pattern should dry.
- Glue decorative eyes (they are sold in needlework stores). Stickers can be on an adhesive basis or without, then use PVA glue.
These are such interesting and original answers to the question of how eggs are painted for Easter. Traditionally, housewives do this on Maundy Thursday. Easter is a wonderful Christian holiday that gives wings and hope for a better life. He comes to us in the spring, like the first timid rays of the sun. Spend some time dyeing eggs and let a bright spring holiday into your life.
Is it hard to lose weight in the usual ways?
Why stubborn dieting DOES NOT BRING visible results, but only leads to frustration and depression, and how to still lose weight in order to:
- Return the attention of her husband or find a new man.
- Again feel the envious glances of friends and colleagues.
- Believe in yourself, feel slim and desirable.
- Do not be shy to go to the cinema or to a cafe with your friends.
- Feel free to post photos from vacation or with children on social networks.
Burn fat in targeted areas
If you don't know how to dye eggs with napkins, use our tried and tested recipe and you'll have the prettiest Easter eggs on the table. Each time the pattern is new and unique, you yourself can determine in what order the colors will follow each other in the picture. Be sure to use protective gloves, especially when removing the stained tissue from the egg, as you can dye your hands in all the colors of the rainbow. Vinegar must be added to the dye: it fixes the paint on the shell. It is best to use thin, not kitchen napkins, so that the pattern is more delicate.
Ingredients

- 5-10 chicken eggs
- 3 egg dyes (red, yellow, blue)
- 3 tsp 9% vinegar
- 0.5 packs of white paper napkins
- 1 pair of gloves
Painting process
 1. Wash the eggs thoroughly with a sponge, removing all contamination. For drawing a picture in this way, only eggs with a white shell are suitable; on a brown picture, it will not look so bright and colorful. Put the eggs in a saucepan, cover with cold water if they are chilled, or hot if the eggs are at room temperature, but not vice versa. You can not pour chilled eggs with hot water, otherwise they will crack during cooking, and when stained, the dye will penetrate into the protein - such an egg cannot be eaten.
 2. Pour the dyes into wide-mouth containers, such as 200 ml jars or containers. Pour 1 tsp into each container. table vinegar (6% or 9%).
 3. Remove the boiled eggs from the water and wrap each of them with a napkin. Moisten with water so that the napkin fits as tightly as possible to the shell.
 4. Boil water in a kettle and pour the amount of liquid indicated on the label into each jar.
 5. With a tablespoon or a teaspoon, alternately pour each color onto the eggs wrapped in napkins. You don't need to fill them with one color at once, try to fill them with red from one edge, blue from the other, and yellow in the middle. Mixing with each other, the colors will become iridescent. Put on gloves and lightly squeeze each egg so that the napkin fits snugly on the shell. Leave to cool for approximately 30 minutes.
Dyeing eggs for Easter with the help of rags will not be difficult for you. To implement your plan, you just need to find rags that, when cooked, will shed and leave their paint on the eggs. If there are no rags, then threads will do. It remains only to wrap the eggs in accordance with the desired pattern and boil.
To make the eggs colorful, it is better to take pieces of silk rags. So, put the silk rag on the table face up, put the egg in the center of the rag and tightly, but carefully, tighten it with an elastic band, as in the picture:

Wrap the sevrhu again with an ordinary cotton cloth and again secure with a reinca.
Now pour water into the pan and add 4 tbsp. white vinegar. Dyes that are used in silk fabrics, under the influence of vinegar, will transfer their color to the shell. Bring to a boil, make a low heat and boil for 30-40 minutes. Carefully remove the finished eggs with tongs or a spoon and cool, preferably in cold water.
Dyeing eggs with rags is one of the dyeing methods. We take bright rags, wrap the eggs with the front side, tie the ends with a thread. Pour water into a saucepan, put eggs, also add three tablespoons of vinegar, cook for 15 minutes after boiling. Then pour cold water, remove the fabric. The eggs will have the pattern that was on the fabric.
One of the simplest and most unpretentious, but nevertheless effective ways of coloring eggs for Easter is just the way of coloring eggs in rags.
To do this, we need pieces of colored fabric with a pattern or just brightly colored, and we need to choose the fabric that sheds well.
We select shreds of fabric according to the color scheme, wrap the egg and wrap it with threads, then boil the eggs for 15-20 minutes in water with vinegar.
The video tutorial below will help to paint beautiful eggs for Easter in shreds:
One of the easy ways paint eggs for Easter - using ordinary rags. Rags are better to take bright (so that the pattern on the egg is clearly visible) and silk (such shreds shed well).
We apply the selected shred to the egg with the front side, press it tightly. Then we wrap it tightly with white threads or wrap it tightly on top with a white cotton cloth.
We put the eggs in the fabric in a saucepan, pour water, add vinegar (3 tablespoons per saucepan), after boiling, cook for 15 minutes.
After filling with cold water and remove the fabric. The result is a beautiful pattern on the eggs.


For painting, you need a fabric that will actively shed and dye the water. The more flowers there are, the more bizarre the colored shell will be. It is better to take pieces of fabric in second-hand shops and flea markets. The front side should be pressed firmly against the shell so that the egg does not slip on the fabric. Then the egg is tightly wrapped in a white cotton cloth and placed in a saucepan, poured with water and 3 tablespoons of vinegar. 15 minutes to cook after boiling. Then pour cold water and remove the fabric. Ready!

The result is like after an art workshop. The fabric must be chosen with an unstable, that is, easily transferable dye. It can be silk or silk jersey, muslin or chintz. We wrap the egg tightly, but carefully, in a cloth, and then sew the edges with threads for reliability. After that, the workpiece must be wrapped with a flap of cotton fabric.
The next stage is the main one. Eggs are lowered into a pot of water, in which vinegar must be added. We put the casserole on the fire and cook hard boiled. After that, cool the eggs and - here it is! - a work of art, which is a pity to eat.
The resulting drawing on your own, that is, with your hands, brush and paints, can be done only after many years of preparation.
There are several ways to dye eggs for Easter in a variety of colors. If you want to show originality and get eggs with a non-uniform or multi-colored shell, then you can use textile products, for example, colored threads, as well as fabrics with a bright color pattern, the main condition is that they must be new and prone to molting.


In order to get a beautiful and unusual pattern on the egg shell, it can be boiled, after being wrapped in a new colored fabric, which is still capable of giving off paint. For this, the following types of fabrics with an unstable dye are better suited.
At what time they began to paint, no one really knows. But we believe that they have been doing this for a very, very long time. Therefore, every year in the spring we do not just tint them in different colors, but try to make them a unique masterpiece.
Everyone is preparing very seriously for the great holiday of Bright Easter. They make various delicious dishes, bake Easter cakes. But the main thing on the table, of course, are the eggs. Their coloring is not so difficult. It's just a fun thing. Especially for children. They are waiting for the day when you can do whatever you want with them.
I confess honestly that one year I could not paint them. But I decided that the children would do it for me. I boiled white eggs, cooled them and gave them. He also gave them felt-tip pens and allowed them to show their imagination. Oh, it was something. Their joy simply knew no bounds. In general, as they say, I killed two birds with one stone! That is, he painted them and occupied the children with a good deed.
This article will focus on coloring eggs, decorating them and serving them on the table. There will be simple and easy ways, as well as something more difficult. The result is always beautiful.
Easter in 2019 falls on April 28th. The main custom on this day is to illuminate and give each other colored testicles. But where did this tradition come from?
In Christianity, the red Easter egg symbolizes the tomb and resurrection, and the red color is the blood of the crucified Christ. Since his tomb was in a cave, and a stone, similar in shape to him, closed the entrance. And in it, under the shell, a new life is hidden. Therefore, the Easter egg for Christians is a reminder of the Resurrection of Jesus Christ, salvation and eternal life. There are several versions of the origin of the tradition of painting them for Easter.
There is a legend about Mary Magdalene. She is revered as an Equal-to-the-Apostles saint and myrrh-bearer who preached the resurrection of Christ in Rome. According to him, she appeared to the emperor Tiberius with the news of Christ. To appear before him, it was necessary to present a gift. But since Mary was poor, she gave as a gift an egg painted red with the words "Christ is Risen!".

There is also a version that it was ordinary, not painted. And the emperor expressed doubts about the news of the resurrection. He said that just as the dead do not rise, so it cannot turn from white to red. And then, in front of everyone, the egg began to turn red.
There is also an assumption that staining is associated with the birth of the Roman emperor Marcus Aurelius. One of his mother's hens laid them down that day with red dots. This event was interpreted as a happy omen. And since then, the Romans began to send each other painted Easter eggs as a congratulation.
The Romans also had a custom of eating a baked egg before a meal. This meant the successful start of a new business. After all, it is like the sun: it revives and revives everything. Also in Rome, they were used painted in rituals and games.

There is an assumption that the tradition of painting them at Easter is associated with the pre-Christian celebration of spring. Many peoples believed that it was endowed with life-giving power. And the whole universe was seen by them as coming out of an egg. Among the Egyptians, Greeks, Romans and Persians, it symbolized the rebirth and the birth of a new life.
What is the best way to color eggs for Easter?
We all know that Easter eggs are not only a tradition, but also the basis of the table. It is not so difficult to do this, because the stores have a huge selection of colors and various decor for a beautiful design.
Today we have a huge number of decoration options. You just need to turn on your imagination, and there is no limit to this. It is only desirable that the design should have as few dull and dark colors as possible. Since this holiday is bright and spring, it is advisable to use rich bright colors of spring, as well as all shades of red.
Easter eggs can be decorated however you like. It all just depends on the method of staining, in the use of which such definitions are applied as:
1. dyes – staining in any solid color;
2. drapanki - one-color, but with a pattern scratched on them;
3. specks – painted in any color with inclusions in the form of stripes, specks of a different color;
4. Easter eggs – decorated in the form of an ornament or a pattern with a storyline. Eggs are painted by hand with paints or wax.

There are several conditions for preparing eggs, the observance of which will help you color them easily by any means:
1. they must be at room temperature. First, let them lie on the table, and when they get warmer, it will be possible to cook. Then, when lowered into water and in general in the process, the shell will not burst;
2. so that the color lays down evenly and easily when stained, they are washed and degreased. Wash with any detergent under cool running water. Degrease with alcohol-containing liquids;
3. always add salt to the water when boiling eggs: 1 tablespoon is placed in 1 liter of water;
4. already finished and painted were beautiful and attractive, they need to be dried and wiped with a cotton pad dipped in vegetable oil. Then rub with a disk without oil. Then they will beautifully cast with gloss.
We dye eggs with natural dyes:
Most housewives make this with food coloring they buy at the store. Although they are called food, they are still not as useful as they seem. And although we color the shell, not the protein, when cleaning the hands are stained and the dye gets on the edible part. And that means in our body. The same thing happens when we paint cracked ones (do not throw them away and food paint, which means it will not bring harm). All store-bought food colorings have chemicals that quickly turn pysanky bright and beautiful colors, which is not natural. Therefore, it is not useful for a person at all.

But not many people know that there are quite a few natural dyes. They are quite affordable for any person, as there are almost in every kitchen. You probably did not even suspect that some products can color them. Only these dyes cannot quickly paint in a bright and saturated color. Since they are not so active, that is, they do not have chemistry, which means that it will take more time to stain.
Now I will tell you what natural dyes are and how to achieve a brighter color with their help.
1. Carrots: rich yellow.
Chopped or grated on a grater, pour two large carrots with 2 cups of water. Bring to a boil and keep on low heat for 15 minutes. Strain the broth and add 3 teaspoons of vinegar to it.
2. Turmeric: mustard yellow.
Pour two tablespoons of the powder into 1 cup of boiling water. Add 2 teaspoons of vinegar.
3. Green tea: light yellow.
Brew 3 tea bags in one cup of boiling water. Let it brew for five minutes. Pour in 1 teaspoon of vinegar.
4. Orange: yellow tint.
Pour the peel from 5 fruits with 2 cups of water. Keep on low heat for 20 minutes. Strain the broth and splash 1 tablespoon of vinegar into it.
5. Dill: golden brown.
Use seeds. Pour 3 tablespoons of dill with one glass of water. Bring to a boil and keep on low heat for 15 minutes. Strain and add 1 teaspoon of vinegar.
6. Coffee: brown.
Brew 1 cup of very strong coffee and add a little acetic acid, diluted to 9%.
7. Beets: Pale pink to deep pink.
Finely chop or grate large beets. Pour in 4 cups of water. Bring to a boil and simmer over low heat for 10 minutes. Strain the broth and pour in 2 tablespoons of vinegar.
8. Red paprika: reddish orange.
In one glass of boiling water, brew 3 tablespoons of seasoning. Add 1 teaspoon of vinegar.
9. Onion peel: orange.
Remove the skin from six yellow onions. Pour in two glasses of water. Bring to a boil and keep on low heat for 15 minutes. Pour in 3 teaspoons of vinegar.
10. Parsley and Spinach: Pale green.
Grind 100 gr. frozen or fresh herbs in a blender. Pour two glasses of water and simmer for 10 minutes over low heat. Add 1 tablespoon of vinegar to the broth.
11. Blueberry: bluish gray color.
In one glass of water, mash a handful of frozen or fresh berries. Let it brew for 2 hours.
12. Red Cabbage: Blue.
Chop up half of the head. Fill with water and simmer on low heat for 10 minutes. Add 1 tablespoon of vinegar.

There are also many more natural dyes that give their own unique shades. But since these are natural natural dyes, naturally they will not be as bright as purchased ones.
In order for the eggs to acquire a more beautiful and saturated color in natural dye, hold them in the dye for 12 hours. At the same time, place the container in the refrigerator. In the cold, the pigment will intensify.
How to dye eggs in onion skins?
If suddenly you forgot to buy paint, and you no longer want to run to the store, then this method of coloring is for you. After all, everyone in the house has an onion, and the husk is usually thrown away. Only this time it will serve you well.

We will need:
- Onion peel;
- Water;
- Chicken egg;
- Salt;
- Vegetable oil.
1. For painting, we need as much peel as possible. It is better to collect it in advance, but if this is not possible, use at least 6 pieces. Since its volume affects the color of the eggs.
It doesn’t matter what kind of onion you have (red or regular onion). As a result, the color will be the same.

If you have an old pan that you don't mind painting, then use it. We put the husk in it and fill it with water, which should completely hide the contents. We put on fire and when the water boils, reduce it. The rind should simmer, not boil, for 30 minutes. At the same time, add a tablespoon of salt to it so that the eggs remain intact during cooking.
2. Remove the eggs from the refrigerator in advance, as they should be at room temperature. If they are cold and you start lowering them into the pan, then the Easter eggs will simply burst.
It is from the eggs that the color of the coloring depends. If you use white, then the dyed ones will be light. And browns are painted in a darker tone.

3. After the time has elapsed, we extinguish the fire and leave the broth with the husk to cool slightly to make it easier to lower the eggs into it. Gently put them in a saucepan and lightly “dig in” with a spoon into the husk. Bring them to a boil and cook for 10 minutes. Sometimes don't forget to check them and rotate them a bit.

4. Transfer the finished ones to another pan and fill with cold water. This way they clean up better. Then dry and use a cotton pad or bandage moistened with vegetable oil to wipe them. So they will have a nice shine.

We paint eggs with beets for Easter
I never thought that they could be dyed with more than just onion skins and store-bought paints. But also beets. It would seem that everyone knows about it. But I didn't know! I saw it by accident. Came home and started trying. And here it is a miracle! They acquired not just a red color, but such a ... Better try it yourself.

We will need:
- Beet;
- Water;
- Vinegar 9%;
- Chicken egg;
- Vegetable oil.
1. Wash the kokushki so that in the future the dirt does not prevent us from painting them evenly. Boil until tender in boiling water for 7-9 minutes. It is better to paint them hot.
2. Beets, if it is large, you will need 2 pcs. Wash it and peel it off. Cut into small cubes and put in a saucepan. Fill with water to cover the beets. Put on fire and cook for 10 minutes. Then we turn it off.
3. We put them in a saucepan to the beets so that they are completely hidden and "buried" in it. Cool and put in the refrigerator overnight. Staining time from 3 to 12 hours. You can adjust the degree of coloration by removing the eggs.
The longer they are in the decoction, the stronger the staining. And the cold will give a more saturated color.
The broth can be filtered from the pulp, then the staining will be uniform. And so they get the effect of marble.
You can also use only beetroot juice, but then take it twice as much. Grate it on a fine grater or chop in a blender and squeeze the juice. Add 2 tablespoons of vinegar to it and place the egg for coloring. Keep it in the juice as long as possible, preferably from three hours.

Easter eggs in this way acquire a matte effect in the final form. Therefore, to give it a gloss, wipe it with a cloth dipped in vegetable oil.
Coloring eggs with turmeric
Preparing for Easter is always fun. Paint them or bake them. There are always many who want to help. Especially when it comes to eggs.

We will need:
- Turmeric;
- Water;
- Eggs.
Pour cold water (0.5 liters) into a small saucepan and put on fire. Pour 3 tablespoons of turmeric, mix. Gently, using a spoon, dip the raw eggs at room temperature into the water.

After boiling, cook them for 15 minutes. Then we turn off the fire. If the color suits you, then they can be dried and greased with vegetable oil for shine. Usually this is not enough for me, so I cool them together with the broth and put them in the refrigerator overnight. Then the color is more saturated.
How to dye eggs blue with red cabbage?
Who would have thought that red cabbage gives exactly a blue tint, and not red. I had never heard of this before, but I didn't even know about it! I am still surprised when I paint.

We will need:
- Red cabbage - 1 fork;
- Water;
- Eggs;
- Vinegar 9%.
How to prepare for painting I wrote above. Now boil them until tender for 10 minutes and cool.
Cut the cabbage into large cubes and place in a bowl. Fill it with water so that the pieces are hidden. We put on fire and after boiling, cook for 20 minutes.

Drain the finished broth into a deep cup and add 2 tablespoons of vinegar to the hot one. Immediately put the eggs in the hot liquid and leave to stain for at least 3 hours.
I did this: I left the bulk of the eggs in the refrigerator for 12 hours. And the rest the next day left in the solution for different times (4 and 2 hours). I got them in different colors.
Coloring eggs for Easter with a marble method
As you already understood, they can be painted with anything. But still, I like to use onion skins. With it, you can paint very beautifully without much effort.

We will need:
- Onion peel;
- Paper;
- Eggs;
- Gauze or wide bandage;
- Threads or elastic bands;
- Water.
1. Take onion peel and remember or break it. If this does not help, then use scissors to chop into small pieces. The smaller they are, the more interesting the color will be. And also cut some plain white paper. Mix it together with the husk.
2. Prepare gauze or a wide bandage in advance. Old nylon stockings are also suitable. Make them into pieces so large that you can wrap the eggs in them.
3. Soak prepared raw kokushki at room temperature in water, and then roll in a mixture of onion skins and pieces of paper.
4. Wrap in pieces of gauze and tie the ends well with a thread or elastic band.
Just keep in mind that the gauze should tightly press the pieces of husk and paper. After all, the drawing on the eggs depends on this.

5. Put the remaining husk in a saucepan along with the eggs. Fill with water and add 2 tablespoons of salt. We put on fire. After boiling, reduce the burner and cook for 20 - 25 minutes.
6. Cool under running water and remove the gauze. Dry and lubricate with a cotton pad dipped in vegetable oil.
Color eggs marble
In general, I know many ways to marble color, but I will share the most popular. Greenery is often used here. I want to immediately warn you to take a very old pan. Since then it will be difficult for you to wash it.

We will need:
- Eggs;
- Onion peel;
- Zelenka;
- Gauze;
- Gloves;
- Salt;
- Water.
1. Onion peel, no matter what color you have, finely chop or cut.
The onion variety does not affect the color of the stain, as they will still be red. But the intensity of the color depends on its quantity: more is better.
2. Moisten eggs at room temperature with water and dip in the husk. At the same time, you can help with your hands, sprinkling them.
3. Using a thread or elastic band, we tie the ends of the gauze piece or stocking in which the eggs are wrapped.
4. Put the remaining husk in a saucepan. We also transfer Easter eggs there. Fill to the top with water and add a tablespoon of salt. Also pour 1 bottle of greenery.

5. Put on fire and bring to a boil. Then reduce and cook for 15-20 minutes.
6. Thoroughly rinse the finished kokushki under running water. Now remove the gauze, just use gloves so as not to stain your hands.
7. Dry and lubricate with a cotton pad moistened with vegetable oil.
Also marbled color is obtained when you use other natural dyes. For example, if you don’t filter the decoction of beets or red cabbage, but “drop” eggs directly into them. After 12 hours you will get an amazing marble color.
A decoction of blueberries will also help you with this. Only after staining will the top layer of paint begin to peel off. Wash them under running water and the result will surprise you!

How to dye eggs with a lace pattern
I like when they have beautiful pictures on them. But many are afraid of this from ignorance, because they believe that it is laborious. But in fact it is fast, easy and unusual. To make a lace pattern on eggs, you can use different plants, lace, nets and any other materials that are at hand.

We will need:
- Eggs;
- sprigs of parsley;
- Gauze;
- Onion peel;
- Salt;
- Threads.
1. Take twigs of any plants you have. It can be dill, parsley, flowers. You can also use beautiful lace. You can cut out drawings from electrical tape, plaster or paper.
2. Wet them with water and put twigs or a paper pattern. Then we wrap it tightly with gauze and tie the ends with a thread.

3. Put onion skins and eggs in a saucepan. Pour water to the top and pour out a tablespoon of salt so that they do not spill out when cracking.
4. Put the pan on the fire and, bringing it to a boil, reduce it. We cook for 30 minutes.
5. Cool under cold running water. We remove the gauze, dry it. Lubricate with vegetable oil.
Painting eggs with a beautiful pattern - 8 original ways
There are many more original ways to color Easter eggs with drawings. I'm already dizzy with how I'm going to color them this year. I would like to try everything.
To begin with, we need to boil them until cooked for 7 - 9 minutes. And since I'll be using food coloring, I'll need five cups or small jars. I fill them with paint and dilute with water in accordance with the instructions and add a tablespoon of vinegar.
Method 1:
We use threads or stationery rubber bands. We wind them around the egg arbitrarily and lower them into the paint. We wait 3 - 5 minutes and pull it out. Place on a paper towel to drain the paint and let it dry a little. Then carefully remove the threads.

Method 2:
For this we need 3 napkins. We wrap an egg tightly in them and pour different paints from a spoon. Let it sit for 5 minutes to color it. Unfold and brush with vegetable oil.

Method 3:
Let's make a pattern using rice and a nylon sock or gauze. To do this, soak the egg in water and roll in rice. Wrap tightly in cheesecloth and dip in paint. After three minutes, we take it out, remove the gauze and dry it.

Method 4:
Take any candle and light it. With a cotton swab or toothpick, apply wax to the egg in the form of a pattern. It will harden, then put the egg in the paint. We take it out, dry it and wipe off the wax.

Method 5:
Decoupage using drawings from napkins. Below I will describe how to make decoupage entirely from napkins. And here we only need patterns. Separate the color layer and tear off a suitable pattern with our hands. Glue it to the egg with a brush and egg white.

Method 6:
Let's paint it first in one color. Let it dry and stick strips of tape on it. Let's paint again. When stained, carefully remove the adhesive tape.

Method 7:
We need rice again. Pour it into a tall cup and drip a little of any paint. Stir and put the egg in it. shake well. Check if this coloring suits you, then leave it like that. But it is better to drop another paint into the same rice. Mix again and put the same egg, shake until it is colored. Our drawing is speckled.

Method 8:
We color the eggs in the main color. And with the help of a toothbrush, sprinkle them with a different color. Since the drops will fly in different directions, then lay paper towels or newspaper.
How to decoupage eggs for Easter with napkins?
Today this technique is very popular. Therefore, more and more often they began to decorate Easter eggs with it. The result is very beautiful and at the same time it is done quite easily.
We will need:
- Eggs boiled;
- The egg is raw;
- Napkins with a beautiful pattern;
- The brush is soft large;
- Vegetable oil.
1. Since I will use egg white instead of glue, we need to separate it from the yolk accordingly. We stir it with a brush.
2. Napkins should be with a small pattern. Therefore, when buying, imagine how it will look on the egg. Since napkins usually consist of three layers, and we only need one - the top one, we remove the other two.
3. On pre-boiled Easter eggs, we apply the pattern we need on a napkin, as if trying on. If everything suits us, then we begin to straighten it with a brush. In this case, the napkin gets wet and sticks.

Act carefully and quickly, as the protein dries quickly and then everything can break.
This way you brush the whole egg. Cut off the excess with scissors and glue the rest. With a brush, we smoothed out all the folds and we got a beautiful Easter egg.
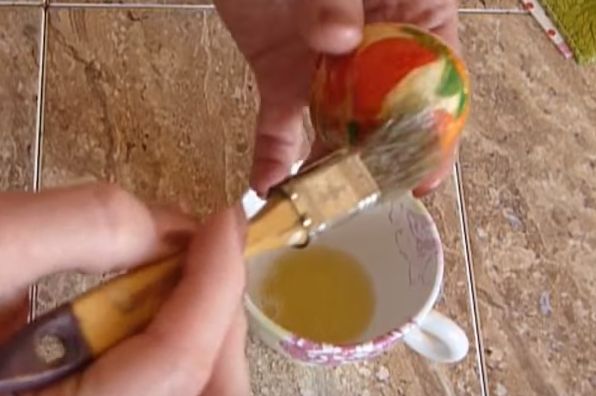
4. Leave it to dry. Then lubricate with a brush dipped in vegetable oil to give them a glossy sheen.
You can also use gelatin instead of protein. To do this, soak it in warm water, and when it swells, bring to a boil. So it will completely dissolve and now our glue is ready for use!
Painting eggs with nail polish

We will need:
- Eggs;
- Cup;
- Water;
- Nail polish;
- Toothpick;
- Gloves.
1. We need white eggs. We prepare them, boil until tender for 9 minutes in boiling water and cool. I must say right away that we don’t need testicles cracked during cooking.
2. Pour water at room temperature into a cup (it is advisable to take one that you don’t mind spoiling). We drip a few drops of varnish of one or more colors into it. If you decide to use more than one, then we drip in turn at one point.

3. Using a toothpick, draw a picture in any form.

4. Put on gloves and take the egg. Dip it on one side, then the other side into a cup and dry.
The result is very interesting and beautiful. But it is desirable to use this technique with empty shells. Since you yourself understand that varnish is a strong chemistry and I would not recommend using it for food purposes. Therefore, to decorate eggs for Easter, it is better to use other methods.
How to stick beautiful stickers on Easter eggs?
To date, they just haven’t come up with anything to make our life easier. Even those who came up with these stickers saved us time. After all, here you do not need to stain the dishes with paints and wait for them to be painted.

We will need:
- Eggs;
- Thermal stickers;
- Water.
First you need to check the size of the thermal stickers and eggs. All stickers have a standard diameter. They are great for commercial eggs labeled C1 and C2. But from poultry, problems may arise, since they are large. And, when you have already decided on the size, then get down to business.
1. First, boil them in the usual way and cool under cold running water. Now we put thermal stickers on them. Try to keep them in the middle.
2. Boil water again in a small saucepan or kettle. Using a spoon, carefully lower it into boiling water. The sticker immediately wraps around it tightly. Do the same with the remaining samples.

An egg decorated in this way is unlikely to crack if you drop it. Since the sticker protects it.
This decor has a huge minus: it is very difficult to clean them from the shell. After all, the sticker is firmly attached and it is very difficult to tear it.
How to decorate eggs with foil. Easter egg decoupage
There is another great idea how to decorate it. You can just wrap it in foil. It's that simple and you don't need anything else. But you definitely haven't tried this method.

We will need:
- Foil;
- PVA glue;
- Food colorings;
- Vinegar;
- Water;
- Toothbrush.
1. Boil them and cool in cold water. We dilute food coloring according to the instructions and add a tablespoon to each color. We lower the kokushkas into them and leave them to be painted for 3-5 minutes. We get and dry.
2. Coat the egg with glue, but try to do it in such a way that there are places not touched by glue. We wrap it with foil (it is sold in stores for creativity). We roll in the palms and remove the excess. Let dry a little. Then gently brush it with a toothbrush. Thus, we give it the effect of aging.

Making fluffy eggs for Easter
I peeped this wonderful method from my neighbor. She treated my children last year. They were just delighted with these eggs.

We will need:
- Eggs;
- Food colorings;
- Vinegar;
- Egg white;
- Gouache;
- Boric alcohol or vodka;
- Water;
- Sieve;
- Manka.
1. First, paint the semolina. Pour a tablespoon of water and a tablespoon of alcohol into a cup. Add 0.5 teaspoon gouache. You can use food coloring, only in dry form. Stir and add 4 tablespoons of semolina. Mix everything well and put it on a clean and dry paper to dry. it will dry out in about 1.5 to 2 hours. Then sift it through a sieve, if there are lumps - mash.

2. Boil the eggs until cooked and cool. Dilute food coloring according to the instructions and add 1 tablespoon of vinegar to each color. Dip in paint and paint for 5 minutes. Take out and dry.
3. We coat the Easter eggs with protein using a silicone brush and roll in colored semolina. You can combine colors according to your taste. This is how we make them fluffy.
Easter egg decorations + Beautiful serving of eggs on the table
I have so many decorations, but I want you to see how it can be done more. Because sometimes it's easier to see.
This is not a difficult way to decorate, because you just need to paint them and scratch out the pattern. Although a clerical knife must be handled carefully, because it is very sharp.
I also wanted to give you some ideas on how to drop your beautiful Easter eggs on the holiday table.
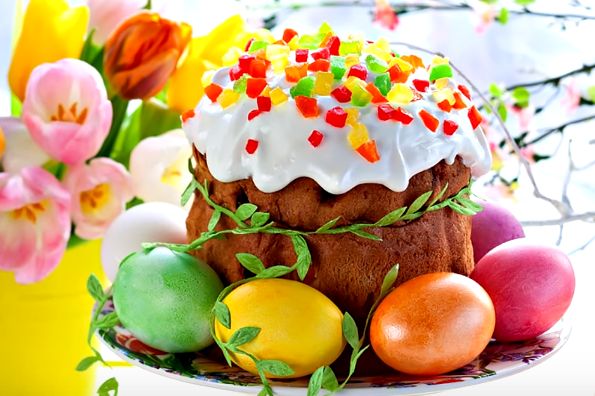
1. The simplest thing is to lay eggs around or Easter cake. By the way, it would be better if the dish is placed on some tall cup. To highlight the Easter decoration of the table, and put a bouquet of flowers next to it.
2. Put all the colored eggs in a glass vase and add some greens or flowers to them.

3. Buy pasta nests and put eggs in them. This decoration can be placed around the table.

I hope you enjoyed the table decoration ideas, as well as how to dye Easter eggs. I tried to tell you as many painting and decorating options as possible. But know that you can always fantasize, as there is no limit to this. Bring your ideas to life and share with us.
All the best to you and Happy Easter! Christ is Risen!
All housewives prepare unusual eggs for the Great Easter holiday, trying to surprise their guests with the originality and exclusivity of an integral attribute of the holiday - a boiled egg. In this article we will describe how to make beautiful eggs for Easter using ordinary bright napkins using the decoupage technique. This is quite fun and interesting, so it is worth involving all family members in such an activity.
Necessary materials
- Eggs - 8-10 pcs.
- Small brush.
- Multilayer napkin.
- Scissors.
Preparing eggs for painting with napkins
Before you start painting the eggs, they must first be prepared. Preparation takes place in the following steps:
- Eggs should be at room temperature. Dip them in cold water and cook for 10-12 minutes after boiling water.
- Drain the hot water from the eggs and fill them with cold water.
- After the eggs have completely cooled, wipe them dry, removing possible spots and other contaminants.
- We make a solution of water and vinegar to degrease the shell. For 1 liter of water you will need 80-100 ml of vinegar.
- We dip the boiled eggs into the resulting solution for up to 5 minutes.
- We wipe the eggs dry and you can start decorating them.


Preparation for dyeing eggs with napkins
A multilayer napkin should be with an interesting abstraction. From a multi-layered napkin, cut out the drawings along the contour. It is advisable not to disassemble it into layers, since cutting one thin layer is not very convenient.
Preparing glue for gluing napkins:
- Take an egg and separate the white from the yolk.
- Place the egg white in a small bowl and beat with a fork until foamy.


The process of dyeing eggs with a napkin using decoupage technique
- We take the previously cut out pattern from the napkin and separate only the top color layer.
- On the already prepared egg, apply a beaten egg white with a brush.
- On the place (shell) that was smeared with protein, we fix the pattern cut out of the napkin (only the top color layer).
- With a brush dipped in protein, carefully level a piece of napkin.
- In this way, we cover the whole egg with drawings from napkins.
- To save time and speed up the process of decoupling eggs, we use a hair dryer. With it, we dry the egg with glued drawings from napkins.
- After a dry, already beautiful egg, once again cover with egg white. This layer will act as a varnish. The eggs will be shiny, and the napkin patterns will be more secure.
- Dry the egg again with a hair dryer and you're done.


- In order for the egg to remain intact during cooking, and the shell does not burst, it is necessary that the eggs be at room temperature. They must be taken out of the refrigerator in advance.
- It is better to choose napkins with a small pattern, then these patterns will look more organic on the eggs.


