How to paint Easter eggs beautifully. We paint testicles from improvised means at home
Painted eggs or krashenki are an essential attribute of Easter 2018. They symbolize spring and the rebirth of a new life, and special attention should be paid to the process of their creation.
And although eggs are traditionally dyed on Maundy Thursday, on the eve of Easter, it is worth deciding on ideas for decorating them in advance. Site "24" offers 10 original ideas for painting, as well as recipes for unusual "Easter eggs" in the form of dessert and ice cream.
Easter Egg Coloring Ideas 2018
space eggs
materials:
- acrylic paints
- brush or old toothbrush
- water
How to paint:
Paint the eggs with black acrylic paint. To evenly cover the egg with paint - use egg stands.
Separately apply "cosmic colors" to the cardboard. For example, purple, blue, cyan, golden, white, etc., choose one color and spray it on the egg. This can be done either with a brush or even with an old toothbrush. However, apply another color only after the previous coat has dried.

Easter eggs: tips for coloring
Advice: so that the paint lays evenly - wash all the eggs well with a brush and soap. You should also wipe all the eggs with an alcohol solution.
Tie-dye eggs
Materials:
- Food coloring (3-4 colors)
- Paper towel
How to paint:
Wrap the washed and boiled eggs in a paper towel. Apply a drop of food coloring of different colors around the perimeter of the egg.

DIY Easter egg: how to paint eggs in different colors
Leave the egg to dry and only then unwrap.

Pastel colors
Materials:
- Whipped cream
- Food coloring (several colors)
How to paint:
Whip cream. It is better to take chilled and with the highest percentage of fat content. Apply several colors of food coloring to the surface of the mass. Using a toothpick, make arbitrary patterns on the surface.

How to color Easter eggs with cream
Dip the boiled eggs completely into the bowl of cream and turn them over a few times. Leave the eggs in the mixture for 30-40 minutes. Then take it out and let it dry well.

Advice: before dyeing eggs for Easter, they must be taken out of the refrigerator so that they are at room temperature. If you throw an egg from the refrigerator into hot water immediately, the shell may crack.
Mosaic
Materials:
- Egg paint
- Boiled unpainted eggs
How to paint:
Boil the eggs and paint them in the desired color. Boil some eggs and don't color them. Grind undyed egg shells.

Two in one - mosaic and Easter egg
And stick these pieces on the colored eggs in random order.

Important! Use glue that is food grade.
quilling eggs
Materials:
- Paper for quilling
- Glue
How to do:
Roll up small circles of quilling paper. The narrower the paper, the neater the egg will look. Stick the paper elements on the boiled egg.

Easter egg decoration: quilling is what you need
Previously, the egg can be painted in the desired color.

Sweet eggs with sprinkles
Materials:
- Easter sprinkles
- Glue
How to do:
Sprinkling can be useful not only for decorating paska. Coat the egg with special glue and roll it in the sprinkles.

Easter decoupage
Materials:
- Protein
- Napkin for decoupage
How to paint:
Cut out the pattern you want from the napkin. Whip up the protein. Wrap a dry boiled egg in a napkin and blot with beaten protein.

Decoupage Easter eggs: original ideas
Leave to dry well.

Decoupage Easter eggs: how to do it?
Advice : To avoid cracking the shell, add half a teaspoon of salt to the water.
"Golden" eggs
Materials:
- Gold colored foil
- Glue
How to do:
Apply glue to the egg, but not over the entire surface, but only partially. Stick on the foil. Use a coarse-bristled brush to remove excess foil.

Before applying the foil - the egg can be painted in the desired color.

Marble technique
Materials:
- Nail polish
- Water
How to paint:
Put a few drops of nail polish into a bowl of water. Using a toothpick, create an arbitrary pattern on the surface of the water.

Decorating Easter eggs: nail polish will come in handy
Put the egg in water so that the varnish film completely covers the egg. Leave on for 10-15 minutes, then remove and leave to dry.

Instead of varnish, you can use oil (art) paint.
Advice: to make the eggs shine after painting - rub them with vegetable oil.
Ombre technique
Materials:
- Food coloring
- Water and spoon/ladle
How to paint:
Dilute the paint in water and pour it into a glass. Using a spoon or ladle, dip the egg halfway into the glass of paint. Do this for 3 minutes. Then raise the egg so that the water covers it halfway for another 5 minutes. Just raise and lower the egg.

DIY Easter Ideas: Ombre Technique
The last ten minutes - paint over only the bottom of the egg in the same way.

Easter Egg Decorating: Ombre Technique
Advice: for children, it is worth dyeing eggs only with natural dyes - beetroot juice, spinach, onion husks and the like.
And not just boiled eggs.
Boiled chicken eggs - it's quite difficult to surprise someone at Easter. But ice cream or a full-fledged dessert in the form of an egg is quite possible. We offer you simple recipes that you can easily repeat at home.
ice cream egg
Ingredients:
- Water 500 ml
- Fruit juice with pulp 250 ml
- Sugar 200 g
- Fresh lemon juice 1 tbsp
- sachet of gelatin

Cooking:
1. Soak gelatin for 5 minutes in water and then add sugar. Heat the liquid over low heat until completely dissolved.
2. Slowly drink fruit juice. Hold for another minute on the fire and remove from the stove. Strain through a sieve, let cool and add lemon juice.
3. For the shape, you can use plastic eggs that are sold in children's stores. Make a small hole through which you will pour the finished mixture.

4. After that - put the eggs with popsicles in the freezer for at least 2 hours.
chocolate dessert
Ingredients:
- Chocolate eggs without a toy
- Cream cheese 150 g
- Heavy cream 130 g
- Powdered sugar 30 g
- Lemon juice 0.5 tsp
- Vanilla extract 0.5 tsp
- Butter 20 g
- Fresh orange juice 2 g
- Apricot jam 1 tbsp

Chocolate Easter eggs: delicious and elegant
Cooking:
1. Carefully cut off the top of the chocolate egg. If the edges are uneven - even better, it will seem as if the "shell" has broken off. Leave the eggs in the fridge while you prepare the filling.
2. Mix cream cheese, icing, lemon juice and vanilla extract. Whisk the mixture until smooth. Whip the chilled cream separately and carefully fold into the mixture.
3. Remove the eggs from the refrigerator and gently spoon the filling into the eggs. Leave them in the refrigerator for 30-40 minutes so that the filling freezes well. In the meantime, prepare the "yolk".

4. For the "yolk" mix the butter, orange juice and jam. Heat the mixture over low heat and stir constantly. When the mass becomes homogeneous - remove from heat.
5. In the finished eggs with filling, make a small indentation and put the "yolk" there.
The wonderful spring holiday of Easter is just around the corner. By tradition, it is customary to serve colored eggs on the festive table, and any housewife wants the eggs not to be cracked and look beautiful.
I will not go into details, the history of the origin of traditions - it was a long time ago and different sources interpret the appearance of this Easter attribute in different ways. One thing is clear - Easter eggs paint everything and always).
This is a fun activity with lots of room for creativity. The biggest fans of painting, of course, are children.
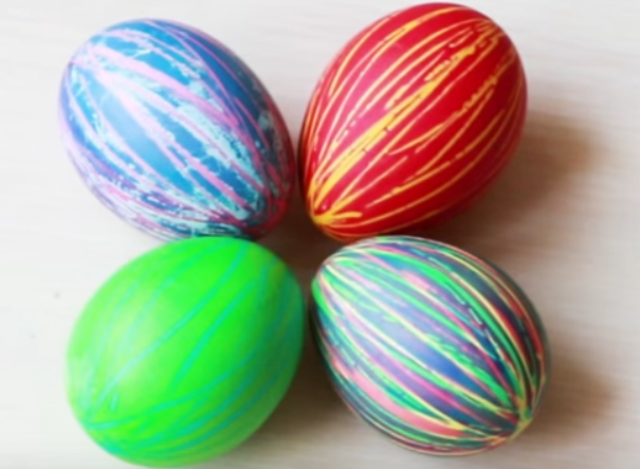
Many amazing ways to paint eggs can be found on the Internet and mine: striped, marbled, speckled, even flowered. All this is interesting, fun, and beneficial. The main benefit is, of course, communication and positive emotions.
Chemical food dyes color very brightly and quickly, but why do we need extra chemistry on the table. I am for natural and food coloring. You can remember the experience of mothers and grandmothers - no chemistry, only natural remedies. You can diversify their experience in relation to today's opportunities.
1. Wash the eggs in soapy water, put them in a saucepan with cold water and cook (boil) for 7 minutes. You can add a little salt at the rate of 1 teaspoon per liter of water.
2. Cool in cold water, and then wipe with vodka or alcohol so that it is painted evenly.
3. Boil natural dyes, strain them through a sieve and then boil / place already boiled eggs in them.
The only way to boil a raw egg in dye is onion skins. In other natural dyes, a pre-boiled egg is dyed.
4. Add 1-2 tablespoons of vinegar to the prepared natural dye.
5. Natural dyes are not very resistant, so when the eggs are cooked, you do not need to wipe them with a towel, just put them on a napkin and let them dry on their own.
6. After dyeing, dyes can be wiped with vegetable oil for shine.

If you follow these rules, you will get wonderful Easter eggs!
Natural food coloring for Easter eggs
It's good when the whole family with children can get together and spend a fun family evening painting Easter eggs. This is a fascinating process and there is no limit to creativity. There are many coloring options on the Internet and I want to try everything.

So, how and in what color can eggs be dyed?
- Colors orange: turmeric, orange or tangerine zest juice, carrots, paprika (4 tablespoons of paprika boil for 30 minutes in a saucepan with a glass of water, then place boiled eggs in this broth).
- Colors brown: coffee, black tea, birch leaves, onion peel.
- Colors red: hibiscus, beets, red onion husks.
- Colors blue: red cabbage, blueberries, elderberry, grape juice from dark grapes.
- Colors green: spinach, parsley, nettle, chlorella.

The color largely depends on the contact time of the eggshell with the dye, the longer - the more saturated it will turn out.

How to dye eggs for Easter with beets?
To dye the eggs red with beetroot, cut into cubes half of the beetroot and boil it for 15 minutes.
We filter the broth and add 2 tablespoons of vinegar to it.

We dip the eggs in a hot beetroot solution for 2-3 hours, stirring occasionally for a uniform color.

Coloring with red cabbage
To dye eggs blue, we need 300 gr. red cabbage and 1 liter of water.
Finely chop the cabbage and cook it for 30 minutes, strain the cabbage solution and add 2 tablespoons of vinegar.
We send boiled eggs to the solution for 5-6 hours, not forgetting to stir occasionally.

We get a dark blue egg. To obtain a blue color, it is enough to keep them in a cabbage solution for 3 hours.

Unfortunately, the color after red cabbage is not very resistant, it is easily scratched.
How to dye Easter eggs with turmeric?
In 0.5 liters of water, cook 20 gr. turmeric 10-15 minutes, stirring. We turn off the fire. In the resulting broth, we lower the eggs for 2 hours.

The color is yellow to orange.
The classic way to dye eggs in onion skins
The most famous and common way to color eggs is with onion skins. This is the only case when raw eggs are boiled in a saucepan along with the husk.
For a more uniform color, you can boil the husk and remove it from the pan, and boil raw eggs in this broth.
Take 2 presses of onion peel per 1 liter of water, boil for 20 minutes, strain and boil eggs in this broth. We get a beautiful red or brown color.

Compare the color of eggs dyed with turmeric and onion skins.

It turns out a uniform saturated color.
We paint the eggs green
For this we need.
- onion peel
- Zelenka
- Eggs at room temperature
- Threads
- Cellophane package
- Water in a saucer
Below you can watch a detailed video on how to paint with onion peel and brilliant green.
How to draw on eggs painted with onion peel?
Do you want very beautiful dyes without chemical dyes? And do-it-yourself with family or friends?) Double bonus for those who are not lazy!
Then watch and read below:

Such beauty is made very simply. For this we need:
- white eggs
- parsley leaves or dill
- nylon tights
- ordinary thread
- onion peel
- vegetable oil
1. Pour the husk (2-3 squeezes) into a saucepan with water (about 1 liter)
2. We wash the egg and put a leaf of parsley on a wet surface. Press it firmly and smooth it out.
3. On top of the egg with a leaf, we put on a nylon mesh from tights or a sock. Do it in any convenient way. For example, cut the tights into pieces of such a size that it will be convenient to wrap the dye.

Tie the edge of the nylon patch with a thread.

You can use smooth tights, or you can use a pattern, this is an additional space for creativity.

4. Dip the prepared eggs into a saucepan with husks, put on fire and cook for 9-10 minutes.

5. Cool the eggs on a plate, remove the mesh and leaves. If desired, you can wipe the surface of the shell with vegetable oil, then the color will be brighter and the surface will shine.

Set the table and celebrate the brightest holiday of the Resurrection of Christ!
How to boil eggs so that they do not burst and are well cleaned?
Here are a few rules on how to properly boil eggs so that they do not crack. After all, it will be very disappointing if, during the creative process, the eggshell cracks and ruins all the efforts.
It is also important that the eggs are fresh enough, you need to be sure that there is complete order inside, and you will not be in for an unpleasant surprise.
How to determine the freshness of eggs?
If you put a raw egg in a bowl of water:
- fresh will sink to the bottom
- a week old will float vertically in water
- not fresh, older than three weeks the egg will float to the surface
It is best to boil eggs not the freshest, but those that were laid a couple of days ago. In very fresh eggs, the shell is more likely to fail and crack during cooking. Yes, they clean worse.

- Egg shells burst from temperature changes, so do not put them cold, straight from the refrigerator, into hot water. It is best to bring the egg to room temperature and then place it in a saucepan with cold water, only then light the fire.
- Use some salt when boiling them. Our grandmothers used this method. Salt the water before you start to boil the egg. You will need about 1 teaspoon of salt per liter of water.
- If cooked too long, the yolks of the eggs become covered with a gray-green coating, and the whites become rubbery. In order to paint, we need hard-boiled eggs, this is about 7-8 minutes. Below in the figure there is a visual illustration of eggs cooked for different times.

Happy Holidays!
Every housewife knows how to paint eggs for Easter with her own hands quickly and accurately. After all, we learn this art from childhood, helping our parents prepare for the most important Christian holiday. But every year not only new dyes appear, but also staining techniques.
And among them there are quite interesting ones that make it possible to make the most beautiful eggs for Easter at home. We offer you to get acquainted with the most unusual ways of dyeing Easter eggs at home using ordinary dyes.
Those who are used to saying: “I paint eggs for Easter in the traditional way, and it always turns out beautifully,” we will not convince them. But even the most inveterate conservatives, having become acquainted with our simple master classes, will change their minds. By experimenting with food coloring, you can get pretty beautiful colored eggs for Easter. We offer to please loved ones with rainbow eggs, which will be full of rainbow colors.
Pre-boil the eggs, trying to prevent cracking.
We dilute the dyes according to the instructions. We need only 3 colors: red, yellow and blue.
It is these shades that will allow you to get all the colors of the rainbow with phased staining.
Dip the egg at an angle into the red dye, where it should sit for about 2 minutes.

We leave it on an impromptu stand until the paint dries completely.

We perform the same operation with yellow and blue dye, while turning the egg at a different angle.
After completing all the manipulations, rainbow eggs can be treated with vegetable oil for shine. As a result, multi-colored beautiful dyes are obtained, full of all the colors of the rainbow.
How to make an Easter egg using dyes and napkins
Perhaps this is the easiest and fastest way to color Easter eggs that does not require much effort. But the result is striking in its unusualness and beauty.

We will need all the same 3 types of dyes and ordinary paper napkins.
First, dilute the dyes in the proportion indicated on the package.

We prepare the egg itself - we wrap it in an ordinary paper napkin. It is better to work with gloves, as caustic synthetic dyes leave unattractive stains on the skin that are difficult to wash off.

We draw one of the dyes into the syringe and apply directly on top of the napkin. After we do the same with the second paint and the third. You can determine the order of application of the solution yourself. If desired, you can alternate shades several times.
At the end of the work, we press the napkin tightly against the egg shell, trying not to crush the egg.

In this form, you need to leave the craft to soak the paint into the shell for about 10-15 minutes.

It remains to remove the napkin and enjoy the excellent result of their labors.

A detailed master class for coloring rainbow eggs in the video:
DIY lace eggs for Easter
A beautiful lace pattern on the eggs can be obtained by using lace when dyeing.

At home, needlewomen will definitely have trimmings of various laces. But even in the absence of such, it is not difficult to buy some lace in a specialized store.

We cut the lace fabric into squares, which will be enough in size to wrap the egg. We tightly tie the edge with a thread or elastic band. Cut off the excess lace.

Dye the eggs dressed in lace with dye diluted in water. Dry the product without removing the fabric.
The result is very beautiful and unusual Easter eggs.
Original striped Easter eggs
Cool striped Easter eggs can be made using ordinary rubber bands. They can be replaced with rubber bands for bracelets and even simple threads.
To color the craft in several colors, start with the lightest shade.
We breed dyes in the required proportion.
First, we color the eggs in the lightest dye or keep a minimum of time in any solution.

Let the product dry.

We put a few rubber bands on warm boiled eggs. Moreover, they can be placed both along the egg and across. Or make an unusual pattern at an angle.

We lower the egg into any dye of a darker shade. After drying, move the rubber bands and paint the craft again, but in a different solution.
As a result, you should get a beautiful Easter egg in cool multi-colored stripes.

How to get cool multi-colored stripes on an egg, see the video:
Beautiful mosaic eggs for Easter do it yourself
It’s easy to make a cool mosaic pattern on an egg using ordinary electrical tape.

First, paint the egg in the lightest shade and leave to dry. We take the usual narrow electrical tape and cut it into arbitrary triangles. Glue the scraps of electrical tape onto the surface of the painted egg.

Until we cover the entire surface of the craft with a mosaic pattern.

It remains to paint the product in a darker dye.

And let it dry on a stand without removing the stickers.

It remains to carefully remove all the pieces of electrical tape from the painted egg.

And admire the cool eggs with a mosaic pattern.

Step-by-step master class in video instructions:
How to make marble eggs for Easter
There are several ways to color beautiful marbled eggs. An amazing drawing can be obtained using ordinary dyes.

To do this, add a little vegetable oil to the water with the dye. A tablespoon of oil per glass of liquid will suffice. It is oil stains that will help when staining to get a fantasy pattern on the shell.

To begin with, you can color the blanks in ordinary dyes.

Then we proceed to staining in a solution with oil. The egg constantly needs to be turned. The more oil can be applied to the surface, the more bizarre the pattern will turn out.

How to paint Easter eggs with nail polish
Another way to get a cool marble pattern.

Keep in mind that the container in which you will make the staining solution will be problematic to wash. Therefore, it is better to use plastic containers, which, after creativity, it will not be a pity to throw them away.
Be sure to work with gloves.

Pour warm water and a little nail polish of various shades into the container.

Gently mix the colors with a toothpick.

We lower the egg into the solution and turn it until the paint covers the entire surface.

We take out the finished egg from the solution and leave to dry.

Thanks to this method, you can get the most unusual colors of Easter eggs. It all depends on your imagination and the availability of shades of nail polish.
Video: beautiful eggs for Easter
Even more unusual egg coloring methods in the video:
A universal selection of gift ideas for every occasion and occasion. Surprise your friends and loved ones! ;)
How to dry eggs?
Before starting master classes, you need to decide where and how you will store the unfinished results of creativity? After all, it is very easy to lubricate the drawing, if you just put the testicle on a flat surface. There are several options:
- Use egg storage containers. In them, the pattern is less smeared.
- Take foam rubber and toothpicks. Insert the toothpicks into the foam at a distance that allows you to place your creation inside.
- Purchase special stands. You can also build them yourself. For example, make a cardboard ring in which you will put the egg after coloring.
I myself am still just getting ready for the total Easter coloring. While I tried a couple of ways, I will share my research further.
natural ways
In the meantime, keep a very valuable tablet that shows most of the easiest options for decorating eggs with the most natural dyes at home. All of them need vinegar - add one tablespoon to a saucepan of water.

Presented here:
- Coffee. You can also use tea, as it is much more affordable and you don’t have to grind anything. It turns out a beautiful brown shade.
- Beet. My favorite color is pink or crimson, it all depends on the soaking time. It is recommended to soak for 8 hours.
- Carrot. Bright festive color will give you carrots, from which you will need to squeeze the juice, and then boil the eggs in the resulting solution.
- Spinach. A somewhat unexpected way for our latitudes, isn't it?) You will need spinach if you want to get a delicate green color.
- Cabbage. To get the blue color of the eggs, take a couple of heads of red cabbage, finely chop and mix with 500 ml of water. Leave the eggs here for 8 hours, covered with a film on top.
- Turmeric. But she will give a sunny yellow. Grind the turmeric beforehand (you should get 2-3 tablespoons) and cook until boiling, then cool and place the eggs there.
All the main nuances are presented on this wonderful hand-drawn instruction, which I have already stocked up in my hamster bins for a long time. A very useful thing during Easter
They completely forgot about the onion peel! But she is the most classic dye. There is nowhere more classic. For her, take the onion peel in the desired volume (for the brightest shade, peel from four onions is recommended for one glass of water). Boil the water for about half an hour, and then lower the eggs into it for a few minutes.
Advice: for a beautiful flower-grass pattern, place the eggs in nylon "bags", putting blades of grass, flowers, etc. there. The output will be an interesting drawing.

It is not necessary to make exactly plant-like traces. You can wrap eggs with threads, glue paper patterns.
Food colorings
In general, when buying any food coloring, there should be an instruction on it that allows you to competently turn the coloring procedure. If this does not happen, then:
- Add vinegar to water, bring to a boil. Leave for half an hour.
- Then the eggs can be boiled in this solution (for a short time) or lowered into the already cooled solution.
However, there are some tricks that will allow you to stand out from the background of others. For example, if you stick round stickers in the form of a polka dot pattern before painting, you will end up with an unusual and very stylish egg.

Or maybe you want a wealth of colors? Then feel free to take gold leaf (it's not that expensive, by the way, if you know the right places;)). First paint, and then wrap the egg with a piece of gold foil and lightly rub with a brush. It turns out an interesting marble effect.
I wonder where you can buy gold leaf cheaply? There you are link on a comprehensive Aliexpress (the seller is verified and one of the most advantageous offers). Here you can buy a lot of precious leaves for a small amount).

Advice. If you want to achieve a beautiful marble effect, then you can do this: paint the egg in a light color, and then dip it in water with a dark color, in which there will be vegetable oil (small drops, about two teaspoons per 500 milliliters).
minions
A favorite of kids and adults alike, they are super easy to make with yellow and blue dye, plus lots of small toy eyes and a felt tip pen. To do this, the egg needs to be dipped in the dye only halfway, dried. On the yellow part, glue the eyes and draw funny faces. The child is happy

Drawing with a permanent marker
One of the fastest ideas. All you need is a permanent marker (one or more) and your imagination. Dots, lines, numbers, mysterious patterns - you will get minimalistic, but very stylish eggs. True, it seems to me that it is not worth leaving such for a long time so that they can be eaten. Still a marker...

Metallic markers are also on sale now - a perfect accessory for Easter. The drawing is more delicate than when using ordinary colors.

Simplicity and cuteness
Have you ever seen white chicken eggs remind you of funny Hello Kitty? Try to make one like in the photo. Little girls will be especially delighted - they will like the cute design. For extra decoration, use small flowers, bows, buttons, and whatever you have on hand.

We use paints
How without them? You can use watercolors or acrylics. In the second case, you can not be afraid of moisture getting on the surface - this is not scary for acrylic dyes. They do not have a strong smell, they do not penetrate deep into.

Feeling reluctant to mess around with lengthy painting? Then take a pimply film and paint over it properly. It remains only to roll the egg on the surface of the film and you will get a speckled egg

We turn to less traditional methods of coloring.
With the help of fabric
For me, these methods have become a kind of discovery. For example, an option appeared where to put old ties. For this, however, they must be made of real silk.
The method is as follows: take a tie, wrap it tightly with a cloth and over it with threads (you can use cotton cloth). Take a little more vinegar than before (about three tablespoons). Boil the eggs for 10 minutes after boiling, cool and very carefully separate the fabric. Incredible beauty comes out

Here is an option with a silk handkerchief and fabric. In general, do not throw away silk shreds - they can come in handy in the most unexpected situations.

On the topic of fabric and onion decoration: take lace and wrap the eggs tightly with it. The recipe is the same, but the patterns are amazing!

Thread decor
You can wrap your creations with threads not only to form beautiful patterns, but also use them as a full-fledged decorative element. To do this, take PVA and coat the surface as the thread advances, which is laid out in a spiral.

Groats in a move
Why does an egg need to be dyed? After all, you can just glue it with grains! Take anything - rice, peas, buckwheat, sesame and more. You can completely roll the product in one type of grain, or you can pour it in stripes, as in the photo.

confectionery topping
Again, it is necessary to properly coat the surface with glue (you can take PVA) and pour sprinkles on top of it. Balls, stars, and just long strips of sweet material will come in handy.

dragon eggs
Yes, not the most Easter idea, but it also has a place to be. For them, you will need round sequins and glue. You can go the other way - take an artificial foam egg and a lot of buttons. It remains only to stick them in circles to get the effect of scales.
I recommend using options with rhinestones, “scales” and other things either for an empty shell or for artificial fake eggs, since it will be a pity to scrape off all these decorations later.
Advice. How to blow an egg out of the shell? There are two ways:
- Pierce the egg on both sides with an awl. Take a saucer and just blow out the contents of the egg. Blow carefully so as not to damage the shell.
- Pierce the egg on one side. Take the syringe and use it to extract the contents.

Pieces of glass and rhinestones
To decorate eggs, both artificial and natural, square pieces of glass or rhinestones will help you. Looks very impressive and festive

Compromise option
A great idea for those who do not want to mess around for a long time, but still want to decorate. And not artificial eggs, but the most natural ones. For each instance, you will need several small rhinestones, which you can glue in any order. PVA is useful for gluing.

quilling
It seems to me that this method is also suitable for an ordinary Easter egg, it will only be a pity to spoil it. Or you can take an artificial form, as in a master class.

And now, perhaps, the most exotic way of all - coloring ... with nail polish.
Paint eggshells with nail polish
My friends, just the shell without content, if you don't want to get poisoned. I decided to experiment on eggs with contents and realized that even after a short laying they are saturated with the smell of varnish so that only the yolk remains edible at best.
However, if you just want to get a beautiful shell or surface, then take note. Incredibly easy way.
Prepare nail polish (preferably several colors), a container of water (not used for cooking), and the shell itself. Pour the varnish over the surface of the water, drawing the patterns that you want to see later. Take only fresh, undiluted varnishes that have not expired, otherwise you will get not a thin beautiful layer, but thick lines and cakes.
The coverage area should be approximately equal to the surface area of the egg, again to get a beautiful effect.

Gently lower the egg into the pan, submerging it completely in the water. It will immediately be covered with an interesting pattern.

This is what I “painted” for the second egg. First dripped with pink varnish, and then green. As a result, green "dispersed" pink.

I took the eggs not white, but brown, so the result was not very bright.

At the same time, I painted a plastic jar of honey. I didn’t take into account some features, so in some places there were lacquer cakes: _D In general, this method of coloring is suitable not only for the shell - here you can use small decorative jars and dip your nails (although then you have to rub your fingers, but the result is worth it :) )

But what others get by diluting more varnishes and using the white color of the egg as a basis. As soon as people do not fantasize!
 other methods
Suddenly I remembered that I had not told about all the options known to me. What else can be used to color eggs for Easter:
- Zelenka. It is better to use it like this: wrap the eggs with gauze, in which you put rice, leaves, pieces of paper, and so on. Tie tightly. Now place them in a pot of cold water and cook until boiling, then a few more minutes.
- paper decorations. These are all kinds of hare ears, eyes, man-made coasters. The decoration options here are almost endless.
- sequins. Coat the surface with PVA glue or paste, and then generously sprinkle it with sparkles, shaking off excess.
- thermal stickers. Before Easter, they are sold in almost all stores. All that is needed is to put a sticker on the already boiled egg and quickly lower it into boiling water. I must say, it doesn’t always turn out well - you have to experiment with stickers from different manufacturers.
- Pencils + watercolor. Draw an image on the surface with a pencil. Dilute the watercolor in water (the thicker the better) and lower the product there. Didn't like the effect? Wash off the paint and try again.
Finally, I have prepared for you an interesting video with a very simple decor method, in which it is very easy to get the effect of "cosmic" coloring:
Well, how do you like painting? And I'm sure I forgot something. Maybe you can tell in the comments? I would be very grateful, as well as other readers who have looked at the blog. In the future, I will definitely share my painting results with you, do not miss
Don't forget to subscribe to updates so you don't miss new interesting articles! And I say goodbye to you.
Sincerely, Anastasia Skoreva
Hi all. April 28 is coming soon. It is on this day in 2019 that all Orthodox celebrate Holy Sunday. It's time to think about how to beautifully paint eggs for Easter.
It is customary to exchange krashenki with each other on this holiday. And of course, everyone else cooks traditional holiday dishes - they bake and make.
There is one fun tradition on this day, or rather even a game - to beat eggs. The loser is the one whose egg is cracked. Why is this being done? Here is one version.
An egg that breaks carried evil in itself and it must certainly be punished - eaten. A strong egg brings blessings and prosperity to the house, it must be kept in the closet until the next Easter day! Such an egg can protect against diseases and evil eye throughout the year, since it was not in vain that various fortune-telling was performed on them, amulets were made, and terminally ill patients were cured with their help.
I googled and found so many easy and fun ways to dye Easter eggs. Some I didn't even know about.
Today I have made for you a selection of the most interesting, in my opinion, ways to paint and decorate them. I hope you enjoy them too.

But first, let me give you some useful tips.
Remove them from the refrigerator in advance so that they reach room temperature, at least 2 hours.
- For painting, choose white.
- Before cooking, wash them under running water, dry with a cloth (microfiber dries well) or a paper towel. It is also advised to wipe with alcohol or vinegar.
- In order to prevent the eggs from bursting during cooking, add salt to the water (1 tablespoon per 1.5 liters)
- Choose a pan so that they lie close to each other so that when boiling, the shell does not crack against a neighbor.
- When cooking, the water should cover them, keep an eye on this.

Now let's move on to painting.
The classic way in onion skins
This is perhaps the most famous and traditional method. Plus it's budget friendly.
Accumulate more onion peel, the color of the eggs will be brighter.
1. Pour the husk with water and put on fire, after boiling, cook for about an hour.

2. Then we let the broth cool and brew, after that we get rid of the husk, you can pour water through a colander into another pan.

3. Put eggs in this broth and cook for 10 minutes.

4. Then we transfer them to cold water and let them cool.

5. Rub the finished dyes with vinegar so that they do not lose their color and with vegetable oil for shine.

Easter eggs with marble pattern
Very beautiful eggs are obtained if they are painted with this method. There is nothing complicated here. You just need to have onion peel, gauze and thread on hand.
1. First you need to finely chop the onion peel and leave it on a plate.

2. Soak the eggs in cold water and roll in the husk when wet.

3. Then we wrap it in gauze and tie it with a thread. Cut off the end so it doesn't get in the way.

4. Put them in a pot of water to cover the top, add salt and cook for 10 minutes after boiling. Then add a bubble of brilliant green there and cook for another 10 minutes.

5. When they are cooked, let them stand for another 10-15 minutes, and then pull them out and clean them of gauze and husks under cold water. Wipe dry and brush them with vegetable oil for shine. We get this beauty.

Green leaf pattern
Another simple but original way to paint Easter eggs. Here we need a bunch of parsley and dill, onion peel, nylon (old tights or socks are great) or gauze and thread.
1. Do not forget to take the eggs out of the refrigerator in advance and prepare the onion peel decoction as described
2. Moisten the egg and attach a leaf of greenfinch to it. Wrap tightly with nylon and tie with a thread. Do this with the rest as well.

3. Put a decoction of the husk and cook for 15 minutes. Do not remove immediately, let it stand for 10 minutes more. Then remove and free from nylon and greens, rinse in cold water and brush with oil. Beauty in the face.

Coloring eggs with rice
It is done according to the same principle as above. Just roll it in rice groats.

Then also wrap with nylon and cook in a decoction of onion peel.

We free from gauze and rice, rinse, lubricate. This is how they turn out.

We paint in beetroot broth
In this way, you can get eggs of a rich red color.
Description:
- Clean and cut the beets into pieces. Boil it in a small amount of water for 15-20 minutes.
- Drain the broth into another pan, add vinegar there, put the eggs there and cook for 10 minutes. Eggs should be completely covered with beetroot water.
- After the eggs are cooked, let them stand in beetroot water for another half an hour or more, the longer they stand, the color will be more saturated.
- Then rinse them and dry them with a towel.

Red cabbage staining technique
Thanks to this method, our coca will be a beautiful blue color.
1. We need 1 head of red cabbage. It needs to be finely chopped and boiled for half an hour. Then it should cool down and after that we drain the broth into a separate bowl, add 5 tbsp. tablespoons of vinegar.
2. Put boiled eggs there and leave for 2-3 hours. The intensity of the color depends on how long you keep them in the decoction.

Video lesson - 3 original ways to paint eggs
In addition to natural dyes, there are many ways to decorate Easter eggs.
I found a very interesting video with three original coloring methods.
So, with the help of ordinary white napkins, food coloring, nail polish and patterned napkins, you can quickly and easily decorate our products.
Decoupage eggs in vintage style
Very interesting are the eggs in the style of "Vintage" with the help of chopped newspaper and beautiful napkins.

Coat the eggs with glue, you can use ordinary PVA, or you can use egg white, and stick newspaper pieces in several layers. Let it dry.

Cut out the pattern you like from napkins and stick it on top of the newspaper. Can be varnished on top. Let it dry and that's it.

You can also decorate with lace, ropes and buttons.

Coloring with a marker
There is no limit to our imagination. But everything is so simple - you take a boiled egg and paint it with a permanent marker.
It can be like this.

Or like this.

I hope I have helped you with some new ideas on how to color eggs for Easter this year. I've already made up my mind, how about you? Write in the comments which method you chose.
Don't forget what else needs to be baked. I look forward to visiting you again. Have a nice day. original


