Safe chemistry experiments. Multi-colored layers in a bottle
Paper, scissors, heat source.
This experiment always surprises kids, but to make it more interesting for two-year-olds, combine it with creativity. Cut out a spiral from paper, color it with your child so that it looks like a snake, and then proceed to “revive”. This is done very simply: place a heat source at the bottom, for example, a burning candle, an electric stove (or hob), an iron upside down, an incandescent lamp, a heated dry frying pan. Place a serpentine coil over a heat source on a string or wire. After a few seconds, it will “come to life”: it will begin to rotate under the influence of warm air.
For children 3 years old:rain in the bank 
Three-liter jar, hot water, plate, ice.
With the help of this experience, it is easy to explain to a three-year-old "scientist" the simplest phenomena of nature. Pour hot water into the jar by about 1/3, hotter is better. Place a bowl of ice on the neck of the jar. And then - everything is like in nature - the water evaporates, rises up in the form of steam, at the top the water cools and a cloud forms, from which the real rain comes. In a three-liter jar, it will rain for one and a half to two minutes.
For children 4 years old:balls and rings

Alcohol, water, vegetable oil, syringe.
Four-year-old children are already thinking about how everything works in nature. Show them a beautiful and exciting weightlessness experiment. At the preparatory stage, mix alcohol with water, you should not involve the child in this, it is enough to explain that this liquid is similar in weight to oil. After all, it is the oil that will be poured into the prepared mixture. You can take any vegetable oil, but pour it very carefully from a syringe. As a result, the oil appears as if in weightlessness and takes its natural shape - the shape of a ball. The child will be surprised to observe a round transparent ball in the water. With a four-year-old kid, you can already talk about gravity, which makes liquids spill and spread, and about weightlessness, because all liquids in space look like balls. As a bonus, show your child another trick: if you stick a rod into the ball and rotate it quickly, an oil ring will separate from the ball.
For children 5 years old:invisible ink

Milk or lemon juice, brush or pen, hot iron.
At the age of five, the baby probably already owns a brush. Even if he can't write yet, he can draw a secret letter. Then the message will also be encrypted. Modern children did not read the story about Lenin and the inkpot with milk at school, but observing the properties of milk and lemon juice will be no less interesting for them than for their parents in childhood. The experience is very simple. Dip the brush in milk or lemon juice (it is better to use both liquids, then the quality of the "ink" can be compared) and write something on a piece of paper. Then dry the writing so that the paper looks clean and heat the sheet. It is most convenient to develop notes with an iron. Onion or apple juice is suitable as ink.
For children 6 years old:rainbow in a glass

Sugar, food coloring, a few clear glasses.
Perhaps the experience will seem too simple for a six-year-old, but in fact it is worthwhile painstaking work for a patient "scientist". It is good because the young scientist can do most of the manipulations himself. Three tablespoons of water and dyes are poured into four glasses: different colors are poured into different glasses. Then add a spoonful of sugar to the first glass, two spoons to the second, three to the third, and four to the fourth. The fifth glass remains empty. In glasses, put in order, pour 3 tablespoons of water and mix thoroughly. Then a few drops of one paint are added to each glass and mixed. The fifth glass contains pure water without sugar and dye. Carefully, along the blade of a knife, pour the contents of the “colored” glasses into a glass of clean water as the “sweetness” increases, that is, scientifically, the saturation of the solution. And if you did everything right, then there will be a small sweet rainbow in the glass. If you want scientific talk, tell your child about the difference in density of liquids, due to which the layers do not mix.
For children 7 years old:egg in a bottle

Chicken egg, pomegranate juice bottle, hot water or paper with matches.
The experiment is practically safe and very simple, but quite effective. The child will be able to do most of it by himself, the adult should only help with hot water or fire.
The first step is to boil the egg and peel it. And then there are two options. The first is to pour hot water into a bottle, put an egg on top, then put the bottle in cold water (into ice) or just wait until the water cools down. The second way is to throw burning paper into the bottle and put an egg on top. The result will not be long in coming: as soon as the air or water inside the bottle cools down, it will begin to shrink, and before the novice “physicist” has time to blink, the egg will be inside the bottle.
Be careful not to trust your child to pour hot water or work with fire.
For children 8 years old:"Pharaoh Serpent"

Calcium gluconate, dry fuel, matches or lighter.
There are many ways to get Pharaoh Serpents. We will tell you about the one that an eight-year-old child can do. The smallest and safest, but rather spectacular "snakes" are obtained from ordinary calcium gluconate tablets, they are sold in a pharmacy. To make them turn into snakes, set fire to the pills. The easiest and safest way to do this is to put a few cups of calcium gluconate on top of a "dry fuel" tablet sold in tourist shops. When burning, the tablets will begin to increase dramatically and move like living reptiles due to the release of carbon dioxide, so from the point of view of science, the experience is explained quite simply.
By the way, if the “snakes” of gluconate didn’t seem very scary to you, try making them out of sugar and soda. In this version, a hill of sifted river sand is impregnated with alcohol, and sugar and soda are placed in a depression at its top, then the sand is set on fire.
It would not be superfluous to recall that all manipulations with fire are carried out far from flammable objects, strictly under the supervision of an adult and very carefully.
For children aged 9:non-newtonian fluid

Starch, water.
This is an amazing experiment, which is easy to do, especially if the scientist is already 9. The study is serious. The goal is to obtain and study a non-Newtonian fluid. This is a substance that behaves like a liquid with a soft impact, and exhibits the properties of a solid body with a strong impact. In nature, quicksand behaves in a similar way. At home - a mixture of water and starch. In a bowl, combine water with corn or potato starch in a ratio of 1: 2 and mix well. You will see how the mixture resists when stirred quickly and mixes when gently stirred. Throw a ball into the bowl with the mixture, lower the toy into it, and then try to pull it out sharply, take the mixture in your hands and let it calmly flow back into the bowl. You yourself can come up with a lot of games with this amazing composition. And this is an excellent occasion to figure out together with the child how molecules in different substances are interconnected.
For children 10 years old:water desalination

Salt, water, plastic wrap, glass, pebbles, basin.
This exploration is best for those who love travel and adventure books and movies. Indeed, on a journey, a situation may occur when the hero finds himself on the high seas without drinking water. If the traveler is already 10 and he learns to do this trick, he will not be lost. For the experiment, first prepare salt water, that is, simply pour water into a deep basin and salt it “by eye” (the salt should completely dissolve). Now put a glass in our “sea”, so that the edges of the glass are slightly above the surface of salt water, but lower than the edges of the basin, and put a clean pebble or a glass ball in the glass, which will not allow the glass to float. Cover the basin with food or greenhouse film and tie the edges around the basin. It should not be pulled too tight so that it is possible to make a recess (this recess is also fixed with a stone or a glass ball). It should be just above the glass. Now it remains to put the basin in the sun. The water will evaporate, settle on the film and drain down the slope into a glass - it will be ordinary drinking water, all the salt will remain in the basin. The beauty of this experience is that the child can do it completely on their own.
For children aged 11:litmus cabbage

Red cabbage, filter paper, vinegar, lemon, soda, cola, ammonia, etc.
Here the child will have the opportunity to get acquainted with real chemical terms. Any parent remembers such a thing as a litmus test from a chemistry course, and will be able to explain that this is an indicator - a substance that reacts differently to the level of acidity in other substances. A child can easily make such indicator papers at home and, of course, test them by checking the acidity in various household liquids.
The easiest way to make an indicator is from ordinary red cabbage. Grate the cabbage and squeeze out the juice, then saturate filter paper (available at drugstores or wine shops) with it. The cabbage indicator is ready. Now cut the pieces of paper into smaller pieces and place them in different liquids that you can find at home. It remains only to remember which color corresponds to which level of acidity. In an acidic environment, the paper will turn red, in a neutral environment it will turn green, and in an alkaline environment it will turn blue or purple. As a bonus, try making "alien" scrambled eggs by adding red cabbage juice to the egg white before frying. At the same time, you will find out what level of acidity is in a chicken egg.
Did you know that May 29 is Chemist's Day? Which of us in childhood did not dream of creating peculiar magic, amazing chemical experiments? It's time to turn your dreams into reality! Read on and we will tell you how to have fun Chemist Day 2017, as well as what chemistry experiments for kids are easy to do at home.

home volcano
If you are no longer attracted, then ... Want to see a volcanic eruption? Try making it at home! To arrange a chemical experiment "volcano" you will need soda, vinegar, food coloring, a plastic cup, a glass of warm water.
Pour 2-3 tablespoons of table soda into a plastic cup, add ¼ cup of warm water and a little food coloring, preferably red. Then add ¼ of vinegar and watch the "eruption" of the volcano.
Rose and ammonia
A very interesting and original chemical experiment with plants can be viewed on a video from YouTube:
self-inflating balloon
Do you want to conduct safe chemistry experiments for children? Then you will definitely like the balloon experiment. Prepare in advance: a plastic bottle, baking soda, a balloon and vinegar.
Pour 1 teaspoon of baking soda inside the ball. Pour ½ cup of vinegar into the bottle, then put the ball on the neck of the bottle and make sure that the soda gets into the vinegar. As a result of a violent chemical reaction, which is accompanied by the active release of carbon dioxide, the balloon will begin to inflate.
pharaoh snake
For the experiment you will need: calcium gluconate tablets, dry fuel, matches or a gas burner. See the YouTube video for the steps:
color magic
Do you want to surprise a child? Rather, conduct chemical experiments with color! You will need the following available ingredients: starch, iodine, a transparent container.
Mix white starch and brown iodine in a container. As a result, you will get an amazing mixture of blue.
We grow a snake
The most interesting home chemistry experiments can be done using available ingredients. To create a snake, you will need: a plate, river sand, powdered sugar, ethyl alcohol, a lighter or burner, baking soda.
Pour a sand slide onto a plate and soak it with alcohol. In the top of the slide, make a recess where you carefully add powdered sugar and soda. Now we set fire to the sand hill and observe. After a couple of minutes, a dark wriggling ribbon will begin to grow from the top of the hill, which resembles a snake.
How to conduct chemical experiments with an explosion, see the following video from Youtube:
Helpful Hints
Children are always trying to find out something new every day and they always have a lot of questions.
They can explain some phenomena, or you can show how this or that thing, this or that phenomenon works.
In these experiments, children not only learn something new, but also learn create differentcrafts with which they can play further.
1. Experiments for children: lemon volcano

You will need:
2 lemons (for 1 volcano)
Baking soda
Food coloring or watercolors
Dishwashing liquid
Wooden stick or spoon (optional)

1. Cut off the bottom of the lemon so it can be placed on a flat surface.
2. On the reverse side, cut a piece of lemon as shown in the image.
* You can cut half a lemon and make an open volcano.

3. Take the second lemon, cut it in half and squeeze the juice out of it into a cup. This will be the backup lemon juice.
4. Place the first lemon (with the part cut out) on the tray and spoon "remember" the lemon inside to squeeze out some of the juice. It is important that the juice is inside the lemon.
5. Add food coloring or watercolor to the inside of the lemon, but do not stir.

6. Pour dishwashing liquid inside the lemon.
7. Add a full tablespoon of baking soda to the lemon. The reaction will start. With a stick or spoon, you can stir everything inside the lemon - the volcano will begin to foam.

8. To make the reaction last longer, you can gradually add more soda, dyes, soap and reserve lemon juice.
2. Home experiments for children: electric eels from chewing worms

You will need:
2 glasses
small capacity
4-6 chewable worms
3 tablespoons of baking soda
1/2 spoon of vinegar
1 cup water
Scissors, kitchen or clerical knife.
1. With scissors or a knife, cut lengthwise (just lengthwise - this will not be easy, but be patient) of each worm into 4 (or more) parts.
* The smaller the piece, the better.
* If scissors don't want to cut properly, try washing them with soap and water.

2. Mix water and baking soda in a glass.
3. Add pieces of worms to the solution of water and soda and stir.
4. Leave the worms in the solution for 10-15 minutes.
5. Using a fork, transfer the worm pieces to a small plate.
6. Pour half a spoon of vinegar into an empty glass and start putting worms in it one by one.

* The experiment can be repeated if the worms are washed with plain water. After a few attempts, your worms will begin to dissolve, and then you will have to cut a new batch.
3. Experiments and experiments: a rainbow on paper or how light is reflected on a flat surface

You will need:
bowl of water
Clear nail polish
Small pieces of black paper.
1. Add 1-2 drops of clear nail polish to a bowl of water. See how the varnish disperses through the water.
2. Quickly (after 10 seconds) dip a piece of black paper into the bowl. Take it out and let it dry on a paper towel.

3. After the paper has dried (it happens quickly) start turning the paper and look at the rainbow that is displayed on it.
* To better see the rainbow on paper, look at it under the sun's rays.


4. Experiments at home: a rain cloud in a jar

When small drops of water accumulate in a cloud, they become heavier and heavier. As a result, they will reach such a weight that they can no longer remain in the air and will begin to fall to the ground - this is how rain appears.
This phenomenon can be shown to children with simple materials.
You will need:
Shaving foam
Food coloring.
1. Fill the jar with water.
2. Apply shaving foam on top - it will be a cloud.
3. Let the child begin to drip food coloring onto the "cloud" until it starts to "rain" - drops of food coloring begin to fall to the bottom of the jar.
During the experiment, explain this phenomenon to the child.

You will need:
warm water
Sunflower oil
4 food coloring
1. Fill the jar 3/4 full with warm water.

2. Take a bowl and mix 3-4 tablespoons of oil and a few drops of food coloring in it. In this example, 1 drop of each of 4 dyes was used - red, yellow, blue and green.

3. Stir the dyes and oil with a fork.

4. Carefully pour the mixture into a jar of warm water.

5. Watch what happens - the food coloring will begin to slowly sink through the oil into the water, after which each drop will begin to disperse and mix with other drops.
* Food coloring dissolves in water, but not in oil, because. The density of oil is less than water (which is why it "floats" on water). A drop of dye is heavier than oil, so it will begin to sink until it reaches the water, where it begins to disperse and look like a small firework.
6. Interesting experiences: ina bowl in which colors merge
You will need:
- a printout of the wheel (or you can cut out your own wheel and draw all the colors of the rainbow on it)
Elastic band or thick thread
Glue stick
Scissors
A skewer or screwdriver (to make holes in the paper wheel).

1. Choose and print the two templates you want to use.

2. Take a piece of cardboard and use a glue stick to glue one template to the cardboard.
3. Cut out the glued circle from the cardboard.
4. Glue the second template to the back of the cardboard circle.
5. Use a skewer or screwdriver to make two holes in the circle.

6. Pass the thread through the holes and tie the ends into a knot.
Now you can spin your spinning top and watch how the colors merge on the circles.


7. Experiments for children at home: jellyfish in a jar

You will need:
Small transparent plastic bag
Transparent plastic bottle
Food coloring
Scissors.

1. Lay the plastic bag on a flat surface and smooth it out.
2. Cut off the bottom and handles of the bag.
3. Cut the bag lengthwise on the right and left so that you have two sheets of polyethylene. You will need one sheet.
4. Find the center of the plastic sheet and fold it like a ball to make a jellyfish head. Tie the thread around the "neck" of the jellyfish, but not too tight - you need to leave a small hole through which to pour water into the head of the jellyfish.
5. There is a head, now let's move on to the tentacles. Make cuts in the sheet - from the bottom to the head. You need about 8-10 tentacles.
6. Cut each tentacle into 3-4 smaller pieces.

7. Pour some water into the jellyfish's head, leaving room for air so the jellyfish can "float" in the bottle.
8. Fill the bottle with water and put your jellyfish in it.

9. Drop a couple of drops of blue or green food coloring.
* Close the lid tightly so that water does not spill out.
* Have the children turn the bottle over and watch the jellyfish swim in it.
8. Chemical experiments: magic crystals in a glass

You will need:
Glass cup or bowl
plastic bowl
1 cup Epsom salt (magnesium sulfate) - used in bath salts
1 cup hot water
Food coloring.
1. Pour Epsom salt into a bowl and add hot water. You can add a couple of drops of food coloring to the bowl.
2. Stir the contents of the bowl for 1-2 minutes. Most of the salt granules should dissolve.

3. Pour the solution into a glass or glass and place it in the freezer for 10-15 minutes. Don't worry, the solution isn't hot enough to crack the glass.
4. After freezing, move the solution to the main compartment of the refrigerator, preferably on the top shelf and leave overnight.

The growth of crystals will be noticeable only after a few hours, but it is better to wait out the night.
This is what the crystals look like the next day. Remember that crystals are very fragile. If you touch them, they are most likely to break or crumble immediately.

9. Experiments for children (video): soap cube
10. Chemical experiments for children (video): how to make a lava lamp with your own hands
We bring to your attention 10 amazing magic tricks, experiments, or science shows that you can do with your own hands at home.
At your child's birthday party, weekend or vacation, make the most of your time and become the center of attention of many eyes! 🙂
An experienced organizer of scientific shows helped us in preparing the post - Professor Nicolas. He explained the principles behind a particular focus.
1 - Lava lamp

1. Surely many of you have seen a lamp that has a liquid inside that imitates hot lava. Looks magical.

2. Water is poured into sunflower oil and food coloring (red or blue) is added.

3. After that, we add effervescent aspirin to the vessel and observe a striking effect.

4. During the reaction, colored water rises and falls through the oil without mixing with it. And if you turn off the light and turn on the flashlight, the "real magic" will begin.
: “Water and oil have different densities, and also have the property of not mixing, no matter how we shake the bottle. When we add effervescent tablets inside the bottle, they dissolve in water and begin to release carbon dioxide and set the liquid in motion.”
Want to put on a real science show? More experiences can be found in the book.
2 - Experience with soda

5. Surely at home or in a nearby store there are several cans of soda for the holiday. Before you drink them, ask the guys the question: “What happens if you submerge soda cans in water?”
Drown? Will they swim? Depends on the soda.
Invite the children to guess in advance what will happen to a particular jar and conduct an experiment.

6. We take the cans and gently lower them into the water.

7. It turns out that despite the same volume, they have different weights. That is why some banks sink and others do not.
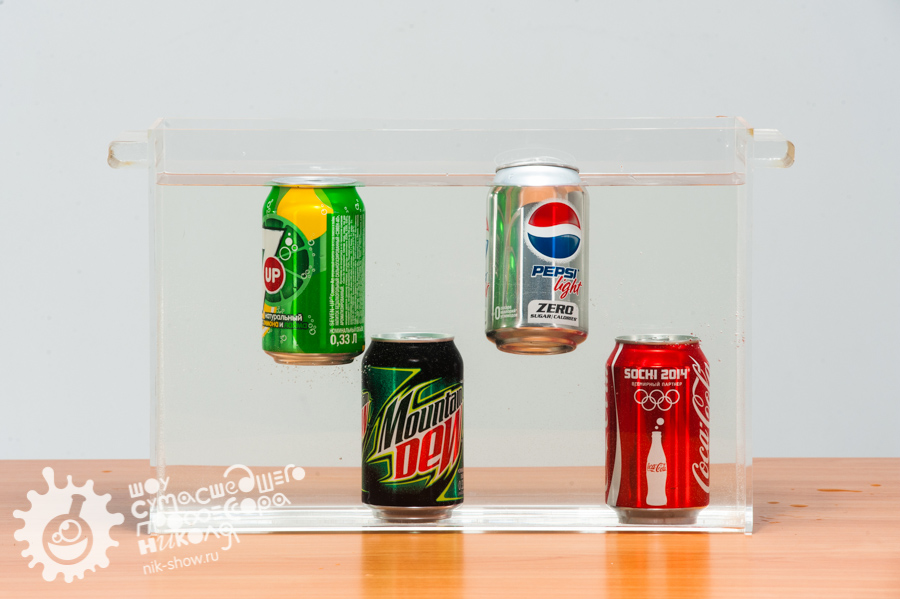
Commentary by Professor Nicolas: “All our cans have the same volume, but the mass of each can is different, which means that the density is different. What is density? This is the value of mass divided by volume. Since the volume of all cans is the same, the density will be higher for one of them, whose mass is greater.
Whether a jar will float in a container or sink depends on the ratio of its density to that of water. If the density of the can is less, then it will be on the surface, otherwise the can will go to the bottom.
But what makes a regular cola can denser (heavier) than a diet drink can?
It's all about the sugar! Unlike ordinary cola, where granulated sugar is used as a sweetener, a special sweetener is added to diet cola, which weighs much less. So how much sugar is in a typical soda can? The difference in mass between regular soda and its dietary counterpart will give us the answer!”
3 - Paper cover
Ask the audience a question: “What happens if you turn a glass of water over?” Of course it will spill! And if you press the paper to the glass and turn it over? The paper will fall and the water will still spill on the floor? Let's check.


10. Carefully cut out the paper.

11. Put on top of the glass.

12. And carefully turn the glass over. The paper has stuck to the glass, as if magnetized, and the water does not pour out. Miracles!
Commentary by Professor Nicolas: “Although it’s not so obvious, but in fact we are in the real ocean, only in this ocean there is not water, but air that presses on all objects, including you and me, we just got used to it to this pressure that we do not notice it at all. When we cover a glass of water with a piece of paper and turn it over, water presses on the sheet on one side, and air on the other side (from the very bottom)! The air pressure turned out to be greater than the pressure of the water in the glass, so the leaf does not fall.
4 - Soap Volcano
How to make a small volcano erupt at home?


14. You will need baking soda, vinegar, some dish detergent and cardboard.


16. Dilute vinegar in water, add washing liquid and tint everything with iodine.

17. We wrap everything with dark cardboard - this will be the “body” of the volcano. A pinch of soda falls into the glass, and the volcano begins to erupt.
Commentary by Professor Nicolas: “As a result of the interaction of vinegar with soda, a real chemical reaction occurs with the release of carbon dioxide. And liquid soap and dye, interacting with carbon dioxide, form a colored soap foam - that's the eruption.
5 - Candle pump
Can a candle change the laws of gravity and lift water up?


19. We put a candle on a saucer and light it.

20. Pour tinted water on a saucer.

21. Cover the candle with a glass. After a while, the water will be drawn into the glass against the laws of gravity.
Commentary by Professor Nicolas: What does the pump do? Changes pressure: increases (then water or air begins to “run away”) or, conversely, decreases (then gas or liquid begins to “arrive”). When we covered the burning candle with a glass, the candle went out, the air inside the glass cooled, and therefore the pressure decreased, so the water from the bowl began to be sucked in.
Games and experiments with water and fire are in the book "Experiments of Professor Nicolas".
6 - Water in the sieve
We continue to study the magical properties of water and surrounding objects. Ask someone present to put on a bandage and pour water through it. As we can see, it passes through the holes in the bandage without any difficulty.
Bet with others that you can make it so that water will not pass through the bandage without any additional tricks.

22. Cut off a piece of bandage.

23. Wrap a bandage around a glass or champagne glass.

24. Turn the glass over - the water does not spill out!
Commentary by Professor Nicolas: “Due to such a property of water as surface tension, water molecules want to be together all the time and it is not so easy to separate them (they are such wonderful girlfriends!). And if the size of the holes is small (as in our case), then the film does not tear even under the weight of water!”
7 - Diving bell
And to secure your honorary title of Water Mage and Master of the Elements, promise that you can deliver paper to the bottom of any ocean (or bath or even a basin) without soaking it.

25. Have those present write their names on a piece of paper.

26. We fold the sheet, put it in a glass so that it rests against its walls and does not slide down. Immerse the leaf in an inverted glass to the bottom of the tank.

27. Paper stays dry - water can't get to it! After you pull out the sheet - let the audience make sure that it is really dry.
Children are always trying to learn something new every day and they always have a lot of questions. They can explain some phenomena, or you can clearly show how this or that thing, this or that phenomenon works. In these experiments, children will not only learn something new, but also learn how to create different crafts, which they can then play with.
1. Experiments for children: lemon volcano
You will need:
– 2 lemons (for 1 volcano)
- baking soda
- food coloring or watercolors
- dishwashing liquid
- wooden stick or spoon (optional)
- tray.

1. Cut off the bottom of the lemon so it can be placed on a flat surface.
2. On the reverse side, cut a piece of lemon as shown in the image.
* You can cut half a lemon and make an open volcano.

3. Take the second lemon, cut it in half and squeeze the juice out of it into a cup. This will be the backup lemon juice.
4. Place the first lemon (with the part cut out) on the tray and spoon "remember" the lemon inside to squeeze out some of the juice. It is important that the juice is inside the lemon.
5. Add food coloring or watercolor to the inside of the lemon, but do not stir.

6. Pour dishwashing liquid inside the lemon.
7. Add a full tablespoon of baking soda to the lemon. The reaction will start. With a stick or spoon, you can stir everything inside the lemon - the volcano will begin to foam.

8. To make the reaction last longer, you can gradually add more soda, dyes, soap and reserve lemon juice.
2. Home experiments for children: electric eels from chewing worms

You will need:
- 2 glasses
- small capacity
- 4-6 chewing worms
- 3 tablespoons of baking soda
- 1/2 tablespoon of vinegar
- 1 cup water
- scissors, kitchen or clerical knife.
1. With scissors or a knife, cut lengthwise (just lengthwise - this will not be easy, but be patient) of each worm into 4 (or more) parts.
* The smaller the piece, the better.
* If scissors don't want to cut properly, try washing them with soap and water.

2. Mix water and baking soda in a glass.
3. Add pieces of worms to the solution of water and soda and stir.
4. Leave the worms in the solution for 10-15 minutes.
5. Using a fork, transfer the worm pieces to a small plate.
6. Pour half a spoon of vinegar into an empty glass and start putting worms in it one by one.

* The experiment can be repeated if the worms are washed with plain water. After a few attempts, your worms will begin to dissolve, and then you will have to cut a new batch.
3. Experiments and experiments: a rainbow on paper or how light is reflected on a flat surface

You will need:
- a bowl of water
– clear nail polish
- small pieces of black paper.
1. Add 1-2 drops of clear nail polish to a bowl of water. See how the varnish disperses through the water.
2. Quickly (after 10 seconds) dip a piece of black paper into the bowl. Take it out and let it dry on a paper towel.

3. After the paper has dried (it happens quickly) start turning the paper and look at the rainbow that is displayed on it.
* To better see the rainbow on paper, look at it under the sun's rays.


4. Experiments at home: a rain cloud in a jar

When small drops of water accumulate in a cloud, they become heavier and heavier. As a result, they will reach such a weight that they can no longer remain in the air and will begin to fall to the ground - this is how rain appears.
This phenomenon can be shown to children with simple materials.
You will need:
- shaving foam
- food coloring.
1. Fill the jar with water.
2. Apply shaving foam on top - it will be a cloud.
3. Have the child start dripping the food coloring onto the “cloud” until it starts to “rain” – drops of food coloring start to fall to the bottom of the jar.
During the experiment, explain this phenomenon to the child.

You will need:
– warm water
- sunflower oil
- 4 food colorings
1. Fill the jar 3/4 full with warm water.

2. Take a bowl and mix 3-4 tablespoons of oil and a few drops of food coloring in it. In this example, 1 drop of each of the 4 dyes was used - red, yellow, blue and green.

3. Stir the dyes and oil with a fork.

4. Carefully pour the mixture into a jar of warm water.

5. Watch what happens - food coloring will slowly sink through the oil into the water, after which each drop will begin to disperse and mix with other drops.
* Food coloring dissolves in water, but not in oil, because. The density of oil is less than water (which is why it “floats” on water). A drop of dye is heavier than oil, so it will begin to sink until it reaches the water, where it begins to disperse and look like a small firework.
6. Interesting experiences: in a bowl in which colors merge
You will need:
- a paper-cut wheel painted in the colors of the rainbow
- rubber band or thick thread
– cardboard
- glue stick
- scissors
- skewer or screwdriver (to make holes in the paper wheel).

1. Choose and print the two templates you want to use.

2. Take a piece of cardboard and use a glue stick to glue one template to the cardboard.
3. Cut out the glued circle from the cardboard.
4. Glue the second template to the back of the cardboard circle.
5. Use a skewer or screwdriver to make two holes in the circle.

6. Pass the thread through the holes and tie the ends into a knot.
Now you can spin your spinning top and watch how the colors merge on the circles.


7. Experiments for children at home: jellyfish in a jar

You will need:
- a small transparent plastic bag
- transparent plastic bottle
- food coloring
- scissors.

1. Lay the plastic bag on a flat surface and smooth it out.
2. Cut off the bottom and handles of the bag.
3. Cut the bag lengthwise on the right and left so that you have two sheets of polyethylene. You will need one sheet.
4. Find the center of the plastic sheet and fold it like a ball to make a jellyfish head. Tie the thread around the “neck” of the jellyfish, but not too tight - you need to leave a small hole through which to pour water into the head of the jellyfish.
5. There is a head, now let's move on to the tentacles. Make cuts in the sheet - from the bottom to the head. You need about 8-10 tentacles.
6. Cut each tentacle into 3-4 smaller pieces.

7. Pour some water into the jellyfish's head, leaving room for air so the jellyfish can "float" in the bottle.
8. Fill the bottle with water and put your jellyfish in it.

9. Drop a couple of drops of blue or green food coloring.
* Close the lid tightly so that water does not spill out.
* Have the children turn the bottle over and watch the jellyfish swim in it.
8. Chemical experiments: magic crystals in a glass

You will need:
- glass cup or bowl
- plastic bowl
- 1 cup Epsom salt (magnesium sulfate) - used in bath salts
- 1 cup hot water
- food coloring.
1. Pour Epsom salt into a bowl and add hot water. You can add a couple of drops of food coloring to the bowl.
2. Stir the contents of the bowl for 1-2 minutes. Most of the salt granules should dissolve.

3. Pour the solution into a glass or glass and place it in the freezer for 10-15 minutes. Don't worry, the solution isn't hot enough to crack the glass.
2


