Pancho cake is the main example of Moscow confectionery. Cake “Pancho” with pineapples, step-by-step recipe with photos Classic recipe for Pancho cake
A big sweet greeting to all those with a sweet tooth. Today I want to talk about such a culinary masterpiece as pancho cake, which has long become a leader among original desserts. The unforgettable taste of a delicate sponge cake with pineapples makes this dessert truly a masterpiece.
Pancho cake has one feature that makes it an almost universal creation. The cakes can be dark or light in color, depending on whether the recipe contains cocoa powder and in what quantity. Most often, both types of biscuits are prepared.
Classic pancho cake recipe with pineapples
If you take pineapples for your future treat, then this is a classic pancho cake, but you can diversify the taste by using cherries, strawberries, kiwi or other juicy berries and fruits for the filling.
To make pancho cake with cherries, you need to remove the seeds from the berries, being careful not to damage the pulp too much. You will need quite a lot of cherries so as not to disturb the very moist texture of the sponge cake for which it is famous.
For those who don’t have time or don’t want to bother with an intricate recipe, I suggest trying to make a curly pancho cake. This option cooks quickly and tastes just as good as the classic one. In addition, it can be a way out of a situation when guests are already on the doorstep.
For little housewives there is also a variety of dessert preparation. Little girls can make pancho cake without an oven to surprise their parents. This option is not complicated, does not require baking in the oven, so it can be made very quickly. You can also quickly make pancho cake from ready-made cake layers.
The classic is sour cream pancho cake, but if desired, you can make it with condensed milk, butter cream or white icing. A very tasty treat is made with banana curd cream flavored with lemon juice. Both pineapples and other fruits or berries with a characteristic sourness are suitable here, but of course, the main ingredient is bananas.
I want to offer a step-by-step recipe with a photo of pancho cake with pineapples, and also talk about other options for this magnificent dessert. All of them are not difficult to perform. At home, this treat can be baked, made in a slow cooker, or without heat treatment, as you like.
This pancho cake with sour cream, the recipe for which I will give a little later. And if you replace sour cream with condensed milk, you get a curly pancho recipe. But still, at home, baking according to traditional recipes turns out tastier.
Grocery list
So, what do you need to make the classic Don Pancho cake?
- Flour - 2 cups
- Pineapple (canned) - 1 can
- Eggs - 6 pcs
- Sugar - 3 cups
- Sour cream - 500 g
- Soda - 1/2 tsp. (without slide)
- Cocoa powder - 4 tbsp. l.
- Lemon juice - 2-3 tsp.
- Walnuts - 1 cup
- Dark chocolate - half a standard bar
Despite the composition, the calorie content of pancho cake is average, only 250 Kcal per 100 grams, so it is suitable even for those on a non-strict diet.
Step by step recipe
So, a step-by-step recipe showing in detail how to bake pancho cake.
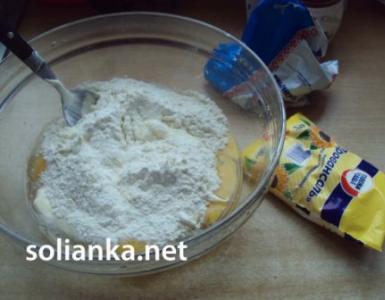
- The first step is to make sour cream. Using a mixer, beat sour cream with sugar (1 cup). You can add a little lemon juice for taste. The finished cream needs to be put in the refrigerator for a while so that it becomes a little thicker.
- We will make a sponge cake from eggs, cocoa, flour and sugar. In the first cup, beat the sugar and egg whites first. We do this gradually, adding sugar little by little so that the crystals dissolve completely.
- Add the yolks to the already risen foam. We continue to beat.
- In a second cup, mix cocoa powder, flour and baking soda. You can sift the mixture so that there are no lumps and it is saturated with oxygen.
- Carefully mix the contents of both cups into one mass. You need to stir slowly, without sudden movements. This way the airiness of the future biscuit will not be affected.
- Pour the dough into the prepared baking dish and place it in the oven for 25-30 minutes. The temperature is not higher than 180 degrees.
- Take out the finished cake and cut it into small cubes. Sometimes two-thirds of the cake is cut off, leaving a thin continuous cake as a base. But it’s more interesting to make a cake from pieces of biscuit, without a base.
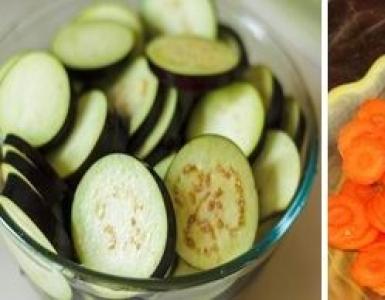
- If necessary, cut the pineapples into small slices. We also grind the walnuts, but not into flour, but so that there are small pieces.
- Now it's time to start assembling the pyramid. Take the cream out of the refrigerator, let it warm up a little at room temperature, then start laying out the layers.
- Dip the biscuit cubes into the cream and place them on a plate. Then randomly, but not in a continuous layer, lay the pineapples on top and sprinkle them with nuts.
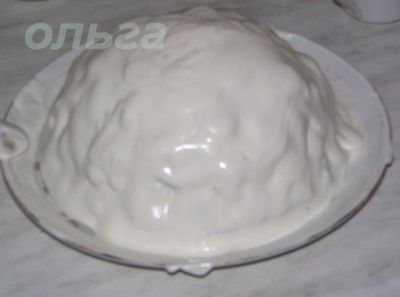
- Repeating laying out layers, we give the shape of a slide. Fill the piece with the remaining cream.
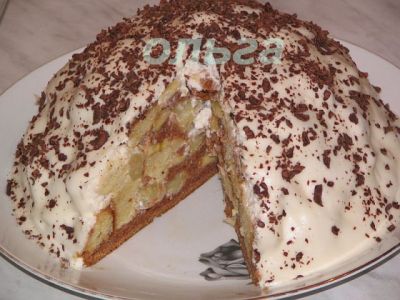
- Melt the chocolate in a water bath and pour it over our creation, creating intricate patterns or simply artistic drips.
- Ideally, the dessert should sit for several hours before serving, but this is not necessary.
I mastered my first lazy pancho cake during my school years. Then my masterpiece created a sensation among my classmates, and for some reason everyone decided that it was extremely difficult to prepare. Actually this is not true. I just used a pre-made sponge cake from the store and added all the other ingredients to it. But there are many more interesting recipes for this dessert.
Pancho cake with condensed milk
An option that many will like.

For the test you need to take:
- 0.5 cans of pineapples
- 1.5 cups flour,
- 1 tbsp. spoon of sugar,
- 0.5 cans of condensed milk,
- 1 glass of sour cream,
- 2 eggs,
- 2 teaspoons of soda (quenched),
- 0.5 cups walnuts
- 2 tbsp. spoons of cocoa
- Cream: 600g. sour cream, 6 tbsp. spoons of sugar
- Glaze: 50g. butter, half a bar of chocolate.
The algorithm for creating a culinary masterpiece is standard:
- Let's make a sponge cake. Beat eggs with sugar, add flour, soda, condensed milk, sour cream and flour.
- We bake two not very thick cakes and cut them into cubes.
- We randomly lay out the pile, alternating pineapples with biscuit and nuts.
- Pour sour cream or condensed milk on top (depending on what you like)
- Decorate the top with chocolate and butter glaze.
It will be interesting if you take chocolate with nuts, raisins or cookies.
Pancho cake without baking
This cake is on my list of favorites. You don’t need to prepare it for a long time, you just need to buy ready-made sponge cakes, and then, following the classic assembly scheme, create your own unique masterpiece.
Pancho cake in a slow cooker
If you have a multicooker at home languishing from idleness, then you can bake dessert in it. It will take about 2.5 hours to prepare, but practically no effort is required. You can make it with any cream, but pancho cake will still taste better with sour cream or butter.

So, the cooking process is as follows:
We measure everything in multi-cups, that is, a container for a multicooker.
- Take one cup each of sour cream, flour and sugar. Add 1 egg and 05 tsp. baking soda, after whisking and mixing everything, put it into the multicooker bowl.
- Multicooker mode – “Baking”, 60 minutes.
- We repeat the procedure of kneading the biscuit again, but this time we take a little less flour and add cocoa powder. Either way, you should end up with one multi-cup.
- Bake again for 60 minutes in the “Baking” mode.
- While the cakes are preparing, make the sour cream.
- Mix 250 grams of sour cream with 1 multi-cup of sugar and add, if desired, half a can of condensed milk.
- We cut the finished cakes into pieces of any shape and begin to assemble the dessert.
- We lay everything out in random order, soaking each tier with cream.
- You can add pineapples, strawberries, peaches, mangoes and other fruits and berries to the biscuit.
- Pour the remaining cream on top and decorate with chocolate melted in a water bath, simply pouring a thin stream from a cup.
Here is a cake in a slow cooker, Sancho-Pancho, as some call it.
Pancho cake with bananas

An interesting option for preparing this dessert with bananas. You can cut the fruit into pieces to make a layer of the cake, or you can make a cream based on bananas and cottage cheese, and use pineapples from the classic recipe as a filling. Banana-curd mass, flavored with lemon or lime sourness, will be the highlight of the dessert, giving it an even brighter taste and delicate texture.
Pancho cake with kefir

There are times when guests appear on the doorstep unexpectedly. Good housewives always have several different preparations in stock for such occasions. There will probably be ready-made sponge cakes. To quickly make a treat for unexpected guests, you can place pieces of sponge cake dipped in kefir on a dish, add slices of fruit or berries, and pour sweet yogurt over them. You can sprinkle chocolate chips or melted chocolate on top if time allows.
Pancho cake with strawberries

A very tasty and original masterpiece is made with strawberries. It is best to take fresh berries, as frozen ones often lose their taste and aroma. The best cream for this option would be butter.
Pancho cake with pineapples and bananas
The harmonious combination of pineapples and bananas became the basis of another original pancho cake recipe. Fruits cut into small slices go well with biscuit cubes, nuts, sour cream or curd cream. Sour cream can be replaced with natural yogurt, adding a little lemon juice and sugar.
Sancho pancho cake cream recipe
The classic cream for pancho cake is sour cream whipped with sugar. To achieve a piquant sourness in the cream, you need to use thicker sour cream.
The proportions of the products are as follows:
- 500 gr. sour cream
- 3-4 cups sugar
Everything needs to be mixed using a mixer. The speed should be set low so that the cream does not turn into a liquid substance. The finished cream needs to be put in the refrigerator for a short time, where it will acquire the required consistency, and then, before use, it needs to be kept on the table to bring it to room temperature.
How to beautifully decorate and serve Sancho Pancho cake
The familiar design in the form of a snow-white slide with chocolate stains can be improved. If the main color of the cake is white, then you can decorate the finished dessert with chocolate icing, covering it with a pyramid already poured with cream, and making a pattern on top with white icing. The dessert is served simply by cutting it into slices.
You can also decorate with chopped walnuts and fruit slices included in the recipe. If you use curd cream as an impregnation, it makes excellent voluminous decorations, such as borders or flowers. It all depends on your imagination and the main ingredients specified in the recipe.
Sour cream cake “Pancho” can be safely put on a par with such famous cakes as “Prague” and “Bird’s Milk”. Delicate sponge cakes soaked in delicious sour cream and topped with aromatic chocolate glaze – that’s what makes up the wonderful taste of this culinary masterpiece.
By the way, “Pancho” has many other names, including “Vanka” and “Curly Pinscher”. Perhaps you know him by these names! Many inexperienced cooks confuse “Pancho” with the “Count Ruins” cake. But, despite their external similarity, these two representatives of the sweet world have completely different compositions, and, accordingly, differ significantly in taste.
Skilled confectioners working at the Fili-Baker company keep the recipe for their famous creation a secret. But if you try really hard, you can find analogues of “Pancho”. And the reason lies not in the fact that some particularly inquisitive housewife managed to reveal the secret recipe, far from it! The thing is that the recipe for this cake was found completely by accident during a “survey” of grandmothers, aunties and neighbors for interesting recipes. Representatives of the company liked one of the recorded recipes so much that they decided to start producing this cake on the Russian market and immediately gave it the name that is now known to everyone.
Cake "Pancho" - preparation of products
Let’s lift the secret curtain and list those products without which the Pancho cake simply would not work. So, to prepare this extraordinary delicacy, you need fresh eggs, cocoa powder, good flour sifted through a sieve, soda and lemon juice. Don’t forget to stock up on fruits; pineapples are especially good at Pancho, but any other will do just fine. It is better to take sour cream for the cake with fat content, at least 35%, otherwise the product will lose in taste. You will also need walnuts and dark chocolate.
As for the cream, it is the most common, but no less tasty - sour cream. Its preparation does not take much time, and anyone can whip sour cream and sugar! As you can see, everything is simple!
“Pancho” managed to find his admirers and become truly popular. Housewives all over the country are trying to guess its riddle and come up with their own versions of the delicacy. This is how a great variety of different recipes arose, which we will introduce you to.
Pancho Cake - the best recipes
Recipe 1: Classic Pancho Cake
The original recipe for “Pancho” is somewhat similar to another dessert called “Pincher”. Preparation, as a rule, does not take too much effort and time. Even a novice pastry chef can easily prepare a cake. And what can we say about our housewives, who, so to speak, have already “get their hands on it” and cope with culinary matters no worse than experienced chefs! Therefore, stock up on the appropriate ingredients and go for it - you will succeed!
Ingredients:
- two eggs
- half a can of condensed milk
- 1.5 stack. flour
- a glass of sour cream
- two tbsp. lie cocoa
- a glass of sugar (without a slide)
- 1 tsp. baking powder
To soak the cakes:
- 6 tablespoons. Sahara
- half a cup of shelled nuts (walnuts)
- canned pineapple
— 800 gr. full fat sour cream
For the glaze:
- four table. l. sour cream
— 30-40 gr. butter
- sugar (preferably powder or sand)
Cooking method:
1. Knead the dough. Beat eggs with sugar, then add condensed milk, cocoa and sour cream to the egg mixture. Beat a little more. Add the flour mixed with baking powder and fold in the dough - carefully so that the mixture does not settle. Grease a baking sheet lined with parchment, lay out the dough and put it in the oven. Bake until done, checking the crust periodically. We take it out and cool it.
2. While the cake is baking, make the impregnation. Beat heavy sour cream and sugar. When the cake has cooled to room temperature, break it into square pieces the size of a matchbox. Dip the pieces in the impregnation and place them in a mound (cone) on a large flat dish. In between, sprinkle the cake with chopped nuts and pre-cut canned pineapples. After such manipulations, we put “Pancho” in the refrigerator and wait for it to freeze.
3. Prepare the glaze. While the cake hardens, let's make the glaze. Place the sour cream on the fire and immediately add sugar. Keep the mixture on the stove until it boils, remembering to stir. Then add oil and cook for another 2-4 minutes. Remove the glaze from the stove and cool until warm. You can also use melted dark or white chocolate instead of frosting. Pour glaze over frozen cake. Put it in the refrigerator again until it hardens.
Recipe 2: Sancho Pancho Cake
For those who have not yet decided on the choice of dessert for the next holiday, we suggest you bake the “Sancho Pancho” cake. Its juicy, excellent taste will certainly please all guests. It's all about making just one crust, so you'll have plenty left over for other holiday plans.
Ingredients:
- six eggs
- two glasses of sugar
- 6 table. spoons of sugar for glaze
- a little soda (on the tip of a spoon)
- 8-12 tablespoons (tablespoons) of cocoa
– lemon juice – half a teaspoon
- two stacks. flour
- 3 ripe bananas
- a glass of roasted hazelnuts
- 700 ml thick fat sour cream
- 4 table. spoonful of milk
- melted butter 100 g.
Cooking method:
1. Separate the whites from the yolk mass, beat the whites with a mixer, gradually introducing a glass of sugar and yolks into them. Put the mixer aside and arm yourself with a broom. Gently stir in cocoa mixture (4-5 spoons), soda, quenched with lemon juice, and, accordingly, flour. Stir until smooth. Line a deep round pan with baking paper, grease it and pour in the dough. Bake until done.
2. The result is an airy and light cake. Leave it to cool, cutting it crosswise into two parts (one part should be half the size of the other). Let's make the cream: to do this, beat the sour cream with sugar until the crystals disintegrate.
3. Take out a flat plate and begin to form the cake. Place the first cake layer (which is smaller) on a dish, fill it with cream and arrange the bananas cut into slices. Next stage: cut the second cake into even squares, and dip each piece in cream. Place the squares on the whole crust, forming a regular mound and periodically sprinkling with nuts and banana slices (or any fruit, you can use a fruit and berry mix).
4. Refrigerate the dessert for half an hour. And the finishing touch is the glaze, which we pour over the cake after it hardens. It is prepared as follows: mix milk with cocoa and sugar, put it on the stove and wait for the sugar to dissolve. Next, add melted (softened) butter to the glaze and remove from heat. Wait for the oil to completely dissolve, mix and pour over the top of the cake. Place the treat in the cold again until it hardens.
Recipe 3: Pancho cake with cherries and dried fruits
“Pancho” with cherries will become a real “lifeline” for those housewives who do not have the opportunity to spend a lot of time in the kitchen. This cake is prepared in just 1-1.5 hours. Plus, it doesn't require any special ingredients and the results are simply amazing!
Ingredients:
- sugar 2 cups
- 1 stack. sour cream
- two eggs
- slaked soda
- a glass of flour
- cocoa (powder)
- vanillin
- dried apricots, raisins
- for cream: sour cream and sugar in a 2:1 ratio (for example, 2 cups of sour cream and a glass of sugar)
- cherries (fresh or frozen) 200 gr.
- 100 gr. raisins and dried apricots (50 to 50)
- shelled walnuts
- chocolate bar for decoration
Cooking method:
1. Pour sugar (2 cups) into a bowl, add eggs, beat until fluffy. Add sour cream, a spoonful of slaked soda and a little vanillin (to taste) to the mixture. Stir with a spatula and divide the mixture into 2 equal parts. To the first part add a glass of flour, chopped dried apricots and raisins. Knead the dough (it should not be too thick).
2. We will use the second part to prepare the dark cake. To do this, add flour (1 cup) and 4 tablespoons of cocoa powder to the mixture. Forming the dough. Bake each cake for 20-30 minutes at 200 degrees.
3. Prepare the cream: to do this, beat the sour cream with a mixer, gradually adding sugar to it. While the cakes are cooling, prepare cherries (remove pits), raisins and dried apricots (cut). Place the berries in a colander and allow excess moisture to drain.
4. Cut the cooled white cake into squares (about the size of a matchbox) and dip the pieces into the cream. We put the dark cake on a dish, and on top we begin to form a mound of pieces of white cake, periodically sprinkling nuts, cherries and dried fruits between the layers. Decorate the top of the cake with nuts and dark chocolate shavings. We put “Pancho” in the cold for several hours (3-15), after which we take it out and enjoy the magical sweet and sour taste. Bon appetit!
Pancho cake - a note for the hostess
— For baking cakes, the best shape is from 20 to 25 cm. This is a standard size that will allow the cakes to bake evenly;
— All ingredients must be at the same room temperature before preparing the cakes and cream, so we strongly recommend that you remove everything from the refrigerator in advance and allow the products to reach the appropriate temperature;
— To make the cake more fluffy and tender: firstly, be sure to sift the flour, and secondly, when baking the cakes, do not rush to remove them from the oven, much less from the mold. Let them brew a little, cool, and only then, holding the mold over steam (so that the cake comes off better and does not crumble), release it;
— The readiness of the cakes is checked in the classic way: with a match or a toothpick. If it is dry and clean, then the cake is ready;
— To improve the taste properties of future cakes, beat the whites separately from all the ingredients - long and thoroughly, and only then you can gradually add (pour in) other ingredients.
Pancho Cake is a recipe for sponge cake with special sour cream. Despite the fact that Pancho cake is a patented and secret recipe, many pastry chefs know approximately how to prepare it.
Pancho cake contains eggs, sour cream, flour, baking soda, lemon juice, cocoa, walnuts, chocolate, and fruit. The recipe for Pancho cake with pineapples is popular. But they also make Pancho cake with cherries and bananas...
- sour cream (two glasses for cakes + 500-600 grams for cream) - 1 kg;
- eggs - 2 pcs;
- sugar (2 cups for dough + 1 cup for cream) - 3 cups;
- flour - 2 cups;
- soda - 1 tsp;
- pineapple (diced) - 1 jar;
- walnut - 50 g;
- vanillin (optional in cream);
- cocoa - 2 tbsp;
- vegetable oil (for greasing molds);
|
|
First we make the dough. Beat sour cream, sugar, eggs. |
|
|
Gradually add flour and a teaspoon of soda with a whisk. |
|
|
We get this dough. |
|
|
Place half of the dough into a pan lined with parchment and greased. |
|
|
Add cocoa to the second half of the dough. |
|
|
Mix and get this brown dough. |
|
|
We send it to the form, as in the first option. |
|
|
Here is the finished white cake. |
|
|
Here is the finished chocolate cake. |
|
|
Here they are, both of them, my handsome men)))… |
|
|
|
|
|
We take a plate with a smaller diameter (I just had a mold of 26 cm, if you have a smaller one, this procedure is excluded...), cut the cake along the plate. |
|
|
This is the basis. |
|
|
Tear or cut all remaining biscuits into small pieces. |
|
|
Whip the sour cream with sugar by hand for about 7 minutes until it begins to thicken, add vanilla if desired... |
|
|
These stains should remain - the cream is ready. |
|
|
Grease the base with cream, lay out pieces of biscuits, a little pineapple and walnuts. |
|
|
Cover with cream. |
|
|
Next layer. |
|
|
Again cream, biscuits, nuts, pineapples, etc. (with our hands we help the cake to organize itself into a cone shape). |
|
|
We do this until all the ingredients are gone - I like to put a white sponge cake on the top layer, because the dark one tends to show through through the final layer of sour cream... |
|
|
Cover with cream (leave a couple of spoons of cream for finishing) - put the cake in the refrigerator along with the left cream, let it sit for an hour. |
|
|
Then you need to properly “walk” the cream over the “untinted areas”... |
|
|
|
|
|
|
|
|
For example, I put the mass into a bag, pierce a hole and... Pancho should brew for 12 hours! |
|
|
Carefully transfer the finished cake to a clean dish. |
|
|
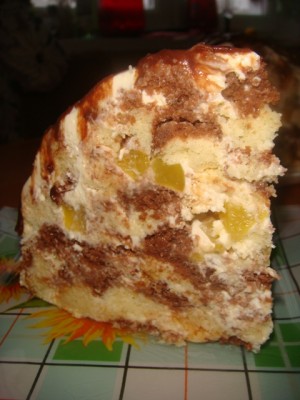
Here's a cross-section of our handsome guy. |
|
|
Here's a piece for you... bon appetit! |


Recipe 2: Pancho Cake with Cherries and Nuts

Delicious delicate cake with sour cream, cherries and nuts.
Dough:
- 6 eggs
- 250 g sugar
- 200 g flour
- 4 tablespoons without a slide of cocoa powder
- 1 tsp baking powder
Cream:
- 400 g sour cream 20%
- 200 g cream 33%-38%
- 150 g sugar
Also:
- 200 g frozen cherries
- 80 g walnuts
- 1 tbsp. powdered sugar
Glaze-decoration:
- 50 g dark chocolate
- 30 g butter

Pancho cake consists of sponge cake with the addition of cocoa, delicate sour cream, sour cherries and nuts. This cake is folded into a slide, and the top is completely covered with cream and additionally decorated with glaze.
We are preparing a biscuit.
Beat the eggs well for at least 5 minutes until fluffy.
Continuing to beat, gradually add sugar at the end.

Sift flour, cocoa, baking powder together.
Add the dry mixture to the beaten eggs in parts, and gently mix with a spoon from bottom to top.

Pour the dough into a greased mold (I used a 22 cm diameter mold).
Place in an oven preheated to 180 degrees. Bake for approximately 30-35 minutes.
Check with a toothpick for doneness.

Cool the finished biscuit completely on a wire rack for 1-2 hours.

Defrost the cherries, drain the liquid (save the liquid).
Sprinkle the cherries with powdered sugar.

Cut the nuts into large pieces.

Preparing the cream.
Whip the cream until thick.

Add sugar, sour cream, beat until smooth and sugar is completely dissolved.

Cut the biscuit into 2 unequal parts (the lower part should be approximately 1-1.5 cm high).

Cut the top part of the biscuit into cubes or pieces with a side of 2-3 cm.

Assembling the cake.
Place the bottom of the sponge cake on a large plate.
Soak in liquid drained from defrosted cherries (about 6-7 tbsp).
Grease the cake well with cream.

Place ½ part of the cherries and ½ part of the nuts on the cream.

Dip the biscuit pieces liberally on all sides into the cream and place them in one layer on the cake.
The outermost pieces should lie slightly at an angle so that a slide is formed.
We don’t save cream; when forming the cake, about 2/3 of the cream should be used.

Top with half of the remaining cherries and half of the remaining nuts.

Place another layer of sponge cake pieces dipped in cream on top, but with a smaller diameter.

Top with remaining cherries and remaining nuts.

Place the last tier of sponge cake pieces dipped in cream.

Coat the cake with the remaining cream on all sides using a spoon.

Like that.
If the cream drips onto the plate, scoop it up with a spoon and send it upstairs.

Prepare the glaze for decoration.
Break the chocolate into pieces, put it in a small saucepan, and add butter there.
Make a water bath - place the container with chocolate in a pan of water (the water should not touch the bottom of the pan).
Melt chocolate and butter, stir until smooth.

Place the glaze in a pastry syringe (if you don’t have a syringe, put it in a tight bag, tie it, and cut off a small corner).
Make a pattern on the cake (simply pour stripes of frosting onto the cake, going over the top each time).
Alternatively, you can not melt the chocolate, but simply grate it on a fine grater and sprinkle on the cake.
Place the cake in the refrigerator for 3-4 hours until completely soaked.
Recipe 3: Pancho cake with pineapples and bananas

For the cake you need to bake two cake layers - white and dark.
For white crust, mix
- 1 glass of sour cream
- 1 egg
- 1 cup of sugar
- 1 cup flour
- half a teaspoon of soda.
For a dark crust, mix
- 1 glass of sour cream
- 1 egg
- 1 cup of sugar
- 1 cup flour
- half a teaspoon of soda + 2 tablespoons of cocoa.
Bake 
Cut one of the cake layers (white or dark) horizontally in half (cut with a knife and then with a thread), leave the bottom for the base of the cake, 
and break the top and the other whole cake into pieces, slightly smaller than a walnut.

For the cream, whip
- 500-600 g sour cream (at least 20 percent)
- 1 cup of sugar
I beat with a whisk by hand, because in my food processor the sour cream gets hot and does not thicken. Whip with a whisk easily and quickly enough; the sour cream should stick slightly to the whisk. Well, 5-7 minutes, no more.
Pour cream over the broken pieces and mix. Decorate the cake in layers - pieces of dough - canned pineapples (1 can) - slices of 2 bananas, etc. in several layers. Lightly coat each layer with cream. Lay in a slide,

pressing slightly with your hands under the cone.

Pour cream over the finished slide
The sour cream will drip slightly onto the dish. It's OK. Collect it with a spoon and place it on the top of the cake, gradually it will all be absorbed into the cake. Sprinkle the finished cake with chocolate chips or crumbs.
Let it soak for 8 hours, and ideally until the next day.
And this is what the cake looks like in cross section
MY ANSWERS TO YOUR QUESTIONS
Mold size
It is more convenient to take a 22 cm mold. If your mold is larger, then I advise you to trim off the excess using some kind of plate or lid.
“Well, that's how I do it. I take a bowl, pour half a glass of sugar into it (I don’t like it too sweet), break 1 egg and grind it into a fluffy mass with a spoon. Not for long, no more than a minute. I take 200 grams of sour cream in a plastic cup or simply put an incomplete regular 250 gram glass. I immediately put some of the sour cream into the sugar-egg mixture, and put half a teaspoon of soda into the remaining sour cream. After stirring the soda in this sour cream, add it to the dough. I mix everything well. I pour 1 cup of flour there. Again I mix everything thoroughly until smooth. All. If the mold is silicone, then I do not grease it, but if it is regular, then I lightly grease it with butter or margarine. Bottom and walls. I pour the dough into the mold and put it in the oven. If the oven is preheated, then bake for 15-20 minutes. If it's cold, then more. The temperature is average, not hot. As soon as the pie smells and starts to brown, you can reduce the heat even further. Bake until dark beige. Insert a wooden toothpick into the middle of the cake, it should be dry. So the cake is ready. Remove from oven. Let cool slightly and place on a dish or plate. As you can see, I don’t stand on ceremony with this test. I don’t sow flour, I don’t beat anything in a mixer, I can put it in a cold oven and the like. I can increase the amount of sour cream to a full glass and flour to a glass and a quarter, the fat content and thickness of sour cream is any. Then the taste and density of the dough differs slightly. But it always turns out great.”
About assembling the cake
mayday82 wrote:
How do you cook it? What do you cover with?
I collect it on a large flat dish. So that the edges are free when the cream drips and needs to be picked up. I cover it with a large saucepan, but this is not necessary, you just need to make sure that there is nothing so unwanted in the refrigerator on the shelf nearby Smile Before serving, I ALWAYS take it out of the refrigerator in advance, sprinkle it with grated chocolate and transfer it (carefully!!! Wink) to a large flat plate plate. If you do not transfer it, be sure to thoroughly wipe the edges of the dish or plate to remove dried cream and chocolate crumbs with a paper towel. Somehow like this!
Favorite review
This is a wonderful cake and an absolutely self-sufficient recipe. If you strictly follow it, don’t change anything and don’t add “gags”, then the result will exceed all expectations.
Recipe 4. Pancho cake with condensed milk

For the test:
- 4 eggs
- 2 b. condensed milk
- 2st. flour
- 2 tbsp. cocoa
- 2 tsp. baking powder
For cream:
- 900gr. sour cream (20-30%)
- condensed milk (to taste!!)
- canned peaches
- and pineapples.
* The cakes are made with condensed milk, but they are not at all sweet. I always knead the dough separately for light and dark cakes, but you can prepare the dough and divide it into 2 parts, adding cocoa to one.
For light crust: beat 2 eggs until fluffy (5 minutes), then add a can of condensed milk, beat well. Add sifted flour and baking powder. Place the dough in the mold and bake for ~25 minutes at 180C. For dark crust everything is the same, only with the addition of cocoa.
Cool the finished cakes completely.
Preparing the cream: add condensed milk to the sour cream to taste (I don’t whip the sour cream, but just stir until smooth, so it remains thick), put the cream in the refrigerator while the cakes cool.
Assembling the cake: I alternately place small pieces of dark and light cake on a plate (I don’t chop it in advance, it’s all in the process), alternating with fruit and spreading with sour cream. Occasionally I lightly squeeze the cake with my hands. I cover with the remaining sour cream and chocolate glaze. It is advisable to let the cake soak for 3-5 hours.
Recipes for making cakes at home with photos
Pancho cake classic recipe with photos step by step
8-10
1 hour 30 minutes
228 kcal
4.67 /5 (3 )
Like many women who have to manage cooking, arranging their home and raising children, I have a catastrophic lack of time for all these activities. But I also want it to remain for a hobby and for my beloved, and so that my husband is not deprived of my attention. Therefore, you always have to sacrifice something. I have chosen the best way for myself - I try to cook delicious dishes, but using quick and simple recipes.
“Pancho” with pineapples is prepared according to my recipe quickly, relatively simply and from available products. Usually, in the instructions for its preparation, cooks mark it as “medium difficulty.” It will be easy for those housewives who have become skilled at quickly baking a regular sponge cake. Preparing the cream is not difficult even for a schoolchild - after all, you just need to combine sour cream with sugar.
And the dessert looks simply mesmerizing. However, the appetizing appearance is in complete harmony with its taste - delicate, refined. Judge for yourself - below I provide a detailed description of the Sancho Pancho cake and a recipe with photos.
- Kitchen appliances and utensils: two containers for kneading dough, a container for preparing cream, a mixer or whisk, a baking dish, an oven.
Those who are very concerned about their figure should be warned: you should not get carried away with eating “Pancho” - the cake is very high in calories. Just look at the ingredients included in the composition.
Required Products
Features of product selection
To prepare the cream for the Pancho cake, It is better to choose full-fat sour cream - the best option would be 30% fat, but you can take 20%. For decoration, a fattier product is suitable - 30% or higher.
The recipe for the classic “Pancho” includes walnuts, but I prefer to cook it with almonds - this way its taste becomes more refined and original.
The “Pancho” cake is also known under the names “Curly Vanka”, “Don Pancho”, “Curly Pinscher”, “Sancho Pancho”, “Curly Boy”.
The history of Sancho Pancho cake
 While you are thinking about what utensils to use for preparing the cake and what additional products you need to buy, I want to tell you an interesting story related to the invention of the recipe for Sancho Pancho cake with sour cream.
Why the dessert is named “Sancho Pancho”, alas, I don’t know, and I couldn’t find any information about it. Here's another name for it: "Curly Pinscher"— the cake was named after long-time English chefs who once had a successful confectionery business.
Probably, the technology for making the Pancho cake, its composition, as well as the original design were invented by one of the representatives of the famous Pincher family. Since then, it began to travel from kitchen to kitchen in many countries and became very popular in the 90s of the last century in the territory of the former Soviet Union. I remember a similar cake, only with cherries and called “Vanka Curly”, was traditionally prepared by my aunt for every birthday. And I, as a child, simply loved to smear the chocolate from the top with my finger.
How to make Sancho Pancho at home
To simplify the process of baking Pancho cake for you, I provide a classic recipe with photos and a description of how to make it step by step.
1. Step 1 ingredients:
- eggs – 5 pieces;
- sugar – 1.5 cups;
- salt – 0.5 teaspoon.
Separate the yolks from the whites. Pour salt into the whites and beat with a mixer until a fluffy mass forms. 
Pour sugar into the yolks and beat with a mixer until the volume of the mass increases and white foam appears on its surface. 
Separate ¼ of the whipped whites and pour it into the yolks. Mix everything thoroughly.
2. Step 2 ingredients:
- flour – 1.5 cups;
- baking powder - 1 teaspoon;
- lemon juice – 1 teaspoon.
 Pour baking powder into flour and mix. Then very slowly, with constant stirring, add the flour into the egg mass. Add lemon juice and the rest of the whipped egg white mixture. When pouring in the whites, you need to carefully stir them in with a spatula, pointing it from top to bottom.
3. Step 3 Ingredients:
- cocoa powder – 4 tbsp. spoons.
Divide the resulting dough into two parts (one of them should be slightly larger) and place them in different bowls. Pour cocoa into the larger portion and stir until the chocolate color is uniform. 
4. Preheat the oven to 180 degrees. Grease the baking dish with butter. Then pour one part of the dough (any part) into it and send it to bake. Then we do the same manipulations with the other part of the dough. If you have two baking pans, you can bake two biscuits at the same time. Baking time will be 20-25 minutes. 
Recipe for cream for Sancho Pancho cake
5. Step 5 Ingredients:
- sour cream – 800 g;
- sugar – 1 glass.
Making sour cream for Pancho couldn’t be easier. First you need to beat the sour cream and sugar well. Take a mixer and beat the mixture until it becomes light, fluffy and holds its shape. You can pour two teaspoons of lemon juice into the mixture. 
6. After preparing the sponge cakes and cream for the Pancho cake at home, we begin its assembly and decoration. To begin, cut the cooled chocolate cake lengthwise. The cake should remain no thinner than 1.5-2 cm at the bottom - this will be the base of the dessert.
7. Light-colored sponge cake and cut the top cut part of the chocolate cake into 2-3 cm cubes. 
8. Step 8 Ingredients:
- pineapples – 300 g;
- almonds – 1 cup.
Cut the pineapples into small pieces, crush the almonds. Lubricate the chocolate cake base generously with cream. Sprinkle pineapples and almonds on it.
9. The next layer will be made from cut pieces of biscuits. We pour pieces of different colors in a chaotic order. Fill with cream and sprinkle with pineapples and almonds. Each layer should be smaller in diameter so that the cake takes the shape of a dome or mound. 
10. After laying all the layers, generously grease the cake on all sides with cream. 
11. Step 11 Ingredients:
- dark chocolate – 75 g.
Now you can start decorating. Melt the chocolate in a water bath or in the microwave and pour it over the cake, starting from the top. 
Many people still remember those times when it was not possible to buy a delicious and tender cake. To welcome guests with dignity, the hostesses made every effort and baked homemade sweet pies. Each had its own signature recipe, sometimes it was kept a great secret and passed down only by inheritance.
Today the situation has changed, and the store shelves are full of all sorts of goodies, but the habit of pampering family and guests with home-made cakes remains.
Pancho cake is one of those desserts that you can bake at home. Therefore, I suggest, without delay, to familiarize yourself with all the intricacies of its preparation.
History of origin
The cake recipe was developed at a Moscow confectionery factory at the very beginning of the 21st century. It can be found both in company stores and in specialized departments of many supermarkets. For the sake of fairness, I note that it appears there under various names, slightly different from the real one.
Whatever this cake is called, in addition to Pancho, it is also signed with “Vanka Curly”, and “Don Pancho”, and “Sancho-Pancho”, and “Don Quixote”, and “The Curly Guy”. In a word, culinary product manufacturers have a lot of imagination.
All cakes have one thing in common – delicious and delicate sour cream. It is thanks to him that Pancho’s cake is so widely popular among sweet tooths. Any housewife can try making this exquisite dessert in her own kitchen, especially if a festive event is planned.
The recipe for the dish is somewhat unusual and will require diligence, but the result will exceed all your expectations.
No matter how hard the manufacturers tried to keep the cake recipe secret, it still leaked to the masses, and today we have the opportunity to cook it at home. If you are careful while working, you will end up with a cake similar to the one shown in the photo.
First of all, you need to purchase all the ingredients; the Pancho dough consists of:
one and a half cups of flour; one and a half glasses of granulated sugar; 5 eggs; 4 full tablespoons of cocoa, vanilla sugar and a teaspoon of baking soda
The cake is filled with cream, which is prepared from:
a kilogram of high-fat sour cream; 100 ml 10% cream; one and a half glasses of sugar; dark chocolate bars; cans of canned pineapple slices
Let’s immediately knead the dough for baking pancho’s cakes:
- Separate the eggs into whites and yolks.
- Add 1.5 cups of sugar, vanilla and soda to the yolks, beat the mixture with a blender until bubbles appear.
- The whites need to be cooled, add a pinch of salt and beat until an airy dense mass is formed.
- Combine both mixtures, adding the whites in small parts, stirring gently each time with a spatula.
- The flour must be sifted, so the cake will be more airy, and poured into the dough along with cocoa powder.
- You should end up with a mass similar in consistency to sour cream (see photo).
- Bake one cake in the oven and cool it on a metal rack.
The recipe for Pancho cream is prepared as follows:
- Place the sour cream in a three-layer gauze bag and hang it over a bowl. Excess liquid will drain off and you will get a product of high density and excellent quality.
- Add granulated sugar to the sour cream, grind, and then beat with a blender.
- Make sure that the mass does not separate, so I do not recommend using the blender for a long time.
Now let’s start creating the dessert; Pancho’s cake must be constructed in the following sequence:
- Cut the cake in half lengthwise. Leave one part whole, and cut the second into cubes measuring 3x1.5 cm.
- Place the base on the dish, then spread a layer of sour cream.
- Place pineapple slices and any nuts on top of the cream.
- Mix the remaining cream with biscuit blocks and place it on the cake in a cone shape, this is exactly the shape of the classic Pancho.
- Using your hands, smooth the entire surface of the dessert, it should be a little bumpy, and leave the cake to soak.
Cooking the glaze:
- Break the chocolate bar into pieces and melt it in a water bath with the addition of cream.
- As soon as the ingredients are mixed, remove the dishes to the table and cool the mixture until warm.
- Decorate the finished cake with glaze, pouring it in a thin stream, starting from the very top.
- Once the whole cake turns chocolate, put it in the refrigerator for a day.
- At a low temperature, Pancho will be well soaked and ready to serve.
Did you like this classic dessert recipe? But that's not all, I have prepared for you:

The cake can be easily prepared at home. So, if you have an oven, feel free to get started.
First, write down a list of ingredients from which Pancho is baked:
2 tbsp. Sahara; one and a half tbsp. flour; 5 eggs; 3 full spoons of cocoa powder; ½ teaspoon of soda; 10 ml lemon juice or apple cider vinegar; 150 g pitted cherries; 800 g very fat sour cream; chocolate and nuts for decoration.
Pancho is prepared in several stages. First you need to bake a sponge cake, or rather two - one with the addition of cocoa, the other without it.
- Knead the dough as directed above.
- Divide it into 2 parts, add cocoa into one and stir thoroughly.
- Bake light and dark cakes separately.
- To prevent moisture from forming, cool the cakes on a metal rack, then divide them in half lengthwise.
- Cut two halves - light and chocolate - into bars, leave the rest untouched.
- The base of Pancho is a light sponge cake, spread sour cream on it and sprinkle with cherries and nuts.
- Cover with dark cake layer, and again make a layer of sour cream and cherries with nuts.
- Mix the biscuit pieces with the remaining cream. Place a mound of the resulting mass and level the surface with your hands.
- Fill the voids with sour cream.
- Melt the chocolate, decorate the cake in the form of thin streaks (as in the photo).
The tragedy of the situation is that the cake cannot be eaten immediately; it must be kept in the refrigerator for 24 hours and set. Believe me, after such a break it will become super tasty and tender.

The recipe requires the following components:
1.5 cups granulated sugar; 320 g white wheat flour; 2 tbsp. kefir; 2 eggs; Art. spoon of cocoa; one and a half teaspoons of baking soda; lemon juice. This is for kneading dough.
The cream is prepared from: 1.5 cups sugar; half a kilogram of sour cream.
Decoration for Pancho consists of: dark chocolate bars; 2 bananas; half a glass of walnuts (or any other) and 2 tbsp. spoons of vegetable oil.
First bake the sponge cakes:
- Pour kefir and eggs into a bowl.
- Add baking soda, slaked with fresh lemon juice, and sugar.
- Beat the mixture with a blender, add the sifted flour.
- Bake two cakes - light and with the addition of cocoa, for which add cocoa to one part and leave the other as is. Cool them at room temperature.
- Cut each pancho cake in half, chop some of the dark and light cake into cubes.
Form the cake:
- Place one of the cakes on a dish and brush it with sour cream.
- Cut the banana into slices and place along with the crushed nuts as the next layer.
- This is followed again by sponge cake, sour cream and a layer of nuts with banana slices.
- Mix half the sour cream with biscuit cubes. Place the resulting mass in a heap on the cake and adjust with your hands.
- Use the remaining cream to smooth the surface of Pancho, and use the melted chocolate to make a decoration in the form of drips.
Place the cake in the refrigerator, in a day it will be ready to serve.

Pancho's recipe allows you to cook it not only in a conventional oven. In order to bake it, you can use another kitchen assistant - a multicooker.
First, make sure you have the following products:
5 eggs; 1 ½ cups granulated sugar; 1 tbsp. flour; a bag of vanilla sugar; half-liter bottle of yogurt; 60 ml milk; ½ cup chopped nuts; ¼ stick of butter; one full spoon of cocoa and 2 bananas
You can bake the Pancho cake shown in the photo using a slow cooker. This unit controls all the processes that occur in it; you only need to knead the dough and select the correct operating mode on the panel. The cake will be ready in one hour.
So, let's start mixing the ingredients. Take a bowl and:
- Beat in the eggs, add vanilla and granulated sugar.
- Beat the mixture with a blender, add flour and mix the dough thoroughly again.
- Grease the multicooker bowl with any fat, fill it with dough and place it in the machine programmed for baking.
- After an hour, remove the sponge cake and cool.
- Separate 1/3 of the cake, it will be useful for the base, cut the rest into small cubes or bars and mix with yogurt and nuts.
Now form the cake:
- Take a deep bowl of small diameter and line it with cling film.
- Place a mixture of biscuit pieces and yoghurt on the bottom, level the surface and cover it with banana slices.
- Drizzle with remaining yoghurt and cover with whole sponge cake.
- Place the cake in the refrigerator; it should soak well for six to seven hours.
- Remove Pancho from the bowl by inverting it over a plate. All you have to do is melt the chocolate bar and decorate the cake, pouring chocolate over the entire surface.
- As you can see, a delicious cake, the recipe of which was invented by experienced confectioners, can be prepared at home, having all the ingredients and using your own imagination.
- Pancho is decorated not only with melted chocolate, but also with various fruits, nuts, and berries.
Cake with Pancho cherries and dried fruits
This recipe will appeal to every housewife who wants to pamper her family with baked goods, but there is absolutely no opportunity to spend a lot of time in the kitchen.
You can prepare the “Pancho” cake at home yourself, in which case it is worth setting aside 1 – 1.5 hours of free time.
Agree that this is not so much. Plus, there is no need to buy any special ingredients, they are all affordable. The result will be excellent.
Ingredients for the dough: 2 tbsp. Sahara; 1 tbsp. sour cream and flour; 2 pcs. chickens eggs; soda (quench with lime juice); cocoa powder; dried apricots, vanillin and raisins by eye.
Ingredients for cream: tbsp. sugar and 2 tbsp. sour cream; 200 gr. cherries; 100 gr. dried apricots and raisins; gr. nuts; chocolate.
Cooking algorithm:
- 2 tbsp. mix sugar with chicken. eggs. The mass needs to be whipped, obtaining a fluffy foam. I add vanillin to the mixture, tsp. soda (slaked), sour cream.
- I stir with a spatula and divide the mixture into 2 parts. In one of them I put raisins, dried apricots, tbsp. flour. Grind the dried apricots before doing this. I mix the dough. The mass should not be thick.
- To the second part of the mixture you need to add 1 tbsp. flour and 4 tbsp. cocoa. This is necessary to form a dark crust. I bake cakes at 200 gr. in the oven. 20 minutes. will be quite enough for this
- I whip sour cream using a home mixer and add sugar. I let the cakes cool, and at this time I chop the dried apricots, add the raisins, washed in advance, and remove the pits from the cherries.
- I cut the white cake into squares. I dip it in cream. I put the dark cake on a dish prepared in advance, make a mound out of the first cake, filling it with nuts, dried apricots and cherries with raisins.
- I use chocolate and nuts to decorate the cake. Before serving the dessert, you should refrigerate it for three hours to a day.
The baked goods have a special sweet and sour taste, which is very popular with all those with a sweet tooth. I wish you bon appetit, be sure to please your loved ones with this original treat for a holiday or a planned family tea party.
Every housewife can bake a delicious homemade cake called “Pancho” if she has the desire, as they say. To achieve excellent results, I advise you to follow the recommendations below:
- It is better to make cakes in size of 20 cm. This parameter is standard. The cakes will bake perfectly in the oven.
- All ingredients must be brought to the same room temperature. It is for this reason that we advise you to get all the products in advance and let them get enough temperature.
- To make the cake fluffy and tender, I advise you to sift the prepared baking flour. Baking cakes involves taking them out of the pan slowly, and you should also not remove them from the oven too quickly. It’s better if the cakes stand, cool, and only then take them out of the mold. If the cake does not come out well, support the pan over a water bath. This trick always helps to release the cakes perfectly.
- To improve the taste of the cakes, it is worth whipping the whites separately from the other components. Do this thoroughly and for a long time, and only then mix other ingredients.